

This page is part of the Pulse guide. Start there for what the extension does, installation and the frequently asked questions.
Turn Pulse on and make it your default dashboard
New installations come with Pulse disabled for the standalone dashboard so you can review settings first. Once you're happy, switch it on - users with the Pulse ACL permission will land on Pulse instead of Magento's default dashboard after login.
How to set it up
-
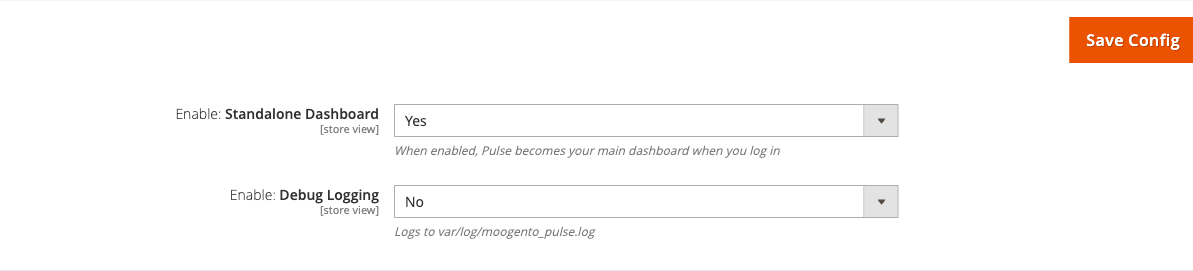
Go to: Stores > Configuration > Moogento > Pulse > Setup: General
-
Set:
- Enable: Pulse = Yes
- Enable: Standalone Dashboard = Yes
- Enable: Debug Logging = No (turn on only while investigating an issue)
-
Save Config
Notes
- When Pulse is disabled, the menu item is hidden and routes return a 403 - configuration is preserved so you can re-enable safely.
- Standalone Dashboard controls whether the default Magento dashboard redirects to Pulse. Turn it off if you want admins to see the standard dashboard and access Pulse via the Moogento menu.
- Debug logging writes to
var/log/moogento_pulse.log. Keep it off on production unless you're reproducing a specific behavior.
Choose the dashboard's default view and live refresh
The dashboard opens with a default scope (store/website/global), a default time range, and an auto-refresh cadence. Pick values that match how your team actually reviews the store.
How to set it up
-
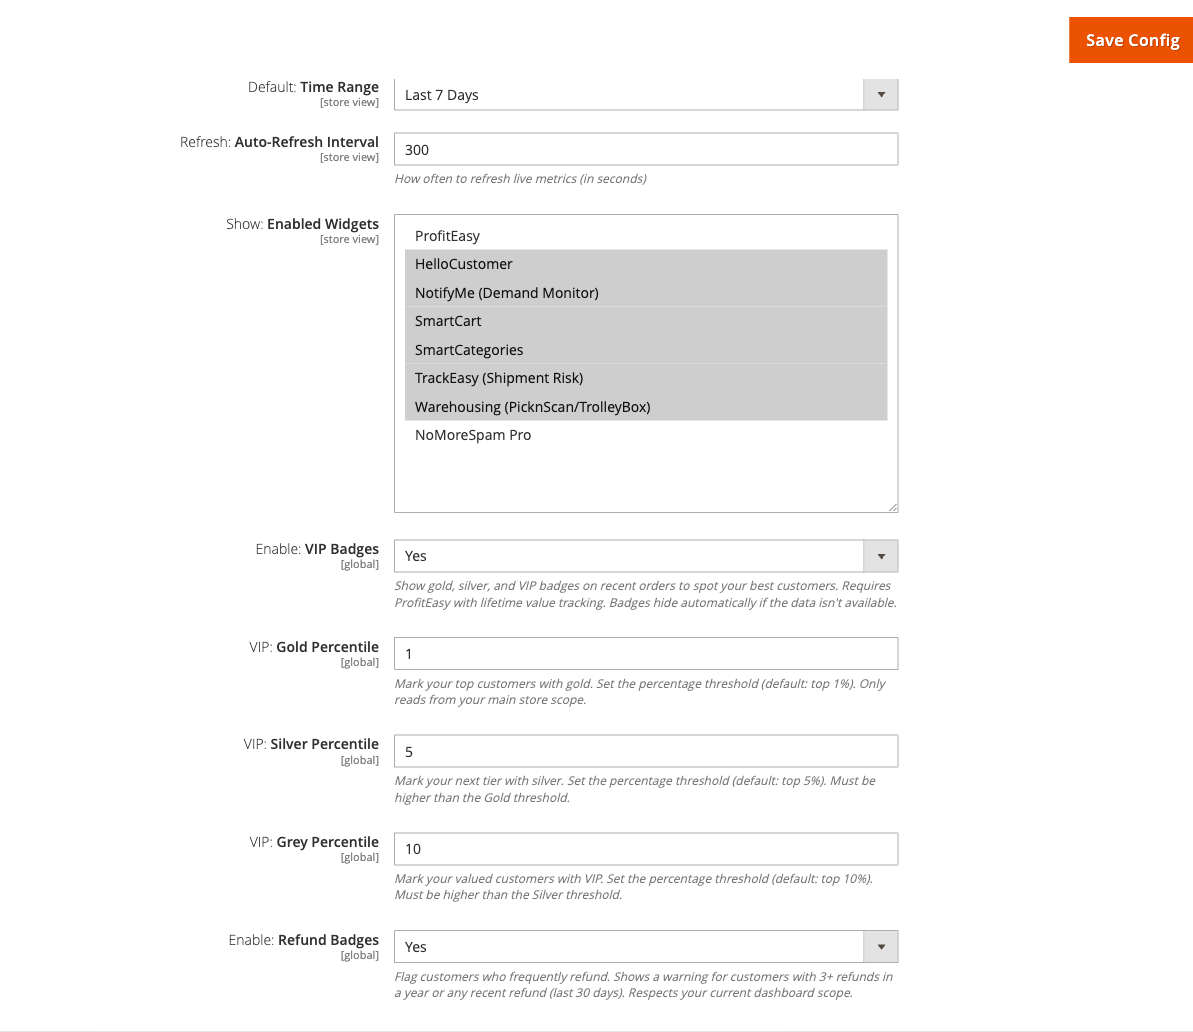
Go to: Stores > Configuration > Moogento > Pulse > Setup: Dashboard
-
Set:
- Default: Scope = Store (pick the scope most of your team works in)
- Default: Time Range = Last 7 Days (or Today if you run a high-tempo store)
- Show: Enabled Widgets = the ecosystem modules you actually run (ProfitEasy, HelloCustomer, NotifyMe, SmartCart, SmartListings, TrackEasy, fulfilment, NoMoreSpam Pro)
-
Save Config
Notes
- Only widgets listed here are queried. Unlisting a widget stops the back-end from fetching its data - a quick way to speed up the dashboard while you audit performance.
- Admins can override the default scope and range at runtime; this setting only controls the first load. Today, Yesterday, weeks and months start and end at midnight in the store's timezone, so each day matches the store's calendar.
- Live metrics refresh every 300 seconds through a lightweight ticker endpoint, not a full dashboard reload.
Highlight VIP and frequent-refund customers in the recent orders stream
Badges in the Recent Orders panel let your team spot your best customers and flag buyers whose refund patterns need attention - without leaving the dashboard.
How to set it up
-
Go to: Stores > Configuration > Moogento > Pulse > Setup: Dashboard
-
Set:
- Enable: VIP Badges = Yes (requires ProfitEasy lifetime-value tracking)
- Enable: Refund Badges = Yes
-
Save Config
Notes
- VIP badges only render when ProfitEasy lifetime-value data is available. Without it, the badges hide quietly instead of showing empty shields.
- The refund badge highlights customers with three or more refunds in the last year, or any refund in the last 30 days - use it as a cue to double-check the order, not an automatic block.
- Percentile thresholds must be ordered Gold < Silver < Grey. Setting Gold to 5 and Silver to 1 will produce no Gold badges.
Tune the alert center to your store's volume
Pulse ships with sensible defaults, but what counts as a "revenue drop" for a $1M/month store is very different from a $50K/month store. Pick detectors you want to hear from and set thresholds that match your baseline.
How to set it up
-
Go to: Stores > Configuration > Moogento > Pulse > Setup: Alerts
-
Set:
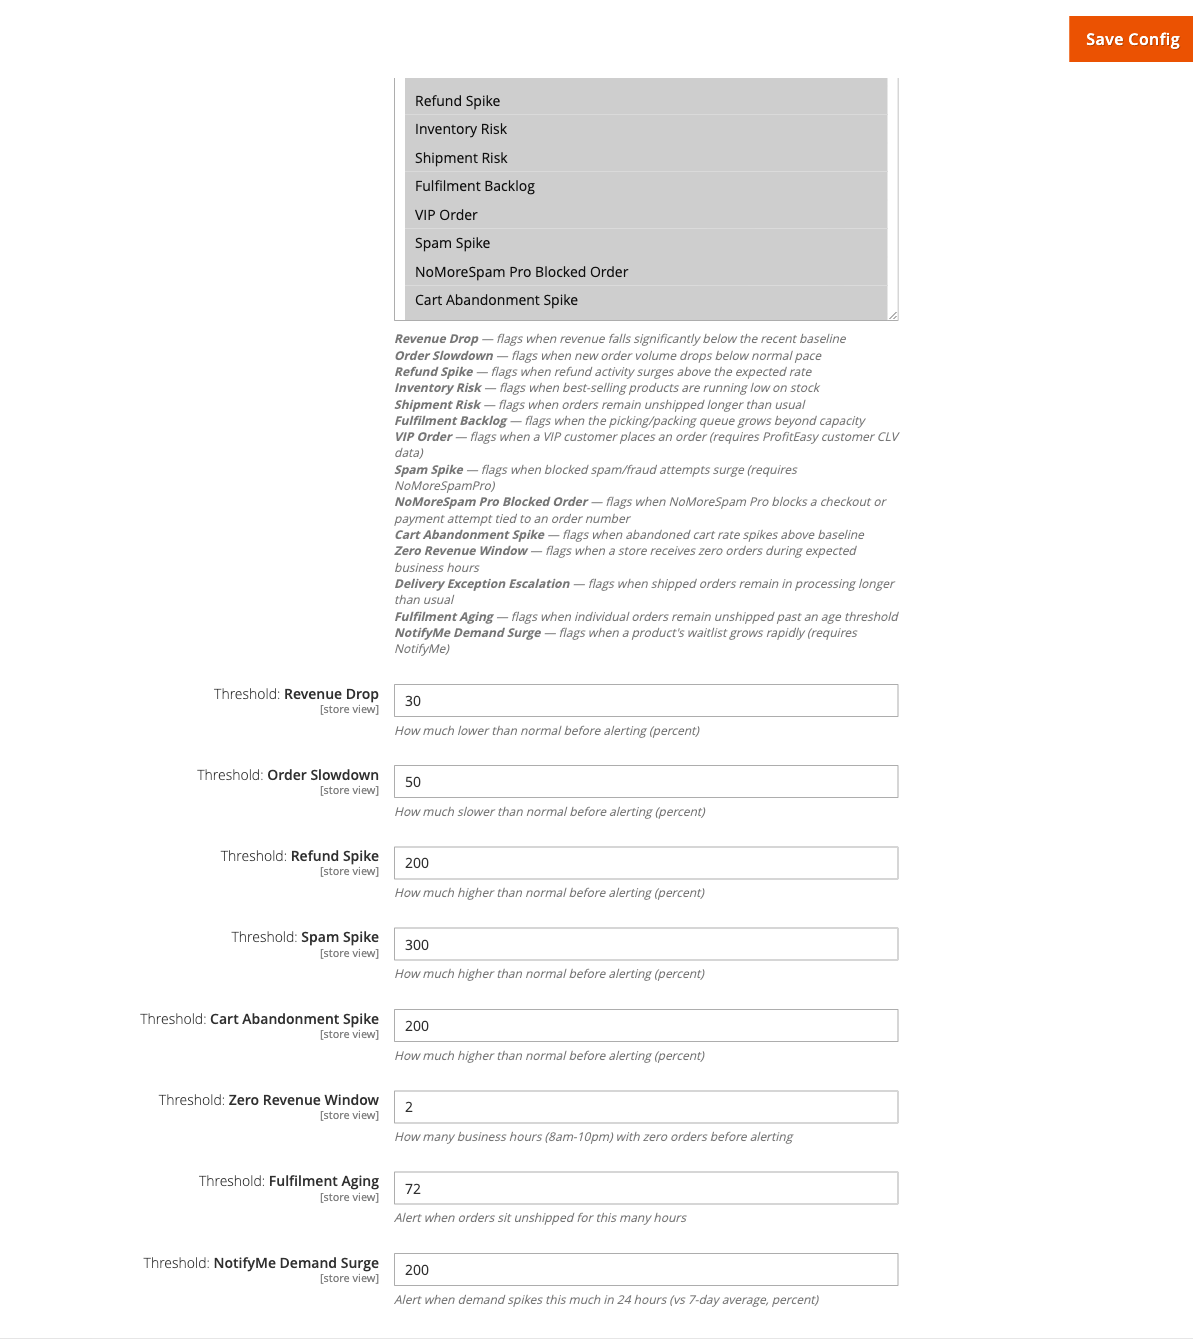
- Enable: Detectors = choose the detectors relevant to your setup (Revenue Drop, Order Slowdown, Refund Spike are the core three)
- Threshold: Revenue Drop = 30 (percent below the usual pace for this point in the day)
- Threshold: Order Slowdown = 50 (percent below hourly baseline)
- Threshold: Refund Spike = 200 (percent above daily baseline)
- Threshold: Zero Revenue Window = 2 by default (hours of 8am-10pm trading with zero orders); raise it to 3+ if your store has quiet weekday stretches
- Threshold: Fulfilment Aging = 72 by default (hours before flagging an unshipped order); lower it to 48 if same-day dispatch is your standard
- Threshold: NotifyMe Demand Surge = 200 by default (percent 24h vs 7-day average); lower it to 100 to catch surges earlier
-
Save Config
Notes
- Some detectors require other modules: VIP Order and Refund Spike lean on ProfitEasy; Spam Spike and NoMoreSpam Pro Blocked Order need NoMoreSpam Pro; Inventory Risk and Demand Surge need NotifyMe; Shipment Risk needs TrackEasy; Fulfilment Backlog needs PickPack or PicknScan.
- Detectors need a few days of order history to establish baselines. On fresh installs, expect some quiet days before alerts start firing sensibly.
- Each alert links straight to the affected orders through the Investigation Grid - no manual filtering needed.
Turn on campaign analytics and connect Google Ads
When you want to go beyond "did we make money today" and see which campaigns drove it, enable Campaign Analytics and, optionally, plug in Google Ads for spend-side ROI.
How to set it up
-
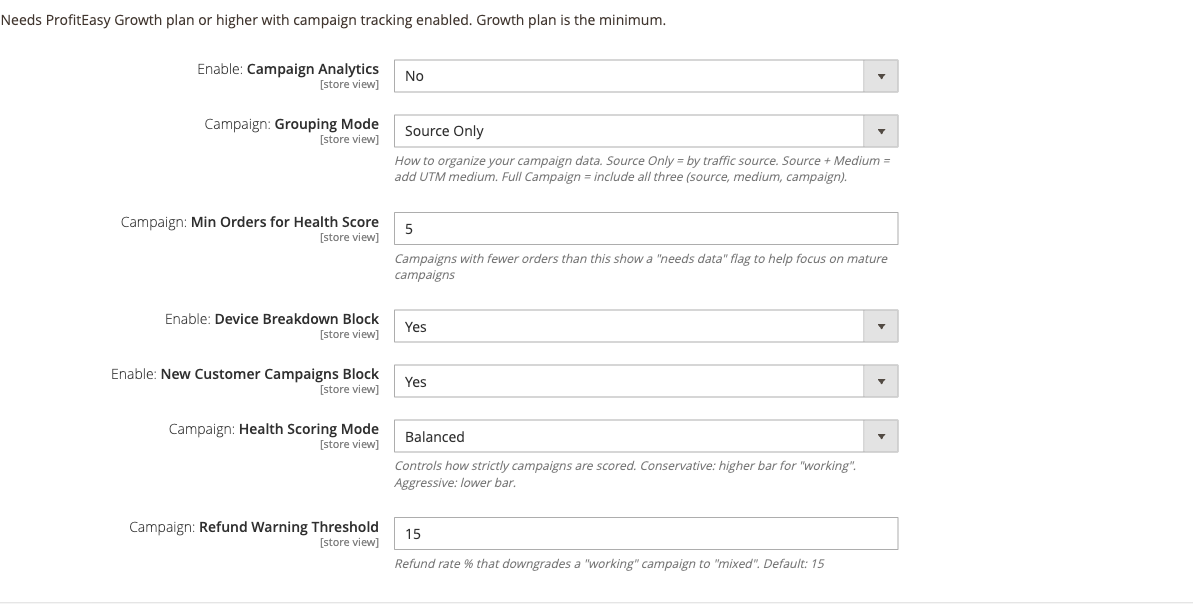
Go to: Stores > Configuration > Moogento > Pulse > Campaigns: Analytics & Ad Spend
-
Set:
- Enable: Campaign Analytics = Yes
- Campaign: Grouping Mode = Source + Medium (recommended over the Source Only default when you want more than a summary view; use Full Campaign for per-UTM detail)
- Campaign: Guest Purchase Matching = your choice (privacy decision about matching guest purchases by email)
-
Save Config
-
To connect Google Ads, open: Stores > Configuration > Moogento > Pulse > Connect: Google
-
Enter your GCP OAuth Client ID, Client Secret, and Developer Token, save, then click Connect. Pulse walks you through picking the Google Ads customer account on return.
Notes
- Campaign Analytics requires Pulse Growth or Pro plus ProfitEasy Growth or Pro with campaign tracking enabled - without it, the Analytics block stays hidden.
- Ad Spend tracking and the Google Ads connector require the Pro plan.
- OAuth client credentials live at Default Config scope only. Account selection (which Google Ads customer to sync) is scope-aware so you can pick different accounts per store view.
- First sync backfills the last N days (the look-back window defaults to 7 days). Subsequent syncs run daily by default.
Connect Meta Ads (Pulse Pro)
Meta Ads (Facebook and Instagram) import is read-only: Pulse reads spend and performance and never changes campaigns, budgets or status in Meta. Pause, enable and budget actions are not offered for Meta campaigns.
How to set it up
-
Go to Stores > Configuration > Moogento > Pulse > Campaigns: Analytics & Ad Spend and set Meta Ads: Enable Connector to Yes.
-
Choose one of two connection methods (both at Default Config scope):
- System user token: create a system user in Meta Business Settings, give it access to the ad account, generate a token with the
ads_readpermission and paste it into the token field. - Your own Meta app: enter the App ID and App Secret, save, paste the shown Redirect URI into your Meta app OAuth settings, then click Connect with Meta.
- System user token: create a system user in Meta Business Settings, give it access to the ad account, generate a token with the
-
Pick the Meta ad account for each store view and click Use this account.
-
Add UTM parameters to your ads, for example
utm_source=facebook&utm_medium=paid_social&utm_campaign={{campaign.id}}. Pulse reads fixed values and ID placeholders. Name placeholders are not used, and campaigns without matching parameters show as unmapped with no order figures.
Notes
- Meta campaigns appear in the paid campaign table with a Meta Ads label and an Open in Meta Ads link. The platform figure is Meta purchases, which can differ from Magento orders.
- Amounts are in the ad account currency and converted to your reporting currency.
- One ad account is used per store view. Once a store has Meta history, its account cannot be switched to a different one.
- Some Meta tokens expire. The config panel shows when a token expires soon; reconnect (or paste a new system user token) to renew it. Syncing stops while the token is expired.
- Disconnecting removes the shared credential, so Meta syncing stops for every store.
Advanced configuration
Mixed-currency handling
What it does
When your Magento store accepts orders in multiple currencies, Pulse needs a rule to reduce them to a single revenue number. Three options are available: skip non-base orders, convert everything to base currency using Magento's exchange rates, or use each store's reporting currency.
Setup
- Go to Stores > Configuration > Moogento > Pulse > Advanced: Data & Privacy
- Set Strategy: Mixed Currency to
skip,base_currency, orreporting_currencydepending on what matches your reporting model

Notes
base_currencyis the most common choice but depends on Magento'sdirectory_currency_ratetable being populated. Check exchange rates are current before relying on it.- Changing the strategy doesn't retroactively rebuild rollups. Run
php bin/magento moogento:pulse:rollup:rebuild --window=168after switching to reprocess the last week.
Data retention
What it does
High-resolution rollups (15-minute and hourly) accumulate fast. Retention determines how long Pulse keeps detailed rollups before compacting. Daily and monthly rollups are kept indefinitely.
Setup
- Go to Stores > Configuration > Moogento > Pulse > Advanced: Data & Privacy
- Set Retention: Data Retention to the number of days you want fine-grained data kept (default 365)
Notes
- Lowering retention does not delete data immediately - the cleanup cron enforces the new window on its next run.
- 365 days is a good default. Longer is fine but grows table sizes noticeably.
Automatic UTM event detection
What it does
Hourly, Pulse scans recent orders for new UTM campaign labels and creates Campaign annotations automatically - so new ad campaigns show up on your revenue chart without anyone having to remember.
Setup
- Ensure ProfitEasy is installed and extracting UTM parameters from orders
- Go to Stores > Configuration > Moogento > Pulse > Setup: Dashboard
- Set Enable: Automated Event Detection to Yes
Set Events: Automatic Event Detection to Yes.
Notes
- Only UTM campaigns observed in recent orders are annotated. Empty-click campaigns are ignored until they produce revenue.
- Auto-created annotations are tagged
source = autoand are distinguishable from manual entries in the annotation table and the event timeline. Manual edits always take precedence. - The campaign event is placed at its first order, and only orders carrying that exact campaign label count toward it; orders placed around the same time appear separately as "Nearby orders (not attributed)".
AI budget recommendations
What it does
On top of rule-based ad spend classification (which runs automatically with no API key), Pulse can call Anthropic, OpenAI, Z.AI, or OpenRouter to produce reasoned, per-campaign budget suggestions. Recommendations refresh periodically (every 7 days by default).
Setup
- Go to Stores > Configuration > Moogento > Pulse > AI: Tracking & Suggestions
- Set Enable: AI Recommendations = Yes
- Pick a provider and set the corresponding API key and model
- Recommendations refresh weekly by default; the expiry is changed from the command line if needed

Notes
- API calls are only made when the AI block requests a fresh recommendation. Costs scale with how often expiry triggers a regeneration.
- If AI recommendations fail (API down, quota hit, key invalid), the rule-based classification still runs and is displayed - the dashboard doesn't go blank.
Dashboard section ACL
What it does
Dashboard sections - ticker, KPIs, chart, categories, suggestions, top products, top categories, detail cards, campaigns, category insights, opportunity insights, traffic and timing, and payment methods - can be restricted per admin role via Magento ACL resources. Denied sections are removed from the layout before it reaches the browser, so users can't un-hide them.
Setup
- Go to System > Permissions > User Roles
- Edit the role you want to restrict
- Open Role Resources and uncheck the specific Pulse dashboard section resources under Moogento > Pulse > Dashboard Sections
- Save the role - affected users see a simpler dashboard on next login
Notes
- The saved-layout feature respects these restrictions: users can't save a layout that unhides a denied section.
- Layout save requires
Moogento_Pulse::dashboard_layout_manage. Users without it still see the dashboard but can't persist custom arrangements.
Tips & best practices
- Keep an eye on the setup-status banner at the top of the Pulse config page - it scores how much of Pulse is wired up and nudges you toward under-used features.
- Turn logging on only when you need it.
var/log/moogento_pulse.loggrows quickly under debug mode and clutters log rotation. - If you manage multiple stores, set scope-specific defaults on the store view scope rather than the website - it keeps each store's dashboard tuned without duplicate admin work.
- Annotate every deploy, every promotion, and every incident as they happen. The revenue chart stays useful for years if your team builds the habit.
- Build your first batch of alert thresholds from the last month of data: pick a threshold that would have fired once or twice, not every hour.
- If you run Search Console and Google Ads together, connect both - Pulse blends organic and paid signals into the attribution evidence panel, which is more honest than either alone.
- The Payment and Shipping Methods card splits data by customers versus guests - check whether your registered customers favour a different payment method than guests, as that often signals a trust or checkout friction issue worth addressing.
Troubleshooting
Dashboard is empty or the menu item is missing
- Cause: Pulse is disabled in config, the user lacks the
Moogento_Pulse::dashboard_viewACL resource, or the license is invalid. - Check: Confirm Enable: Pulse and Enable: Standalone Dashboard are both Yes under General, verify the admin user's role has
Moogento_Pulse::dashboard_view, and check the banner on the config page confirms the license is valid. - Resolution: Enable the missing config values, grant the ACL resource, or renew the license, then reload the dashboard.
Chart and KPI tiles show zero
- Cause: Rollups haven't been built yet, or cron is not running.
- Check: Confirm the
moogento_pulse_update_rollupscron job is running, and that real orders exist within the selected date range and scope. - Resolution: Run
php bin/magento moogento:pulse:rollup:backfillonce to build historical rollups.
Visitor tracking shows Needs attention or Status unavailable
- Cause: Needs attention means the most recent heartbeat for the selected scope is older than expected, so session collection has likely stopped. Status unavailable means the dashboard could not read tracking status at all, usually because a request failed or the scope has no stores.
- Check: Click Check setup in the strip. The summary counts stores with collection switched off and stores with no heartbeat. Confirm Stores > Configuration > Moogento > Pulse > Advanced: Data & Privacy has Privacy: Visitor Session Collection not set to Off for those stores, and that cron is running.
- Resolution: Turn collection back on for the affected stores or restore cron, then reload the dashboard. The state returns to Tracking active as soon as a fresh heartbeat is recorded. A recorded error code on its own does not change the state, so the strip can read Tracking active while Check setup still lists an older code.
Alerts never fire
- Cause: Detector is disabled, the threshold is too lenient, or baselines haven't built up yet.
- Check: Open Setup: Alerts and confirm the detector appears in Enable: Detectors. Run
php bin/magento moogento:pulse:alerts:detect --dry-runto see what the detectors think about your data. - Resolution: Lower the threshold temporarily to confirm the detector can fire, then tune it back to a level that matches your store's baseline.
Currency totals look wrong
- Cause: Mixed-currency strategy doesn't match your expectation, or
directory_currency_rateis stale. - Check: Review Strategy: Mixed Currency and confirm the exchange rates are current.
- Resolution: Refresh exchange rates, then run
php bin/magento moogento:pulse:rollup:rebuild --window=168to reprocess the last week.
Ecosystem widget isn't showing
- Cause: The relevant Moogento module is not installed, not listed under Show: Enabled Widgets, or has no data in the active scope and period.
- Check: Verify the module is installed and enabled, and confirm the current date range and scope contain data for that provider.
- Resolution: Add the module's widget code to Show: Enabled Widgets and save.
Dashboard layout won't save
- Cause: User lacks
Moogento_Pulse::dashboard_layout_manage, or they've hit the 10-named-layout limit. - Check: Check
var/log/moogento_pulse.logfor[Layout\Save::execute]entries if the save still fails. - Resolution: Grant the ACL resource or delete an older named layout, then retry.
Auto-detected UTM annotations aren't appearing
- Cause: Feature disabled, ProfitEasy missing or not capturing UTM parameters, or no qualifying orders in the recent window.
- Check: Confirm Enable: Automated Event Detection is Yes, and verify ProfitEasy is populating UTM fields on new orders.
- Resolution: Ensure the
pulse_detect_utm_campaignscron has run recently, then check the timeline again.
Payment or shipping donut charts are empty
- Cause: No orders in the active date range match the scope, or the section was lazy-loaded before data was ready.
- Check: Confirm orders exist in the selected range and scope. If the charts stay empty after switching tabs, check
var/log/moogento_pulse.logfor errors frompulse/payment/dataorpulse/shipping/data. - Resolution: Click the Shipping Methods or Payment Methods tab to trigger a fresh load.
Malware scanner flags Helper/Moo.php
- Cause: Your host's malware scanner (often Imunify360 on cPanel hosting) heuristically flags the encoded license-check files that ship inside every paid Moogento extension. The files are genuine and unchanged - the encoding protects the license check from tampering.
- Resolution: Add the files to the scanner's ignore list so the warnings stop, and restore any file the scanner already quarantined. Both steps, plus how to verify the files are byte-for-byte what we shipped, are covered in the license file protection guide.