Overview
TrackEasy is a Magento 2 shipment tracking module that connects your store to carrier APIs, generates a visual delivery timeline, and puts tracking information directly into customer emails. Customers get a branded standalone tracking page they can bookmark; you get automatic Delivered By Date (DBD) updates pulled from the carrier and surfaced in the admin orders grid.

This module helps you:
- Show customers a live delivery timeline without them contacting support
- Pull real tracking events from FedEx, UPS, DHL, Australia Post/StarTrack, and Toll automatically
- Add a tracking link, QR code, and timeline image to any transactional email template
- Display and inline-edit the Delivered By Date directly in the admin orders grid
- Surface product recommendations on the tracking page to drive repeat purchases
When to use this
Use TrackEasy when you want to:
- Reduce "where is my order?" support tickets by giving customers a self-service tracking page
- Automatically update the estimated delivery date from carrier scan events rather than setting it manually
- Add a timeline image and tracking link to your shipment confirmation emails
- Show cross-sell recommendations on the post-purchase tracking page
- Inline-edit delivery dates for individual orders without opening each order record
Key capabilities
- Standalone tracking page - a public, token-authenticated URL customers can open without logging in
- Carrier API polling - background cron refreshes tracking events from FedEx, UPS, DHL, AusPost/StarTrack, and Toll every 10 minutes
- Delivery timeline image - generates an SVG/PNG milestone graphic (Order Placed → Packed → Shipped → Delivered) that embeds in emails
- DBD management - calculates and updates the Delivered By Date from carrier responses; supports manual override in the orders grid
- Email template variables - inject tracking data, timeline image, standalone page URL, and QR code into any Magento transactional email
- Delivery update notifications - sends customers an automatic email when their DBD changes
- Post-purchase upsell block - shows cross-sell or CMS block recommendations below the timeline on the tracking page
- Google Analytics UTM tagging - all upsell product links carry configurable UTM parameters for ROI attribution
- ShipperHQ bridge - automatically populates DBD from the ShipperHQ-selected delivery date at order placement (Pro plan)
- ShipStation bridge - calls the ShipStation v2 Rate API at order placement to set an initial DBD estimate (Pro plan)
Installation
TrackEasy installs via Composer, then activates with a license key from your Moogento.com account. The whole flow takes about 5 minutes.
Step 1: Get your Composer keys from Moogento.com
- Sign in at https://www.moogento.com and open My Plugins in your account menu.
- Find TrackEasy in the list of plugins you own.
- Generate (or reveal) the Composer access keys for that plugin - a public key and a private key.
- Add your install domain to the key. Each Composer key is tied to a specific domain - if you're installing on
yourstore.com, addyourstore.comto the key's allowed domains. The Composer download will be rejected on any other domain.
If you run staging and production on different domains, add both - separate keys per environment are fine too.
Step 2: Install the module with Composer
From your Magento 2 root directory:
composer require moogento/module-trackeasy
When Composer asks for credentials, paste the public key as the username and the private key as the password. They'll be cached in ~/.composer/auth.json for future runs.
Step 3: Enable the module in Magento
php bin/magento setup:upgrade
php bin/magento setup:di:compile
php bin/magento cache:clean
Run php bin/magento module:status Moogento_Trackeasy - you should see it listed as enabled.
Step 4: Add your license key in the Moogento admin
- Still on https://www.moogento.com > My Plugins, copy the license key for TrackEasy (separate from the Composer keys you used above).
- In your Magento admin, go to Stores > Configuration > Moogento > Licenses.
- Find the row for TrackEasy and paste the license key.
- Click Save Config, then run
php bin/magento cache:cleanonce.
The license validates within a few seconds. You should see the module's status flip to active. If it stays inactive, double-check the domain on the license matches where you've installed - domain mismatch is the most common cause.
Extra steps for TrackEasy
TrackEasy uses three background cron jobs that run automatically in the default group:
- Token refresh - runs every 5 minutes; ensures each order has a secure tracking token.
- Carrier polling - runs every 10 minutes; queues carrier API requests for active shipments.
- Timeline cleanup - runs daily at 2 AM; removes old timeline image files after delivery.
Confirm that Magento cron is running on your server. If cron is not active, carrier updates and DBD recalculation will not occur.
Setup overview
Most setup happens in:
Stores > Configuration > Moogento > TrackEasy
You'll mainly work with:
- General - enable the module and toggle verbose logging
- Design: Orders Page - calendar-style DBD display in the admin orders grid
- Design: Timeline - configure which order statuses trigger Packed and Shipped milestones, and set DBD/SBD calculation rules
- Design: Tracking Pages - standalone page layout, contact info block, QR code, and post-purchase upsell block
- Setup: Emails - email template variables and timeline image settings
- Setup: Carrier Tracking APIs - add and manage carrier API credentials
- Setup: Google Analytics - UTM parameter configuration for upsell links
- Integration: ShipEasy - allow ShipEasy CSV imports to update DBD
- Integration: ShipperHQ Delivery Date - pull the ShipperHQ-selected delivery date into DBD at order placement (Pro)
- Integration: ShipStation Delivery Date - pull a ShipStation rate estimate into DBD at order placement (Pro)
Common setups
Add a carrier and connect its API credentials
Connecting a carrier lets TrackEasy poll for live tracking events and update delivery dates automatically.

How to set it up
-
Go to: Stores > Configuration > Moogento > TrackEasy > Setup: Carrier Tracking APIs
-
Click Add Carrier in the carrier table. Select the carrier type and fill in the credentials for that carrier:
FedEx
- Type key:
fedex - Client ID - your FedEx Developer Portal OAuth 2.0 Client ID
- Client Secret - your FedEx Developer Portal OAuth 2.0 Client Secret
- Sandbox - toggle on to use
apis-sandbox.fedex.comfor testing; turn off for production
UPS
- Type key:
ups - Access Key - UPS Legacy Access License Number
- Username - UPS account username
- Password - UPS account password
- UPS API Environment is configured separately at Stores > Configuration > Moogento > TrackEasy > UPS: Live Calls > UPS API Environment (default: sandbox)
DHL
- Type key:
dhl - API Key - DHL API key from the DHL Developer Portal
- Uses the EU endpoint (
api-eu.dhl.com) by default; DHL eCommerce Americas OAuth is also supported via the generic config
Australia Post / StarTrack
- Type key:
auspostorstartrack - API Key - key from the AusPost Developer Centre
Toll
- Type key:
toll - API Key - subscription key from the Toll Developer portal
USPS
- Type key:
usps - Sandbox - toggle on to use the USPS sandbox endpoint for testing; turn off for production
- By default, TrackEasy reads the USPS User ID from Sales > Delivery Methods > USPS (
carriers/usps/userid). When that setting is populated, a message confirms the credentials are being used and no further fields are required. - Use custom TrackEasy API checkbox - appears when Magento USPS credentials are already configured; tick it to override with TrackEasy-specific credentials instead.
- When the checkbox is ticked (or no Magento USPS credentials exist), two additional fields appear:
- Username/Tracking API Key - your USPS client ID (REST) or User ID (XML)
- Password/Tracking API Secret Key - your USPS client secret (REST only; not used in XML mode)
- USPS API Mode dropdown - also visible when custom credentials are in use: REST (OAuth v3) (default) or XML (TrackV2). REST uses OAuth 2.0 with a client ID and secret; XML uses the legacy TrackV2 API with a User ID only.
Royal Mail / Evri - link-only. The carrier appears in the list and displays the public tracking URL for the shipment; no API credential fields are required or shown in the admin.
17TRACK - universal fallback
- Type key:
17track - API Security Key - your 17TRACK account API key
- This is an optional fallback that activates only when native carrier APIs and Magento core tracking return no usable data. It covers 2,100+ carriers globally and auto-detects carrier by tracking number.
- New accounts receive 200 free tracking numbers as of January 7, 2026. Each number you register consumes from your account quota.
- Some carriers, including USPS, require extra setup in your 17TRACK account. If USPS lookups are rejected, open Carrier Management in the 17TRACK dashboard, enable USPS under Special Carriers, and confirm your account has available quota. This is a 17TRACK account requirement, not a TrackEasy setting.
- Type key:
-
Click Save Config.
-
Run
php bin/magento cache:clean.
Notes
- Obtain credentials before starting: FedEx uses OAuth 2.0 from the FedEx Developer Portal (
https://developer.fedex.com/); UPS uses a legacy Access Key fromhttps://developer.ups.com/; AusPost uses an API key fromhttps://developers.auspost.com.au/; Toll uses a subscription key fromhttps://developer.tollgroup.com/; 17TRACK uses an API Security Key fromhttps://www.17track.net. - Use the Test button next to each carrier row to verify credentials before saving. For 17TRACK, the Test Token button validates your key via the quota check endpoint without consuming any tracking numbers.
- For FedEx and UPS, always start with sandbox credentials; switch to production once a live tracking number returns results.
- Carrier events are cached in the database. A test using the CLI command
bin/magento moogento:trackeasy:carrier:test --carrier=fedex --tracking=TRACKINGNUMBERreturns the raw API response to help diagnose credential problems. - 17TRACK fallback: This optional provider activates only when native tracking and Magento core carrier APIs return no usable data. It is not polled like primary carriers; instead, it is queried as a last resort when tracking data is missing. Webhook support is available — after configuring 17TRACK in TrackEasy, register the webhook URL from the admin settings panel in your 17TRACK dashboard under Webhook settings to receive automatic push updates when a package status changes.
Set up the delivery timeline in emails
Adding the timeline image and tracking link to your transactional emails keeps customers informed and reduces support contacts.
How to set it up
-
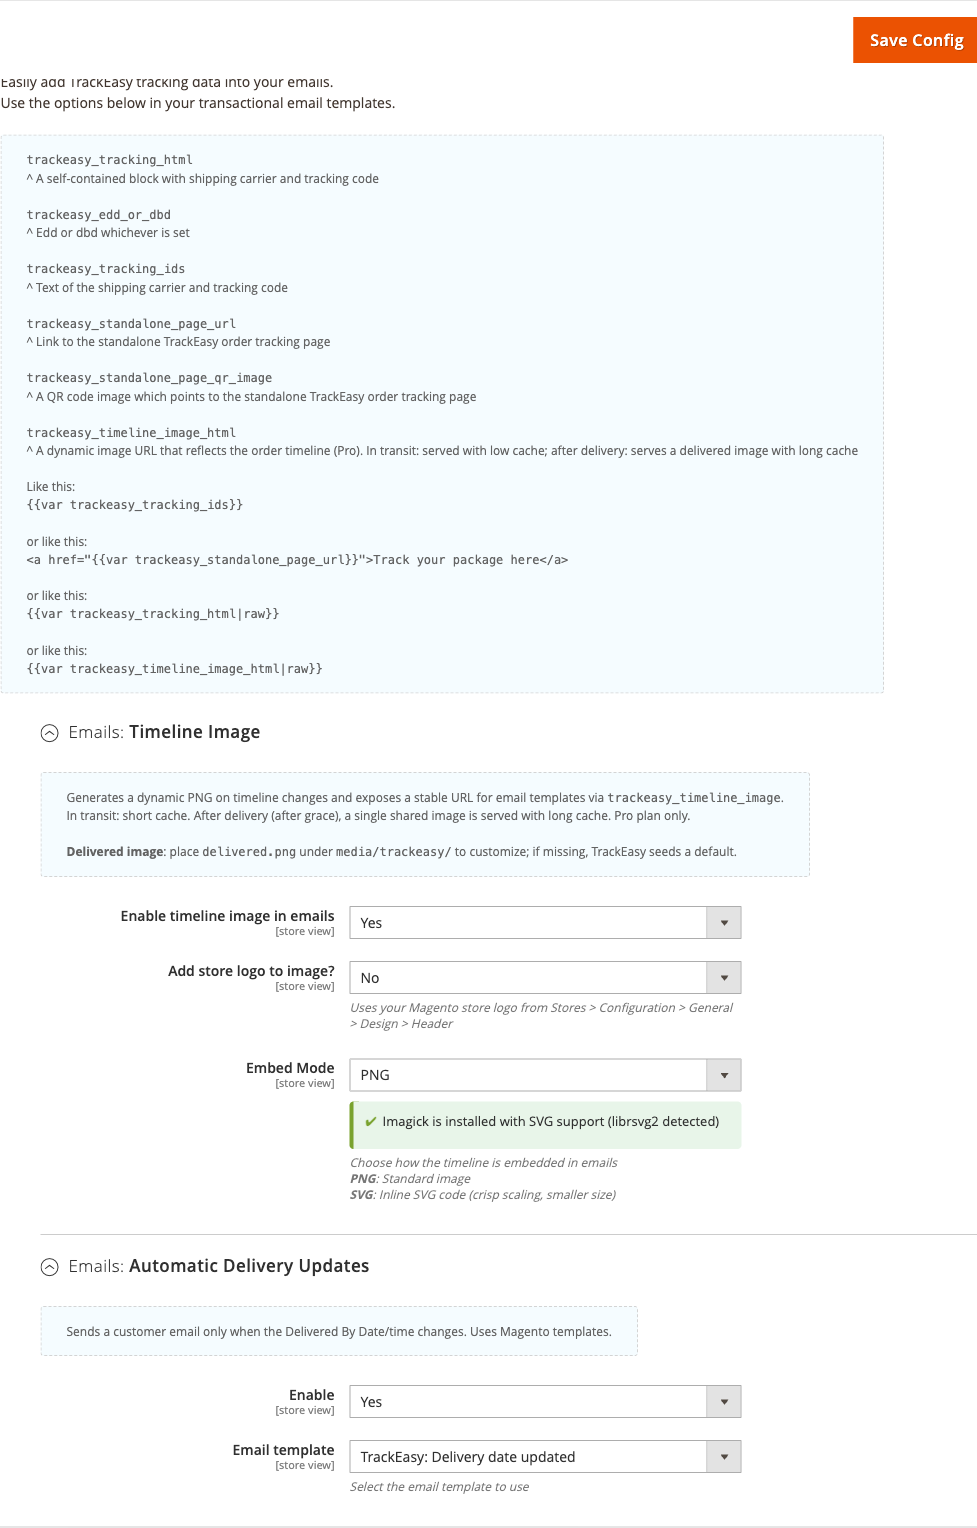
Go to: Stores > Configuration > Moogento > TrackEasy > Setup: Emails > Emails: Timeline Image
-
Set:
- Enable timeline image in emails = Yes
- Add store logo to image? = Yes (uses the logo from Content > Design > Configuration > Header > Logo Image)
- Embed Mode = PNG (standard) or SVG (crisp at all sizes, smaller file)
- If SVG: SVG: Convert text with custom fonts to paths = Yes if you use a non-system font
-
Go to: Stores > Configuration > Moogento > TrackEasy > Setup: Emails > Emails: Automatic Delivery Updates
-
Set:
- Enable = Yes to send a customer email whenever the DBD changes
- Email template = select the delivery update template (or a custom template you've created)
-
Open the email template you want to enrich (Marketing > Communications > Email Templates, or edit the default shipment template):
Add any of the following variables where needed:
{{var trackeasy_timeline_image_html|raw}}- the timeline image{{var trackeasy_tracking_html|raw}}- carrier name + tracking number block{{var trackeasy_tracking_ids}}- plain text carrier and tracking code{{var trackeasy_standalone_page_url}}- link to the tracking page{{var trackeasy_standalone_page_qr_image}}- QR code image pointing to the tracking page{{var trackeasy_edd_or_dbd}}- estimated or delivered-by date, whichever is set
-
Save the template and run
php bin/magento cache:clean.
Notes
- PNG generation requires
rsvg-convert(librsvg) or Imagick with SVG support installed on the server. Check the status indicator in the Embed Mode field: green = Tier 1 ready, orange = fallback available, red = PNG will not generate. If PNG fails, emails automatically fall back to inline SVG or text-only - no broken images are sent. - A custom delivered image can be placed at
media/trackeasy/delivered.png. If that file is absent, TrackEasy seeds a default. - Timeline images are generated on shipment creation, status change, and DBD update. They are stored in
media/trackeasy/timeline/and cleaned up by the daily cron after a configurable grace period.
Configure delivery date (DBD) calculation
The Delivered By Date drives the timeline milestone, the orders-grid DBD column, and delivery-update emails.
How to set it up
-
Go to: Stores > Configuration > Moogento > TrackEasy > Design: Timeline > DBD: Delivered By Date
-
Set:
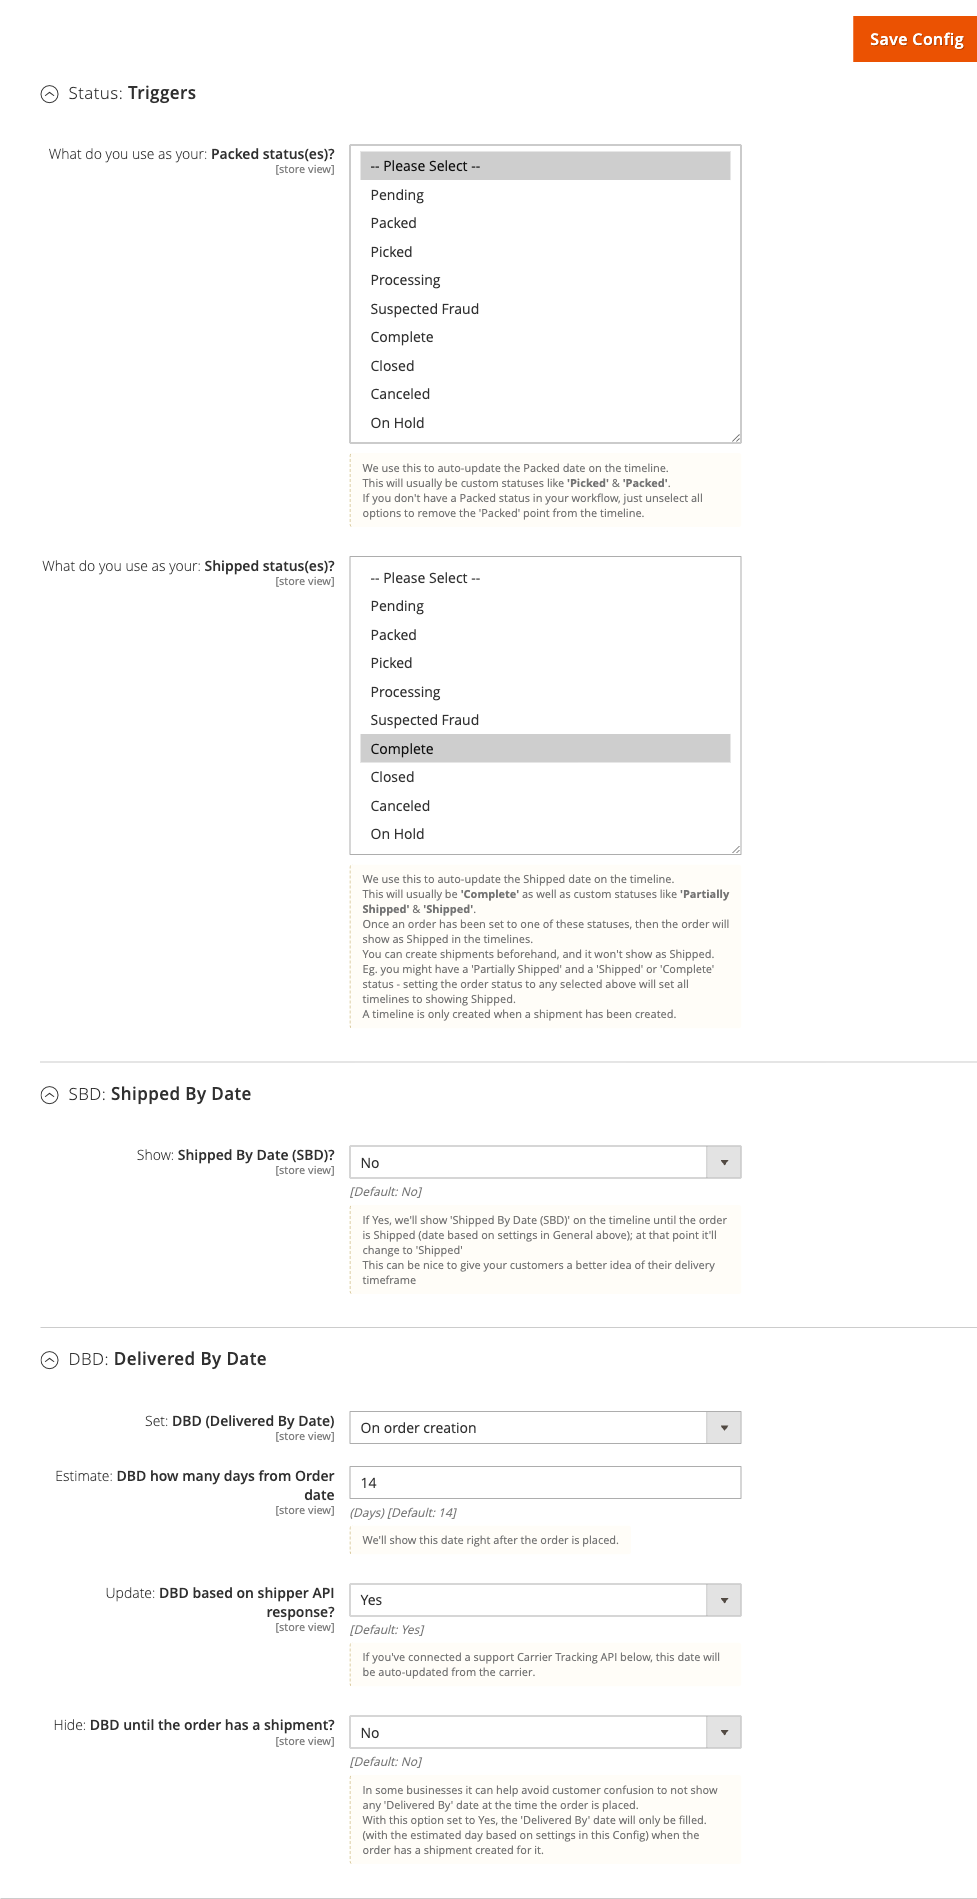
- Set: DBD (Delivered By Date) - choose the calculation method:
- From order date (fixed offset)
- From shipment date (offset recalculated when a shipment is created)
- Combined (sets an initial estimate from order date, then recalculates from shipment date)
- Estimate: DBD how many days from Order date - default 14 days
- Estimate: DBD how many days from Shipment date - used when the shipment-date option is active
- Update: DBD based on shipper API response? = Yes - let carrier events override the estimate (default: Yes)
- Hide: DBD until the order has a shipment? = Yes if you don't want to show an estimate before a shipment is created
- Set: DBD (Delivered By Date) - choose the calculation method:
-
Under SBD: Shipped By Date:
- Show: Shipped By Date (SBD)? = Yes to display a "Shipped By" milestone before shipment (default: No)
- Estimate: Shipped By Date how many days from Order date - default 5 days
-
Under Status: Triggers, set which order statuses advance each milestone:
- Packed status(es) - select statuses like "Picked" or "Packed" that should move the timeline to the Packed point
- Shipped status(es) - select statuses like "Complete" or "Shipped" that mark the order as shipped on the timeline
-
Save Config.
Notes
- If no Packed status applies to your workflow, leave the Packed status field empty - the Packed milestone is removed from the timeline automatically.
- When Update DBD from API is on and a carrier scan provides an updated ETA, the DBD changes and a delivery-update email is sent if that feature is enabled.
- The DBD column appears in the admin orders grid. Enable the calendar-style display at Stores > Configuration > Moogento > TrackEasy > Design: Orders Page > Style DBD in the Orders page.
Set up the standalone tracking page
The standalone tracking page is a public URL sent to customers so they can check their shipment without logging in.
How to set it up
-
Go to: Stores > Configuration > Moogento > TrackEasy > Design: Tracking Pages
-
Set the layout options:
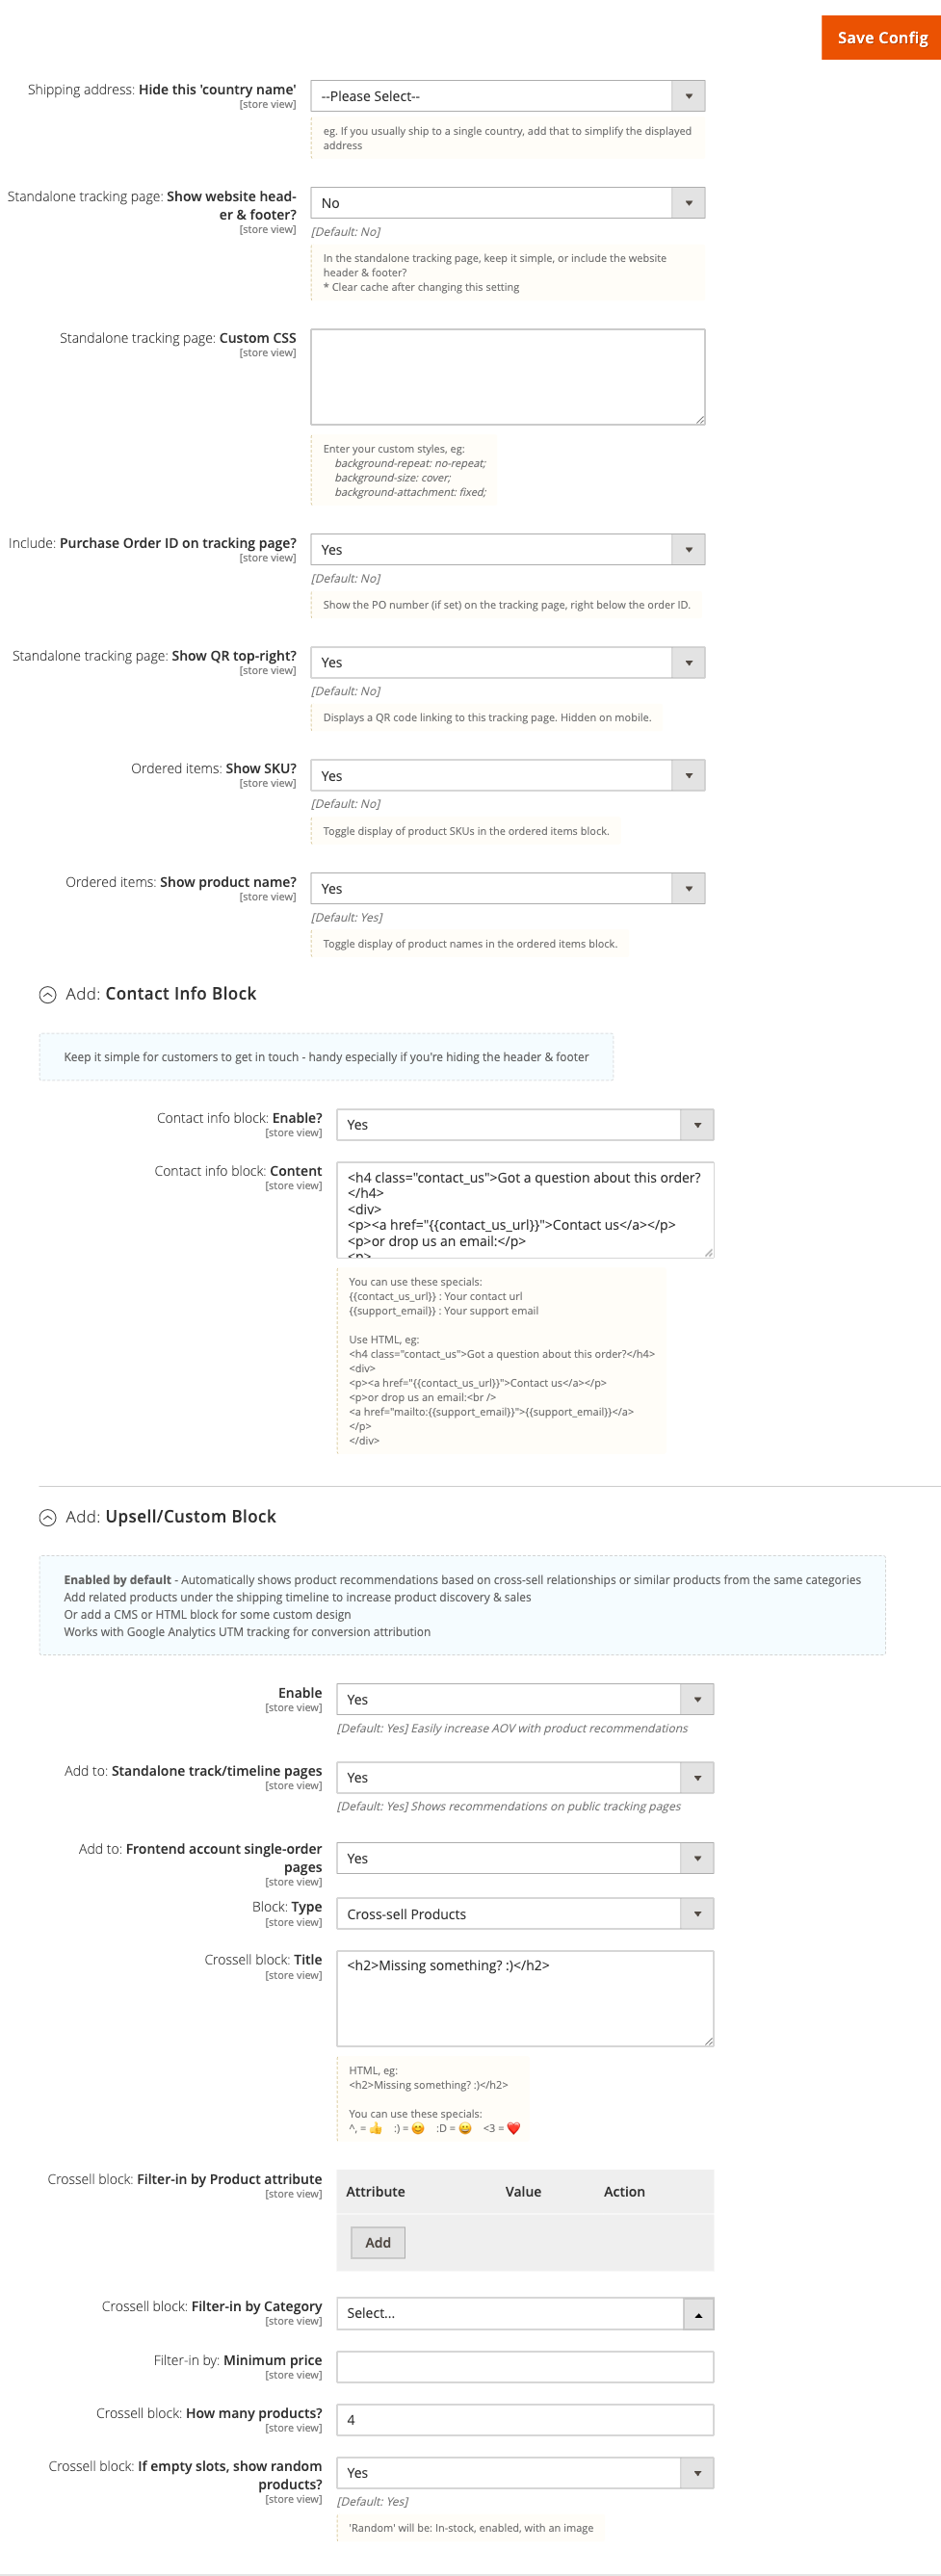
- Standalone tracking page: Show website header & footer? = No for a minimal, focused page (default); Yes to include your theme's header and navigation
- Standalone tracking page: Show QR top-right? = Yes to display a QR code linking back to the tracking page (useful when page is printed; hidden on mobile)
- Include: Purchase Order ID on tracking page? = Yes to show the PO number below the order ID (B2B stores; Growth and Pro plans only)
- Shipping address: Hide this 'country name' - select your primary shipping country to simplify the displayed address
-
Under Add: Contact Info Block:
- Contact info block: Enable? = Yes
- Contact info block: Content - enter HTML; use
{{contact_us_url}}and{{support_email}}as placeholders
-
Under Add: Upsell/Custom Block:
- Enable = Yes (default) to show product recommendations below the timeline
- Add to: Standalone track/timeline pages = Yes
- Add to: Frontend account single-order pages = Yes to also show the block on customer account order detail pages
- Block: Type - choose Cross-sell block, CMS Block, or raw HTML
- For the cross-sell block, set: number of products, category filter, minimum price filter, and whether to fill empty slots with random products
-
To customise the look, paste CSS into Standalone tracking page: Custom CSS.
-
Save Config and run
php bin/magento cache:clean.
Notes
- Tracking page URLs are token-authenticated. Each order gets a unique
moo_trackeasy_code- the token is refreshed by cron every 5 minutes for new orders. Customers cannot guess another order's URL. - The ordered items block can show or hide SKUs (
moogento_trackeasy/moo/items_show_sku) and product names (moogento_trackeasy/moo/items_show_name).
Features reference
General
- What it does: Master on/off switch for TrackEasy, plus verbose logging toggle.
- When to use it: Disable temporarily during maintenance; enable logging only when diagnosing a problem - the log file grows quickly in production.
- Config path:
moogento_trackeasy/moo/enableandmoogento_trackeasy/moo/enable_logging
Design: Orders Page
- What it does: Renders the Delivered By Date in the admin orders grid using a calendar-page widget that matches the timeline style.
- When to use it: Enable when your team regularly checks delivery dates from the grid view.
- Config path:
moogento_trackeasy/moo/style_dbd_in_orders
UPS: Live Calls
- What it does: Sets the UPS API environment - sandbox (
wwwcie.ups.com) or production (onlinetools.ups.com). Credentials (Access Key, Username, Password) are read from Sales > Delivery Methods > UPS. - When to use it: Switch to sandbox for initial testing; flip to production before going live.
- Config path:
moogento_trackeasy/carrier_ups/use_sandbox
Setup: Google Analytics
- What it does: Configures the UTM parameters appended to every product link in the upsell block on the tracking page. Defaults are
utm_source=trackeasy,utm_medium=upsell,utm_campaign=post_purchase. - When to use it: Change if your GA4 campaigns use a different naming convention, or if you want to attribute post-purchase revenue to a specific promotion.
- Config paths:
moogento_trackeasy/moo/utm_source,moogento_trackeasy/moo/utm_medium,moogento_trackeasy/moo/utm_campaign
Integration: ShipEasy
- What it does: When ShipEasy Growth or Pro is installed, this toggle allows a
dbdcolumn in a ShipEasy CSV import to bulk-update the Delivered By Date for multiple orders at once. - When to use it: Enable when you receive carrier-provided delivery windows in a spreadsheet and want to paste them in bulk rather than editing orders one by one.
- Config path:
moogento_trackeasy/shipeasy_integration/csv_import - Format the
dbdcolumn asY-m-d(e.g.2026-05-27).
Integration: ShipperHQ Delivery Date
- What it does: At order placement, reads the delivery date ShipperHQ selected for the shipment and writes it into
moo_trackeasy_dbd. The success-page DBD, timeline, and calendar tools then reflect the carrier's committed date rather than a generic offset. - When to use it: Enable when your store uses ShipperHQ for rated delivery-date promises and you want those dates to flow through to TrackEasy automatically. Requires a Pro license.
- Config path:
moogento_trackeasy/shipperhq_bridge/enabled - Set Overwrite existing DBD (
moogento_trackeasy/shipperhq_bridge/overwrite_existing_dbd) = Yes only if you want the ShipperHQ date to replace any DBD already saved on the order.
Integration: ShipStation Delivery Date
- What it does: At order placement, calls the ShipStation v2 Rate API with the order's shipping method and address, retrieves the
estimated_delivery_date, and writes it intomoo_trackeasy_dbd. Sets an API-sourced delivery estimate the moment an order is placed, before any carrier scan events arrive. - When to use it: Enable when you fulfil through ShipStation and want the most accurate delivery estimate available at order time. Requires a Pro license.
- Config path:
moogento_trackeasy/shipstation_bridge/enabled - Key supporting fields:
- ShipStation API Key (
moogento_trackeasy/shipstation_bridge/api_key) - your ShipStation v2 API key - API timeout (seconds) (
moogento_trackeasy/shipstation_bridge/timeout_seconds) - default 2; keep low to minimise impact on order placement time - Overwrite existing DBD (
moogento_trackeasy/shipstation_bridge/overwrite_existing_dbd) - when enabled, replaces any existing DBD - Service code overrides (
moogento_trackeasy/shipstation_bridge/service_code_overrides) - map Magento shipping methods to ShipStation service codes, one per line (e.g.flatrate_flatrate=usps_priority_mail)
- ShipStation API Key (
Advanced configuration
Timeline image - PNG vs SVG embed modes
What it does
TrackEasy can embed the delivery timeline in emails as a PNG image or as inline SVG code. PNG is the safe default - every email client renders it. SVG is crisper at all sizes and smaller in bytes, but a small number of older email clients may not render it.
Setup
-
Go to: Stores > Configuration > Moogento > TrackEasy > Setup: Emails > Emails: Timeline Image > Embed Mode
-
Set Embed Mode to PNG or SVG.
-
For PNG, check the status indicator:
- Green -
rsvg-convert(librsvg) detected: best quality. - Orange - Imagick available but
rsvg-convertmissing: fallback quality. - Red - Imagick not installed: PNG generation unavailable; emails fall back to inline SVG or text.
- Green -
-
Install
rsvg-converton the server if you want the highest-quality PNG output:- Ubuntu/Debian:
sudo apt-get install librsvg2-bin - CentOS/RHEL:
sudo yum install librsvg2-tools
- Ubuntu/Debian:
Notes
- If both
rsvg-convertand Imagick are unavailable, emails degrade gracefully - no broken-image placeholders are sent. - Custom font text in the SVG can be baked into paths using SVG: Convert text with custom fonts to paths = Yes. This prevents font-substitution in email clients that don't load web fonts.
- Config paths:
moogento_trackeasy/email_timeline/email_embed_mode,moogento_trackeasy/email_timeline/svg_convert_text_to_paths
Carrier refresh queue and cron schedule
What it does
Carrier polling runs asynchronously via Magento's message queue. The moogento_trackeasy_enqueue_track_refresh cron job (every 10 minutes) pushes tracking records into the moogento_trackeasy_carrier_refresh queue. A queue consumer processes each record, calls the carrier API, and writes results to moo_trackeasy_track_cache.
Setup
-
Confirm the Magento
defaultcron group is running on your server. -
Confirm the message queue consumer is running (or that Magento's DB broker is configured for async processing).
-
Check the cache table for problems:
SELECT tracking_number, status, error_message, next_attempt_at
FROM moo_trackeasy_track_cache
WHERE error_message IS NOT NULL
ORDER BY next_attempt_at DESC
LIMIT 20;
Notes
- Failed calls are retried with exponential back-off using the
next_attempt_atfield. - Verbose logging to
var/log/moogento_trackeasy.logcan be enabled at Stores > Configuration > Moogento > TrackEasy > General > Enable Logging while diagnosing queue problems. Disable it again in production.
ShipperHQ Delivery Date Bridge
What it does
Reads the ShipperHQ-selected delivery date from Magento order and quote tables at order placement and writes it into moo_trackeasy_dbd. Three events are observed (sales_order_place_after, checkout_onepage_controller_success_action, checkout_submit_all_after). Each attempt is idempotent. Requires a Pro license.
Setup
- Ensure the ShipperHQ_Shipper module is installed and
php bin/magento setup:upgradehas been run. - Go to: Stores > Configuration > Moogento > TrackEasy > Integration: ShipperHQ Delivery Date
- Set Enable = Yes.
- Set Overwrite existing DBD = Yes only if the ShipperHQ date should replace a DBD already saved on an order.
- Save Config and run
php bin/magento cache:clean.
Notes
- The bridge never calls the ShipperHQ GraphQL Rates API - it only queries Magento-local ShipperHQ tables.
- For split-shipment orders, the latest valid date across all ShipperHQ rows for the order is used.
- Config paths:
moogento_trackeasy/shipperhq_bridge/enabled,moogento_trackeasy/shipperhq_bridge/overwrite_existing_dbd
ShipStation Delivery Date Bridge
What it does
Calls the ShipStation v2 Rate API at order placement and writes the returned estimated_delivery_date into moo_trackeasy_dbd. The call is synchronous with a short configurable timeout (default 2 seconds) to minimise impact on checkout. Requires a Pro license.
Setup
- Go to: Stores > Configuration > Moogento > TrackEasy > Integration: ShipStation Delivery Date
- Set Enable = Yes.
- Enter your ShipStation API Key (from your ShipStation account settings).
- Adjust API timeout (seconds) if needed - keep it at 2 or lower for production.
- Configure Service code overrides if Magento shipping method codes do not map automatically to ShipStation service codes.
- Save Config and run
php bin/magento cache:clean.
Notes
- The carrier list fetched from
/v2/carriersis cached for 24 hours by default (configurable via Carrier list cache duration (hours) =moogento_trackeasy/shipstation_bridge/carrier_cache_hours). - ShipStation v2 authentication uses a single
API-Keyrequest header, not a Bearer token. - If no estimate is returned, TrackEasy's existing DBD calculation behaviour remains in place.
- Config paths:
moogento_trackeasy/shipstation_bridge/enabled,moogento_trackeasy/shipstation_bridge/api_key,moogento_trackeasy/shipstation_bridge/timeout_seconds,moogento_trackeasy/shipstation_bridge/service_code_overrides
Tips & best practices
- Start carrier connections in sandbox mode. Only switch to production credentials once a live tracking number returns events in the Test API tool.
- Enable DBD updates from the carrier API (
moogento_trackeasy/moo/auto_set_dbd_on_api_response = Yes) so your customers always see the most current delivery estimate rather than the original order-date offset. - If your store ships only to one country, set the Hide this 'country name' field on the tracking page to keep the address block clean.
- Keep verbose logging off in production. Turn it on, reproduce the issue, then turn it off again - the log file has no automatic size limit.
- For the upsell block, configure a minimum-price filter to avoid recommending products that are cheaper than or similar in value to what the customer already ordered.
- If you use ShipEasy for admin order processing, enable the ShipEasy CSV import integration so bulk DBD updates from carrier manifests flow through without manual editing.
- The
media/trackeasy/directory must be writable and have at least 100 MB free - timeline image generation is skipped silently when disk space is low. - For the most accurate order-time delivery estimates, choose one DBD source: ShipperHQ bridge (if you use ShipperHQ), ShipStation bridge (if you fulfil via ShipStation), or the carrier API offset calculation. Running multiple bridges at once is safe but the last write wins unless Overwrite existing DBD is off on the later bridges.
Troubleshooting
Carrier API calls return no tracking events
Carrier credentials are saved but no tracking events appear on the tracking page or in the orders grid.
- Cause: Credentials may be incorrect, the API may be set to sandbox when production is needed (or vice versa), or the carrier requires IP allow-listing.
- Check: Go to Stores > Configuration > Moogento > TrackEasy > Setup: Carrier Tracking APIs and use the Test button. Also inspect
var/log/moogento_trackeasy.logand themoo_trackeasy_track_cachetable for messages. - Resolution: Re-enter credentials carefully (no leading or trailing spaces). For FedEx, confirm the OAuth app has the Tracking API enabled in the FedEx Developer Portal. For UPS, confirm you have a Legacy Access Key - new OAuth-only credentials do not work. Switch sandbox/production environment to match the tracking number you are testing with.
DBD is not updating from carrier data
The Delivered By Date in the orders grid shows the original estimate and never changes even after carrier scans occur.
- Cause: The Update DBD based on shipper API response setting is disabled, the cron queue is not running, or the carrier type does not provide a delivery estimate (Royal Mail and Evri are link-only and do not return ETA data).
- Check: Verify
moogento_trackeasy/moo/auto_set_dbd_on_api_response= Yes. Runbin/magento cron:run --group=defaultmanually and checkcron_schedulefor themoogento_trackeasy_enqueue_track_refreshjob. - Resolution: Enable the API DBD update setting, confirm cron is running on a schedule, and verify that the carrier you are using returns an ETA in its API response.
Timeline image is missing or shows as broken in email
The {{var trackeasy_timeline_image_html|raw}} variable renders a broken image or nothing in the delivered email.
- Cause:
rsvg-convertand Imagick are both unavailable, themedia/trackeasy/timeline/directory is not writable, or disk space is below 100 MB. - Check: Check the status indicator at Stores > Configuration > Moogento > TrackEasy > Setup: Emails > Emails: Timeline Image > Embed Mode. Review
var/log/moogento_trackeasy.log. - Resolution: Install
librsvg2-bin(Ubuntu) orlibrsvg2-tools(CentOS) and restart PHP-FPM. If PNG is not available, switch Embed Mode to SVG - emails will degrade gracefully with inline SVG even without server-side rasterization.
Tracking page returns 404
The tracking URL sent to a customer returns a 404 page.
- Cause: URL rewrites are disabled, the module is not enabled, or the cron that assigns tracking tokens to orders has not run yet for recent orders.
- Check: Run
bin/magento module:status Moogento_Trackeasyand verify URL rewrites are on (web/seo/use_rewrites = 1). For new orders, runbin/magento moogento:trackeasy:order:ensure-codeto generate tokens immediately. - Resolution: Enable URL rewrites and run
php bin/magento cache:clean. For a single order, use the CLI command to assign a token manually.
No cross-sell products appear on the tracking page
The upsell block is enabled but the tracking page shows no product recommendations.
- Cause: No products meet all the display criteria (enabled, in stock, has image, visible in catalog/search), cross-sell relationships are not set on the ordered products, and the random fallback is disabled.
- Check: Confirm Enable = Yes under Stores > Configuration > Moogento > TrackEasy > Design: Tracking Pages > Add: Upsell/Custom Block. Check whether Crosssell block: If empty slots, show random products? is set to Yes.
- Resolution: Either configure cross-sell relationships on the products being purchased, reduce the minimum-price filter, or enable random fallback to fill slots with in-stock products.
DBD not set after order placement via ShipperHQ or ShipStation bridge
The Delivered By Date is still showing a calculated offset after orders are placed, even though a bridge is enabled.
- Cause: The bridge is disabled, the license is not Pro, the third-party module (ShipperHQ or ShipStation) is not installed, or no delivery date data was returned.
- Check: Review
var/log/moogento_trackeasy.logfor messages about disabled config, invalid license, missing module tables, or empty API responses. For ShipperHQ, confirmShipperHQ_Shipperis installed. For ShipStation, confirm the API Key is correct and the shipping method maps to a ShipStation service code. - Resolution: Verify the Enable toggle is on at the relevant Integration section, confirm a Pro license is active, and ensure the third-party integration is fully installed and configured. For ShipStation, add a service code override entry if the Magento shipping method code is not recognised automatically.
FAQs
How do I add a tracking link to my shipment confirmation email?
Add {{var trackeasy_standalone_page_url}} to your shipment email template - for example, <a href="{{var trackeasy_standalone_page_url}}">Track your package</a>. See Set up the delivery timeline in emails for the full list of available variables including the timeline image and QR code.
How do I set up Magento 2 shipment tracking with FedEx?
Go to Stores > Configuration > Moogento > TrackEasy > Setup: Carrier Tracking APIs, add a new carrier row, select FedEx, and enter your OAuth 2.0 Client ID and Client Secret from the FedEx Developer Portal. Start with sandbox credentials and use the built-in Test button to confirm they work before switching to production. See Add a carrier and connect its API credentials for credentials for all supported carriers.
What is the difference between sandbox and production mode for carrier APIs?
Sandbox mode sends API calls to the carrier's testing environment using test tracking numbers; no real shipment data is returned. Switch to production once your credentials are confirmed working so that real customer tracking numbers return live events. FedEx sandbox uses apis-sandbox.fedex.com; UPS sandbox uses wwwcie.ups.com. Toggle the UPS environment at Stores > Configuration > Moogento > TrackEasy > UPS: Live Calls > UPS API Environment.
Can I add a new carrier that is not in the list?
TrackEasy ships with direct API polling for FedEx, UPS, DHL, Australia Post/StarTrack, Toll, and USPS. Royal Mail and Evri are link-only (the tracking number and a public carrier URL are shown; no event polling). If you need a carrier not in that list, contact Moogento support - additional carriers can be added in future releases.
Why is the Delivered By Date not updating from the carrier?
The most common reason is that Update: DBD based on shipper API response? is set to No, or the background cron queue is not running. Set that option to Yes at Stores > Configuration > Moogento > TrackEasy > Design: Timeline > DBD: Delivered By Date. Also note that Royal Mail and Evri are link-only and do not return structured ETA data, so DBD is not updated from their responses automatically.
Does TrackEasy send automatic emails when the delivery date changes?
Yes. Enable Stores > Configuration > Moogento > TrackEasy > Setup: Emails > Emails: Automatic Delivery Updates > Enable, and choose an email template. A customer email is sent each time the Delivered By Date changes - whether from a carrier API update or a manual edit in the admin.
Does TrackEasy work with Hyvä, Luma, and Porto themes?
Yes. The standalone tracking page and all frontend blocks are compatible with Luma, Porto, and Hyvä themes. Use the Custom CSS field at Stores > Configuration > Moogento > TrackEasy > Design: Tracking Pages > Standalone tracking page: Custom CSS to match the tracking page to your theme's typography and colors.
How do I show product recommendations on the tracking page?
Product recommendations are enabled by default. Go to Stores > Configuration > Moogento > TrackEasy > Design: Tracking Pages > Add: Upsell/Custom Block and confirm Enable = Yes. The block shows cross-sell products configured on the ordered items; if none are configured, it falls back to in-stock products from the same category. You can restrict recommendations by category, minimum price, or product attribute, or replace the block with a CMS block or custom HTML.
What happens if I disable TrackEasy?
Disabling TrackEasy (moogento_trackeasy/moo/enable = No) stops the standalone tracking page from rendering, removes TrackEasy variables from email templates (they output nothing), pauses carrier polling crons, and hides the DBD column widget in the orders grid. Order data - DBD, tracking tokens, timeline tokens - is not deleted. Re-enabling the module restores all functionality.
Which plan do I need for full carrier API polling and DBD management?
Full carrier API polling, DBD management, the timeline image, and the cross-sell block require the TrackEasy Pro plan. The ShipperHQ and ShipStation delivery date bridges also require Pro. The Growth/Startup plan includes display-only DBD. The Seed/Bootstrap plan supports a single carrier without DBD features. Check or upgrade your plan at https://www.moogento.com > My Plugins > TrackEasy.
Does TrackEasy integrate with ShipperHQ or ShipStation?
Yes. The ShipperHQ bridge (Pro plan) reads the delivery date selected by ShipperHQ at checkout and writes it directly into the Delivered By Date field - no manual entry needed. The ShipStation bridge (Pro plan) calls the ShipStation v2 Rate API at order placement to set an estimated delivery date. Both are configured at Stores > Configuration > Moogento > TrackEasy under the Integration sections.
Related guides
- ShipEasy - admin order processing, bulk shipping operations, and the orders-grid tracking column; works alongside TrackEasy (ShipEasy adds tracking numbers on the admin side; TrackEasy displays them to customers). Requires ShipEasy Growth or Pro for the CSV import DBD update integration.
- Pulse - real-time admin dashboard; includes a TrackEasy widget showing live delivery status across open orders.
- GiftEasy - gift card module; TrackEasy tracking pages are separate from gift card delivery flows.
Need help?
- moo@moogento.com
- Include:
- Magento version
- Module name
- What you're trying to do