Overview
SocialEasy adds social proof to your Magento storefront by showing recent purchase pop-ups and promotional hellobars to shoppers as they browse. When a customer places an order, SocialEasy sends anonymized purchase data to the SocialEasy service, which then surfaces that activity to other visitors in the form of a small notification - the product name, buyer's first name, and location - appearing in the corner of the page. The result is a live signal of store activity that reassures hesitant buyers that others are purchasing right now.

This module helps you:
- Show real-time purchase slide-up notifications to build buyer confidence
- Display hellobars with promotional messages or announcements sitewide
- Track notification engagement with UTM-tagged links back to product pages
- Automatically sync new orders and customer registrations to the SocialEasy service
- Manage the content and appearance of your notifications from the SocialEasy dashboard
When to use this
Use SocialEasy when you want to:
- Reduce hesitation on product pages by showing that other shoppers are buying
- Run promotional announcements (sales, free shipping thresholds, limited-time offers) via a hellobar without touching your theme
- Attribute traffic from social proof notifications back to specific Google Analytics campaigns using UTM parameters
- Launch a new product and quickly build perceived demand by surfacing your first real orders to subsequent visitors
- Complement a retargeting or email campaign with on-site FOMO messaging
Key capabilities
- Purchase notifications - real-time slide-ups showing anonymized recent order details to increase buyer confidence
- Hellobars - sitewide announcement strips managed from the SocialEasy dashboard, no theme changes required
- Analytics tagging - UTM source, medium, and campaign parameters added to every notification link so engagement shows up in your analytics tool
- Conversion window - configurable look-back period (in days) for attributing conversions that started from a notification click
- Auto pixel - optional automatic injection of the SocialEasy tracking script, or use Google Tag Manager for finer control
- Batch order sync - when you first connect your API key, your last 30 orders are sent to seed the notification feed immediately
Installation
SocialEasy installs via Composer, then activates with a license key from your Moogento.com account. The whole flow takes about 5 minutes.
Step 1: Get your Composer keys from Moogento.com
- Sign in at https://www.moogento.com and open My Plugins in your account menu.
- Find SocialEasy in the list of plugins you own.
- Generate (or reveal) the Composer access keys for that plugin - a public key and a private key.
- Add your install domain to the key. Each Composer key is tied to a specific domain - if you're installing on
yourstore.com, addyourstore.comto the key's allowed domains. The Composer download will be rejected on any other domain.
If you run staging and production on different domains, add both - separate keys per environment are fine too.
Step 2: Install the module with Composer
From your Magento 2 root directory:
composer require moogento/module-socialeasy
When Composer asks for credentials, paste the public key as the username and the private key as the password. They'll be cached in ~/.composer/auth.json for future runs.
Step 3: Enable the module in Magento
php bin/magento setup:upgrade
php bin/magento setup:di:compile
php bin/magento cache:clean
If you run php bin/magento module:status Moogento_Socialeasy you should see it listed as enabled.
Step 4: Add your license key in the Moogento admin
- Still on https://www.moogento.com > My Plugins, copy the license key for SocialEasy (separate from the Composer keys you used above).
- In your Magento admin, go to Stores > Configuration > Moogento > Licenses.
- Find the row for SocialEasy and paste the license key.
- Click Save Config, then run
php bin/magento cache:cleanonce.
The license validates within a few seconds. You should see the module's status flip to active. If it stays inactive, double-check the domain on the license matches where you've installed - domain mismatch is the most common cause.
Setup overview
Most setup happens in:
Stores > Configuration > Moogento > SocialEasy
You'll mainly work with:
- General - enable the module, connect your API key, and choose how the pixel script is loaded
- Setup: Google Analytics - configure UTM parameters and the conversion tracking window
Common setups
Connect your SocialEasy account and activate notifications
Before notifications appear on your storefront, you need to link your Magento store to your SocialEasy dashboard with an API key.
How to set it up
-
Log in to your SocialEasy dashboard at https://socialeasy.moogento.io and copy your API key from the account settings.
-
In your Magento admin, go to: Stores > Configuration > Moogento > SocialEasy > General
-
Set:
- Enable = Yes
- API Key = (paste the key from your SocialEasy dashboard - this is separate from your Moogento license key)
-
Click Save Config.
On save, the module validates the key against the SocialEasy service and sends your last 30 orders to seed the notification feed. You should see recent purchase notifications appear on the storefront within a few minutes.

Notes
- The API key is stored encrypted in the database and masked in the admin field after saving.
- If you see a validation message that the key is not accepted, verify it was copied without trailing spaces and that your server can reach
socialeasy.moogento.ioover HTTPS. - To manage what the notifications say and look like, use the Manage notifications link in this group - it opens the SocialEasy dashboard directly.
Set up Google Analytics tracking for notification clicks
Tag every notification link with UTM parameters so you can measure traffic and conversions from social proof notifications in your analytics tool.
How to set it up
-
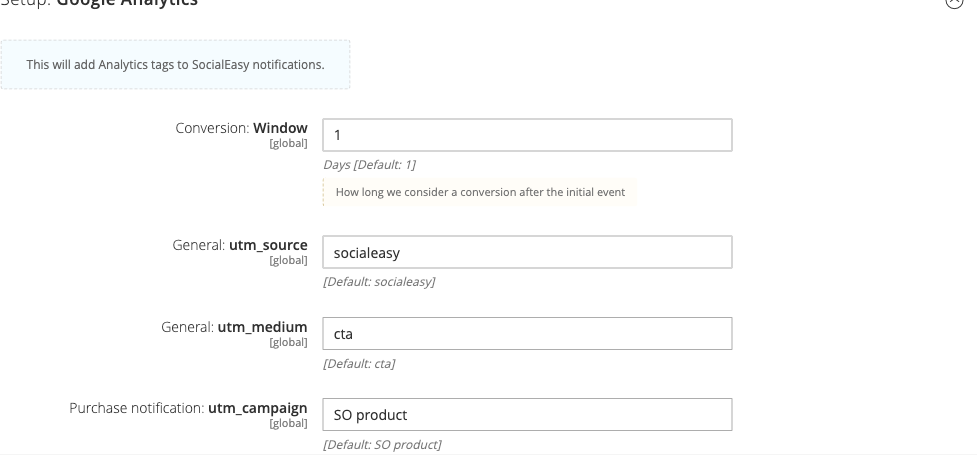
Go to: Stores > Configuration > Moogento > SocialEasy > Setup: Google Analytics
-
Set:
- Conversion: Window = number of days you want to count as a conversion after a click (default:
1) - utm_source = the source label for your analytics tool (default:
socialeasy) - utm_medium = the medium label (default:
cta) - Purchase notification: utm_campaign = the campaign name (default:
SO product)
- Conversion: Window = number of days you want to count as a conversion after a click (default:
-
Click Save Config.
Notes
- UTM parameters are appended to the product URL included in each purchase notification. Shoppers who click through will land on the product page with those parameters in the URL.
- The conversion window controls how long the module tracks whether a visitor converts after seeing a notification - it does not affect your Google Analytics attribution model directly.
- Keep
utm_sourceconsistent with any other SocialEasy traffic sources you already have in your analytics account to avoid fragmented data.
Choose how the SocialEasy pixel script loads
The SocialEasy tracking script can be injected automatically by the module, or you can load it via Google Tag Manager for better performance control.
How to set it up
-
Go to: Stores > Configuration > Moogento > SocialEasy > General
-
Set:
- Auto-Add Pixel Script =
Noif you will load the script via Google Tag Manager (recommended), orYesto have the module inject it automatically on every storefront page.
- Auto-Add Pixel Script =
-
Click Save Config.
Notes
- Google Tag Manager is the recommended approach because it lets you control when the script fires, add consent conditions, and update the tag without a Magento deployment.
- If you use both methods simultaneously (Auto-Add = Yes and GTM), the script will load twice, which can cause duplicate event tracking.
Features reference
Social proof purchase notifications
Displays a small slide-up in a corner of the storefront showing the first name, city, country, and purchased product of a recent buyer. Data is sent to the SocialEasy service automatically each time an order is placed.
- What it does: informs browsing shoppers that real people are buying, creating urgency
- When to use it: always-on once configured; no per-product setup needed
- Config path:
moogento_socialeasy/general/enable
Manage notifications (SocialEasy dashboard link)
A direct link in the admin config to the SocialEasy dashboard login page, where you control notification text, display rules, hellobar content, and appearance.
- What it does: opens
https://socialeasy.moogento.io/login/in a new tab - When to use it: to edit notification copy, pause campaigns, or configure hellobars
- Location: Stores > Configuration > Moogento > SocialEasy > General
Hellobars
Sitewide announcement strips configured entirely from the SocialEasy dashboard. No Magento theme changes or deployments are required to add, edit, or remove them.
- What it does: renders a configurable banner at the top or bottom of every storefront page
- When to use it: for time-sensitive promotions, shipping threshold messages, or event announcements
- Managed from: your SocialEasy dashboard at
https://socialeasy.moogento.io
Advanced configuration
UTM parameter customization
What it does
By default, every notification link includes utm_source=socialeasy, utm_medium=cta, and utm_campaign=SO product. If your store runs multiple SocialEasy campaigns simultaneously - or if you want to segment desktop vs mobile notification traffic - you can change these values per Magento store scope.
Setup
- Go to Stores > Configuration > Moogento > SocialEasy > Setup: Google Analytics.
- Adjust utm_source, utm_medium, and Purchase notification: utm_campaign to match your campaign naming conventions.
- Save Config.
Notes
- These settings are default-scope only (store-view and website scopes are not available for the analytics group). If you run multiple stores, all will share the same UTM values unless you duplicate the API connection under separate SocialEasy accounts.
- Changes take effect immediately on the next order - existing notifications already sent to the service are not retroactively updated.
Pixel script via Google Tag Manager
What it does
Keeping Auto-Add Pixel Script set to No and loading the SocialEasy script through a GTM Custom HTML tag gives you consent-layer integration, lazy loading, and tag-version control without Magento deployments.
Setup
- Set Auto-Add Pixel Script =
Noin Stores > Configuration > Moogento > SocialEasy > General. - In Google Tag Manager, create a Custom HTML tag with the SocialEasy pixel script from your dashboard.
- Set the trigger to All Pages (or a consent-aware trigger if you use a consent management platform).
- Publish the GTM container.
Notes
- The GTM approach is the recommended deployment path per the admin field's own guidance.
- If you switch from Auto-Add = Yes to GTM midway through, clear the Magento full-page cache (
php bin/magento cache:clean) so pages no longer include the auto-injected script tag.
Tips & best practices
- Seed the feed before launch. Place a few test orders on staging before going live so the notification feed has real data when the first real shopper arrives.
- Start with the GTM pixel. It takes an extra 10 minutes to set up but gives you consent control and avoids requiring a Magento deployment every time you need to update the script.
- Match UTM naming to your analytics conventions. If your team uses
source=emailfor email campaigns, don't usesource=socialeasyfor this - pick a value that fits your existing taxonomy so reports stay clean. - Check the SocialEasy dashboard after saving the API key. The batch sync of 30 recent orders happens on save - verify the dashboard shows those orders before going live.
- Use a 1-day conversion window for high-frequency stores. A longer window inflates the conversion count from notification clicks for stores where customers return to buy different items within days.
- Disable on staging if you share a database with production. The module sends real order data to the SocialEasy service on every order event. If staging and production share a database or the same API key, staging orders will appear in your production notification feed.
Troubleshooting
Notifications are not appearing on the storefront
No purchase slide-ups are visible to shoppers after configuration.
- Cause: The module is disabled, the API key is missing or not yet validated, or the pixel script has not loaded.
- Check: Go to Stores > Configuration > Moogento > SocialEasy > General and confirm Enable = Yes and the API Key field contains a value. Open your browser's developer console on the storefront and verify the SocialEasy script has loaded (no 403/404 errors).
- Resolution: Save the configuration again to re-trigger API key validation and the initial order sync. If the pixel is set to auto-add, flush the full-page cache (
php bin/magento cache:clean) so the updated config reaches the frontend.
The API key is not accepted on save
A message appears in the admin indicating the SocialEasy API key is not valid.
- Cause: The key was copied incorrectly, the server cannot reach
socialeasy.moogento.io, or a Content Security Policy rule is blocking the outbound request. - Check: Verify you copied the API key from the SocialEasy dashboard (not the Moogento license key). Test outbound HTTPS from the server:
curl -I https://socialeasy.moogento.io/api/verifyAPI. - Resolution: Re-paste the key from your SocialEasy dashboard and save again. If connectivity is the problem, work with your hosting provider to allow outbound HTTPS to
*.moogento.io.
Product images are not appearing in notifications
Notifications show text but no product image.
- Cause: The product image file does not exist at the expected path, or the image has not been resized and cached yet.
- Check: Confirm the product has an image assigned in the Magento catalog, and that the file exists under
pub/media/catalog/product/. Check that the media directory is readable by the web server. - Resolution: Re-save the product to trigger image processing, or run
php bin/magento catalog:images:resizeto rebuild the image cache.
UTM parameters are missing from notification links
Clicking a notification link takes the shopper to the product page without UTM tags.
- Cause: The analytics settings have not been saved, or the conversion window is set to 0.
- Check: Go to Stores > Configuration > Moogento > SocialEasy > Setup: Google Analytics and verify all four fields have values (Conversion Window, utm_source, utm_medium, utm_campaign).
- Resolution: Fill in any blank fields and click Save Config. UTM parameters will be included in all notifications generated after the save.
FAQs
How do I add Magento 2 social proof purchase notifications to my store?
Install SocialEasy, then go to Stores > Configuration > Moogento > SocialEasy > General, paste your API key from the SocialEasy dashboard, and set Enable to Yes. The module immediately syncs your last 30 orders and the SocialEasy service begins displaying notifications to shoppers.
Why is my SocialEasy API key not working?
The API key for SocialEasy comes from your account at socialeasy.moogento.io - it is not the same as your Moogento license key. If the key still fails after re-pasting, check that your server can reach socialeasy.moogento.io over HTTPS, as some hosting environments block outbound requests by default.
Do the purchase notifications show real customer names?
Notifications display only the buyer's first name along with their city and country - no email address, last name, or order total is shown. The email is stored as a hash and is never exposed on the storefront.
How do I change what the notifications say or look like?
Notification content and appearance are controlled from the SocialEasy dashboard at https://socialeasy.moogento.io. Use the Manage notifications link in Stores > Configuration > Moogento > SocialEasy > General to open it directly.
Does SocialEasy work with Hyvä, Luma, and Porto themes?
Yes. The SocialEasy pixel script and notification widgets are injected by the external SocialEasy service and are theme-agnostic. The Magento module itself only handles the admin config and the backend data sync - no frontend template overrides are required for any theme.
What happens if I disable SocialEasy?
Setting Enable to No stops new orders from being sent to the SocialEasy service and removes the pixel script from the storefront (if Auto-Add Pixel Script is on). Existing notification data in your SocialEasy dashboard is unaffected - notifications simply stop appearing until you re-enable the module.
Which SocialEasy plan do I need?
Social proof notifications, customer sync, analytics tracking, and pixel auto-add are all available on every plan (Seed, Growth, and Pro). Visit https://www.moogento.com or your SocialEasy dashboard for current pricing and plan details.
Should I use Auto-Add Pixel Script or Google Tag Manager?
Google Tag Manager is recommended because it lets you apply consent conditions, update the script without a Magento deployment, and control when the tag fires. Set Auto-Add Pixel Script to No and add the pixel as a Custom HTML tag in GTM. See the Common setups section for step-by-step instructions.
How do I track which conversions came from SocialEasy notifications?
Go to Stores > Configuration > Moogento > SocialEasy > Setup: Google Analytics and configure the UTM source, medium, and campaign values. Every notification link will include those parameters so you can filter the traffic in Google Analytics. The Conversion Window field controls how many days the module considers a click as an attributed event.
Can I run SocialEasy on a staging environment?
You can, but be aware that placing orders on staging will send that data to the SocialEasy service using the same API key. If staging and production share an API key, staging orders will appear in your live notification feed. Use a separate SocialEasy account and API key for staging, or disable the module on staging environments.
Related guides
- Analyticseasy - enhanced Google Analytics tracking for Magento events; complements the UTM tagging that SocialEasy adds to notification links
- Profiteasy - profit and margin reporting; useful alongside SocialEasy when you want to see whether social proof notifications are driving orders on high-margin products
Need help?
- moo@moogento.com
- Include:
- Magento version
- Module name
- What you're trying to do