Overview
AnalyticsEasy gives Magento 2 stores reliable Google Analytics 4 tracking with no custom JavaScript. Once configured, it automatically fires GA4 ecommerce events on product views, cart additions, and purchases. If you use Google Tag Manager, AnalyticsEasy populates a complete data layer and can generate a ready-to-import GTM container JSON so you don't have to build tags from scratch.
This module helps you:
- Track every purchase with accurate order value, product details, and currency in Google Analytics 4
- Push a full ecommerce data layer to Google Tag Manager so your marketing team's tags just work
- Attribute revenue to campaigns automatically using UTM parameter capture
- Control exactly which product data points (brand, category, variant, stock status) go into your analytics
- Respect your customers' cookie consent settings without any extra configuration
Note on the free version when AnalyticsEasy Pro is installed: When Pro is active, the free module's General config shows an "AnalyticsEasy Pro is installed - free version disabled" notice. This is expected - Pro takes over all tracking. Configure everything under Stores > Configuration > Moogento > AnalyticsEasy Pro instead.
When to use this
Use AnalyticsEasy when you want to:
- Set up GA4 ecommerce tracking without writing custom JavaScript or hiring a developer
- Replace a broken or outdated Universal Analytics integration and move to GA4
- Give a marketing agency a clean GTM data layer to build their tags on top of
- Track Google Ads conversions automatically when an order is placed
- Verify that prices recorded in analytics match the tax-inclusive or tax-exclusive figures your finance team expects
Key capabilities
- GA4 ecommerce tracking - automatically fires
purchaseandpage_viewevents with structured item arrays - Google Tag Manager data layer - populates transaction ID, order value, currency, and item details for every purchase
- GTM container generator - exports a pre-built container JSON (tags, triggers, variables) you import directly into GTM
- Google Ads conversion tracking - fires conversion events on the order success page (Pro)
- Remarketing pixel - places the Google Ads sitewide tag on every page to power remarketing audiences (Pro)
- Configurable data points - choose the product identifier, whether prices include tax, and which optional dimensions (brand, variant, stock status, customer group) to send
- UTM campaign attribution - captures UTM parameters from landing URLs and associates them with purchase events
- Cookie restriction awareness - honours Magento's built-in cookie consent mode without additional setup
- Multi-store ready - configuration scoped to website and store view levels
- Server-side Measurement Protocol - sends selected events directly from your Magento server to GA4, bypassing browser limitations (Pro)
- Moogento attribution tracking - attributes conversions driven by SmartListings, HelloCustomer, GiftEasy, and NotifyMe back to the right source (Pro)
Installation
Installing AnalyticsEasy (free)
AnalyticsEasy installs via Composer, then activates with a license key from your Moogento.com account. The whole flow takes about 5 minutes.
Step 1: Get your Composer keys from Moogento.com
- Sign in at https://www.moogento.com and open My Plugins in your account menu.
- Find AnalyticsEasy in the list of plugins you own.
- Generate (or reveal) the Composer access keys for that plugin - a public key and a private key.
- Add your install domain to the key. Each Composer key is tied to a specific domain - if you're installing on
yourstore.com, addyourstore.comto the key's allowed domains. The Composer download will be rejected on any other domain.
If you run staging and production on different domains, add both - separate keys per environment are fine too.
Step 2: Install the module with Composer
From your Magento 2 root directory:
composer require moogento/module-analyticseasy
When Composer asks for credentials, paste the public key as the username and the private key as the password. They'll be cached in ~/.composer/auth.json for future runs.
Step 3: Enable the module in Magento
php bin/magento setup:upgrade
php bin/magento setup:di:compile
php bin/magento cache:clean
If you run php bin/magento module:status Moogento_Analyticseasy you should see it listed as enabled.
Step 4: Add your license key in the Moogento admin
- Still on https://www.moogento.com > My Plugins, copy the license key for AnalyticsEasy (separate from the Composer keys you used above).
- In your Magento admin, go to Stores > Configuration > Moogento > Licenses.
- Find the row for AnalyticsEasy and paste the license key.
- Click Save Config, then run
php bin/magento cache:cleanonce.
The license validates within a few seconds. You should see the module's status flip to active. If it stays inactive, double-check the domain on the license matches where you've installed - domain mismatch is the most common cause.
Installing AnalyticsEasy Pro (upgrade)
Follow the same four steps above but use the AnalyticsEasy Pro plugin entry on Moogento.com and the Composer package moogento/module-analyticseasypro. Both modules can coexist on the same install - when Pro is active, Pro takes over all tracking and the free module's General config displays an informational notice.
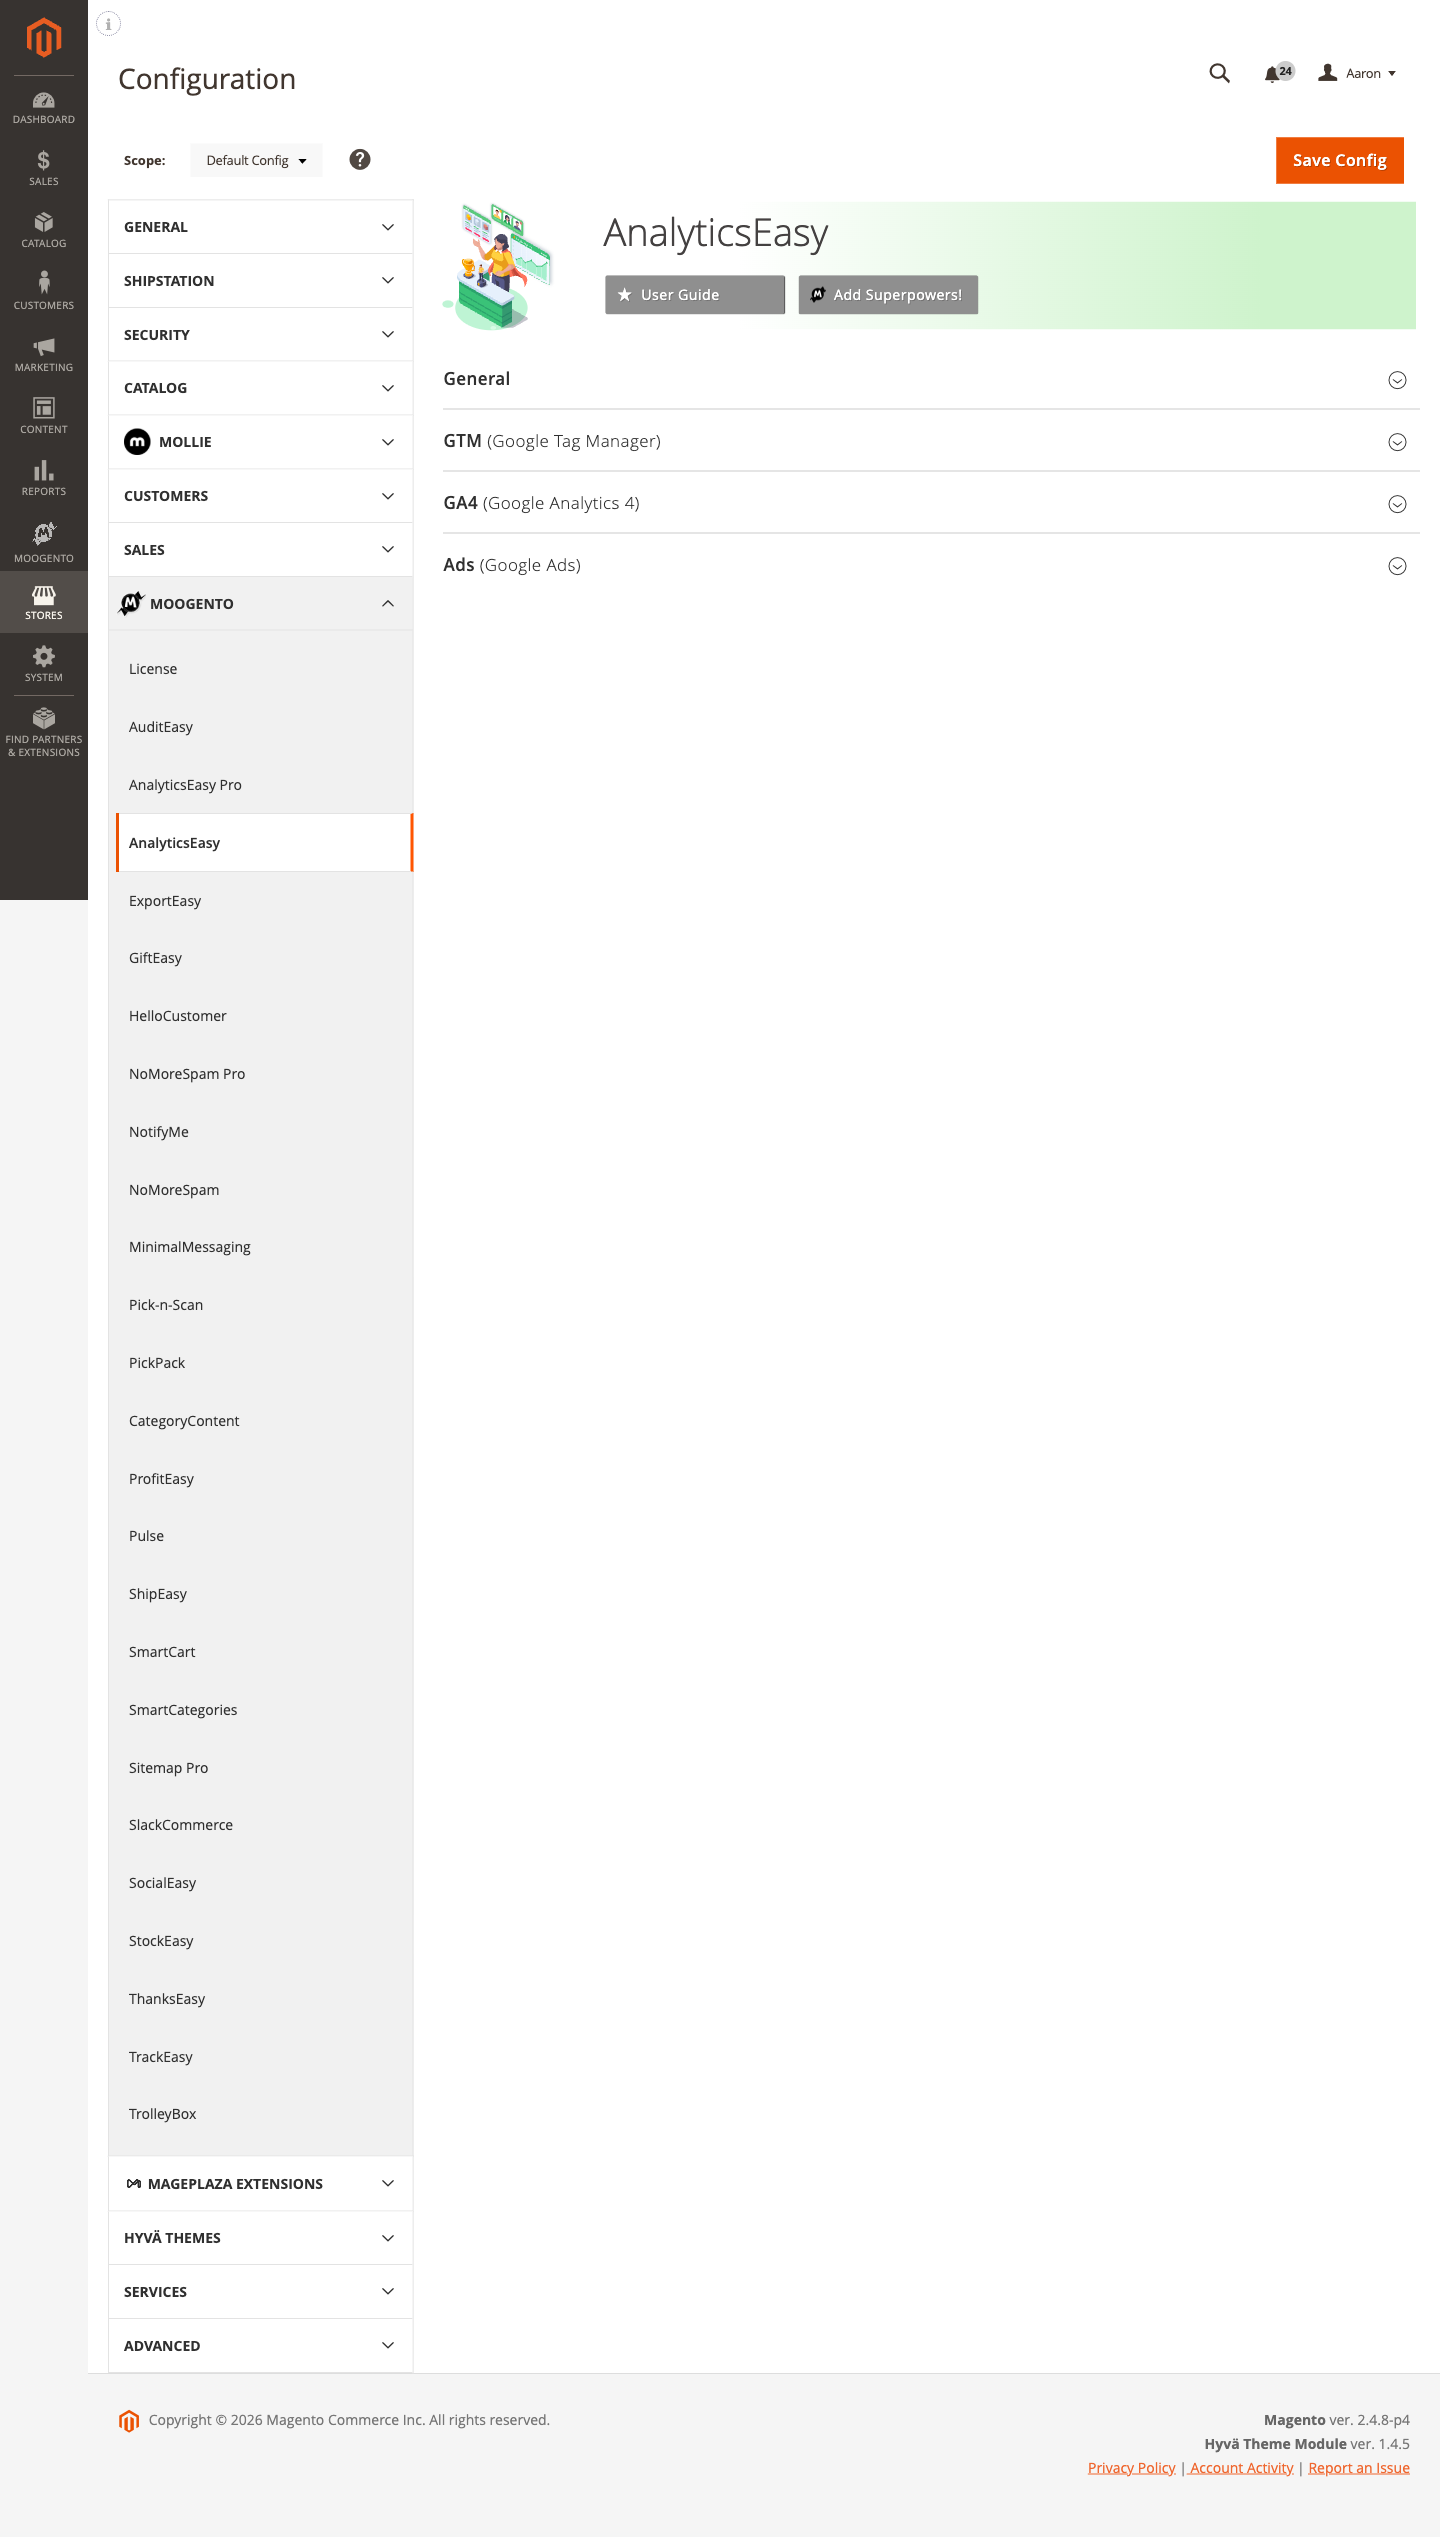
Setup overview
Most setup happens in:
Stores > Configuration > Moogento > AnalyticsEasy
(Or Stores > Configuration > Moogento > AnalyticsEasy Pro if Pro is installed.)
You'll mainly work with:
- General - enable or disable the module globally
- GTM (Google Tag Manager) - account and container IDs, head/body code snippets, and the container JSON generator
- GA4 (Google Analytics 4) - measurement ID, debug mode, and data points (which product and customer dimensions to track)
- Ads (Google Ads) - sitewide tag, conversion tracking, and remarketing (Pro features)
Common setups
Connect GA4 to your store
Get purchase data and page views flowing into Google Analytics 4 immediately after placing your Measurement ID.
How to set it up
-
Go to: Stores > Configuration > Moogento > AnalyticsEasy > General
Set:
- Enable: AnalyticsEasy = Yes
Save Config.

-
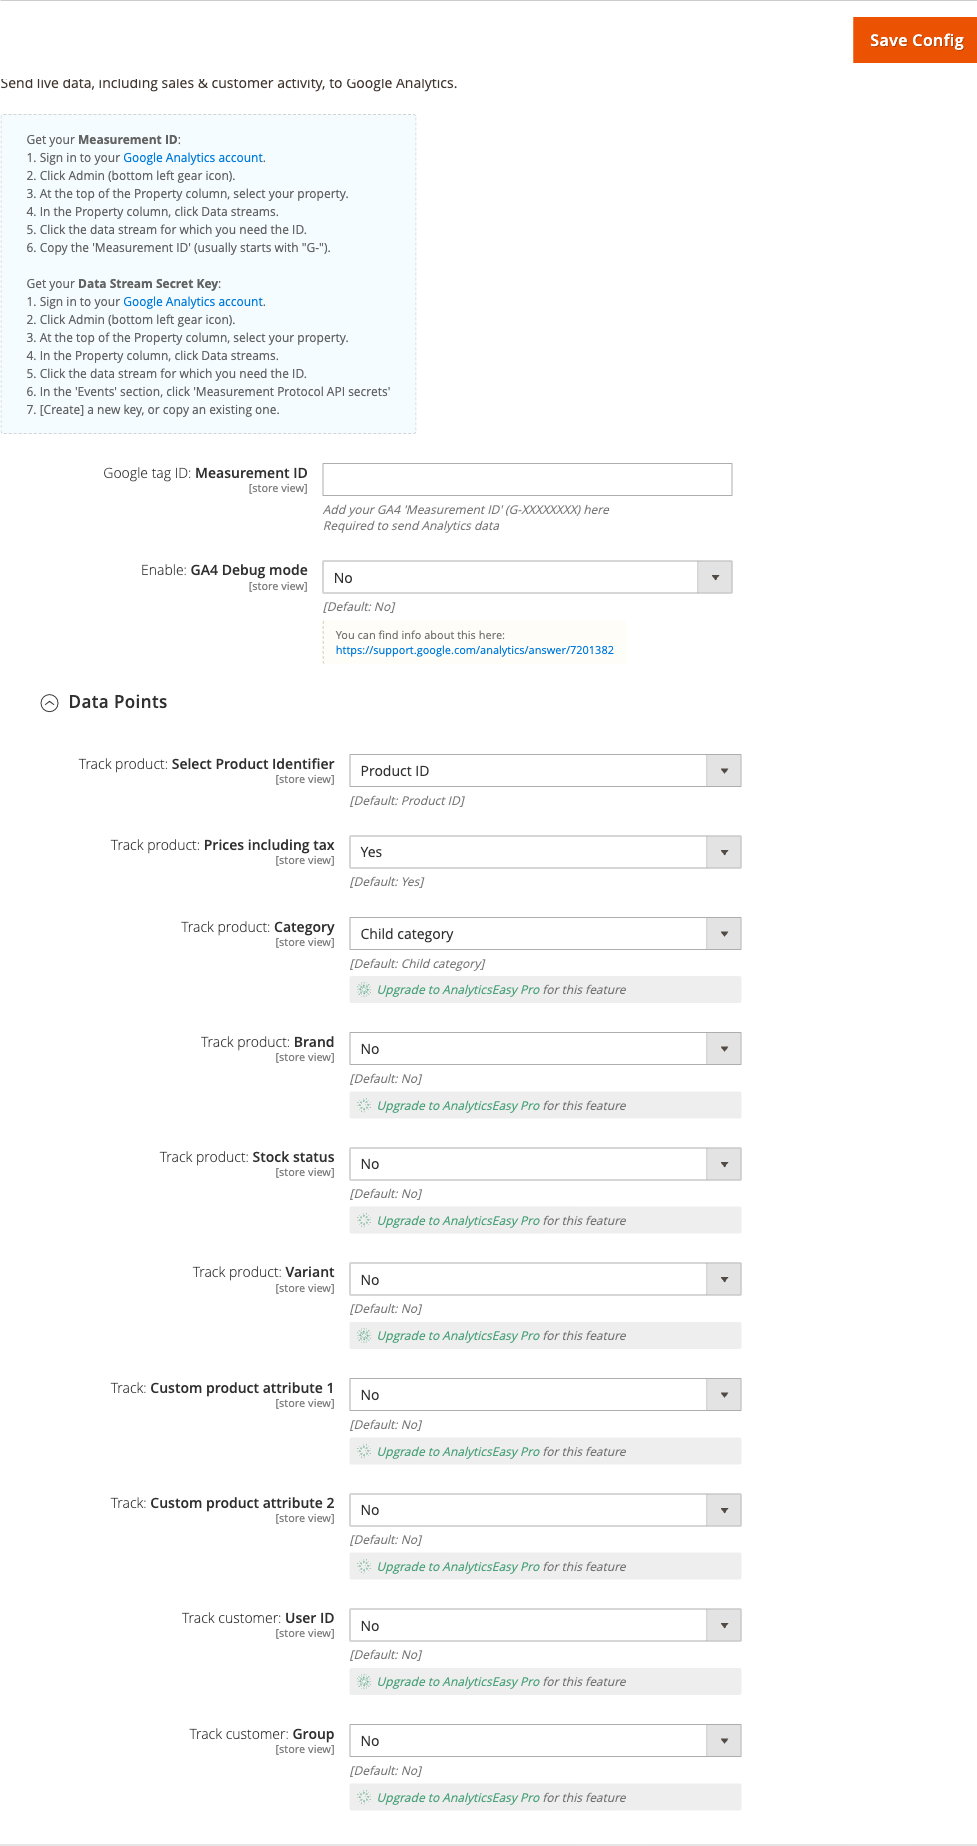
Go to: Stores > Configuration > Moogento > AnalyticsEasy > GA4 (Google Analytics 4)
Set:
- Measurement ID = your GA4 property's Measurement ID (format:
G-XXXXXXXX)
Save Config.
- Measurement ID = your GA4 property's Measurement ID (format:
-
Run
php bin/magento cache:cleanto ensure the tracking code reaches the storefront.
Notes
- Find your Measurement ID in Google Analytics under Admin > Data streams > (your stream) > Measurement ID.
- The field validates the
G-prefix - the config won't save if the format is wrong. - If you use Full Page Cache (Varnish or Magento built-in), flush it after saving so the new code is served immediately.
Connect Google Tag Manager
Use GTM to manage third-party tags (chat widgets, advertising pixels, heatmap tools) without deploying code changes to Magento each time. AnalyticsEasy populates the data layer; GTM reads it.
How to set it up
-
Go to: Stores > Configuration > Moogento > AnalyticsEasy > GTM (Google Tag Manager)
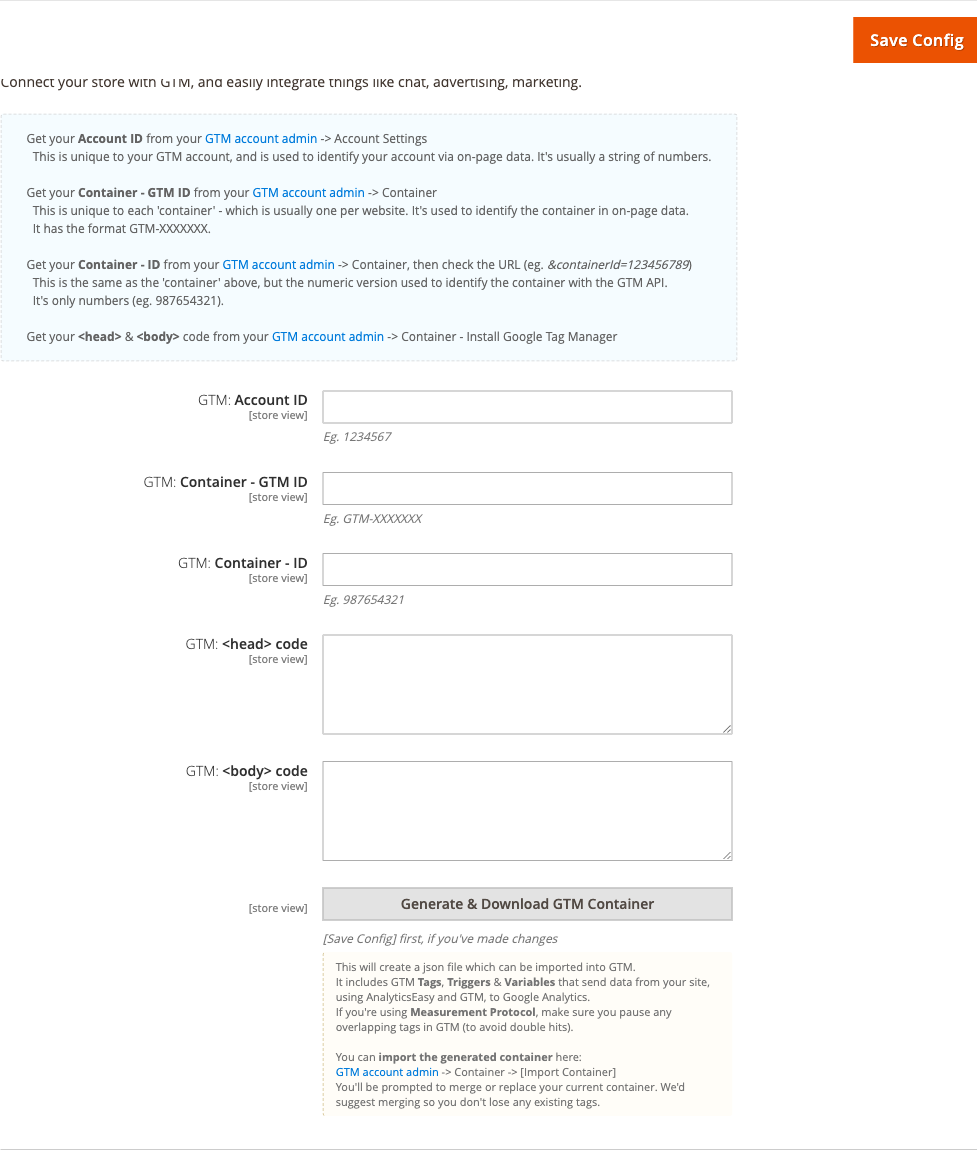
-
Set:
- GTM: Account ID = the numeric account ID from your GTM account admin (e.g.
1234567) - GTM: Container - GTM ID = the container's public ID (format:
GTM-XXXXXXX) - GTM: Container - ID = the numeric container ID from the GTM admin URL (e.g.
987654321) - GTM: <head> code = the GTM snippet from GTM admin > Container > Install Google Tag Manager > <head> section
- GTM: <body> code = the corresponding <body> snippet
- GTM: Account ID = the numeric account ID from your GTM account admin (e.g.
-
Save Config.
-
To generate a pre-built GTM container (tags, triggers, variables for GA4 ecommerce):
- Save Config first if you've made changes.
- Click Generate Container JSON (the button in the GTM section of the config page).
- Download the JSON file.
- In GTM: Admin > Container > Import Container, choose the file and select Merge (not Replace) to preserve your existing tags.
Notes
- The Account ID and Container IDs are used to populate the data layer's metadata - they are separate from the GTM snippet code itself.
- If you are using AnalyticsEasy primarily for GTM (and managing GA4 tags inside GTM), you do not need to enter a Measurement ID in the GA4 section.
- Merging (rather than replacing) the imported container protects any tags you've already built.
Tune which product data goes into analytics
Control exactly what product information appears in GA4 item arrays - useful when you want brand, variant, or customer group data in your reports.
How to set it up
-
Go to: Stores > Configuration > Moogento > AnalyticsEasy > GA4 (Google Analytics 4) > Data Points
-
Set the options relevant to your store:
- Select Product Identifier - choose SKU, product ID, or another attribute as the item ID sent to GA4
- Prices including tax - set to Yes if your store displays prices inclusive of tax and you want analytics to match
- Category - which category level to send (child category by default); more options available with Pro (Pro)
- Brand, Stock status, Variant - enable the dimensions you want to appear in GA4 item reports (Pro)
- Track customer: User ID and Track customer: Group - send logged-in customer data for cross-device attribution (Pro)
-
Save Config and run
php bin/magento cache:clean.
Notes
- The product identifier you choose appears as
item_idin GA4. SKU is generally recommended for consistent cross-channel reporting. - Pro-only fields (Brand, Variant, Stock status, custom attributes, customer tracking) are visible in the config but require an AnalyticsEasy Pro license to activate.
Features reference
General
Controls whether AnalyticsEasy runs at all. When disabled, no tracking code is injected anywhere on the storefront - GTM snippets, GA4 initialization, and all event scripts are suppressed.
- When to use it: Temporarily disable tracking during a maintenance window or store migration without removing the configuration.
- Config path:
moogento_analyticseasy/general/enable
GTM (Google Tag Manager) - Container JSON Generator
Beyond storing your GTM credentials, this section includes a built-in tool that generates a ready-to-import GTM container file. The generated container contains pre-configured tags (GA4 ecommerce, purchase event), triggers (page view, checkout success), and data layer variables that map to the values AnalyticsEasy pushes on every page.
- When to use it: When setting up GTM from scratch or after upgrading the module and wanting to pick up new default tag configurations.
- Config path:
moogento_analyticseasy/googletagmanager/(account_id, public_id, container_id, gtm_code_head, gtm_code_body)
GA4 Debug Mode
Enables GA4's debug mode flag in the tracking code, which causes events to appear in real time in Google Analytics > Admin > DebugView rather than waiting for the standard 24-48 hour processing delay.
- When to use it: During initial setup to confirm events are firing correctly, or when investigating a discrepancy between analytics data and actual orders.
- Config path:
moogento_analyticseasy/googleanalytics/debug_mode
Turn debug mode off in production. Events sent in debug mode are processed differently and can skew your standard reports.
Google Ads - Sitewide Tag, Conversions, and Remarketing (Pro)

Places the Google Ads global site tag (with your Conversion ID) on every page of the storefront. This is required for audience-based remarketing and is the recommended way to set up conversion tracking via Google Ads for most accounts.
Three sub-features live in this group, all requiring AnalyticsEasy Pro:
- Sitewide tag - places the Google Ads global site tag on every page, required for audience-based remarketing and smart bidding. Config path:
moogento_analyticseasy/googleads/sitewide/enable - Conversion tracking - fires a specific purchase conversion event (by label code and label text) on the order success page; optionally skips zero-total orders. Config path:
moogento_analyticseasy/googleads/conversions/ - Remarketing - triggers remarketing events so visitors are added to the Google Ads Audience Manager lists you've defined. Config path:
moogento_analyticseasy/googleads/remarketing/enable
AnalyticsEasy Pro (upgrade)
AnalyticsEasy Pro extends the free module with server-side GA4 Measurement Protocol tracking, a richer data points set, full Google Ads conversion management, and cross-module attribution for other Moogento features. When Pro is installed, its config lives at Stores > Configuration > Moogento > AnalyticsEasy Pro.
What Pro adds
- GA4 Measurement Protocol - sends selected events directly from your Magento server to GA4, so ad-blockers, iOS Intelligent Tracking Prevention, and cookie-consent declines can't swallow your conversion data
- Expanded data points - brand attribute (choose the product attribute), stock status, variant, two custom product attributes, customer User-ID (stable cross-device identifier), customer group
- Google Ads Conversion ID field - Pro adds the dedicated Conversion ID field (
moogento_analyticseasypro/googleads/general/google_ads_conversion_id) and a Skip zero-total orders option (google_ads_conversion_exclude_zero_total) - Remarketing label - Pro adds a dedicated remarketing conversion label field (
moogento_analyticseasypro/googleads/remarketing/google_ads_remarketing_conversion_label) - Moogento attribution tracking - when Measurement Protocol is enabled, Pro listens to the
moo_core_convertible_eventfired by SmartListings, HelloCustomer, GiftEasy, and NotifyMe and sends acampaign_detailsGA4 event with UTM parameters and source module so you can see which Moogento feature drove each sale - SmartCart recommendation tracking - automatically sends
smartcart_recommendation_impression,smartcart_recommendation_click,smartcart_recommendation_added, andsmartcart_bundle_addedevents to GA4 via Measurement Protocol when SmartCart is also installed; no extra configuration needed - Skip customer pages - prevents GTM from firing on account, login, and registration pages (
moogento_analyticseasypro/googletagmanager/skip_customer_pages) - Measurement Protocol Validation mode - validates payloads against Google's debug endpoint without recording events in GA4, so you can confirm everything is correct before going live
Setting up Measurement Protocol (Pro)
-
Go to: Stores > Configuration > Moogento > AnalyticsEasy Pro > GA4 (Google Analytics 4)
-
Enter your Measurement ID (
G-XXXXXXXXXX). -
Expand Measurement Protocol and set:
- Enable = Yes
- Secret Key = paste your Measurement Protocol API secret from GA4 Admin > Data streams > your stream > Measurement Protocol API secrets > Create
- Events = select the events to send server-side (at minimum: Purchase, Begin checkout, Add to cart)
- Track admin-created orders = Yes if phone/admin orders should appear in GA4
- Track Moogento attribution events = Yes (default) to capture SmartListings, HelloCustomer, GiftEasy, and NotifyMe attribution
-
Save Config. Check
var/log/moogento_analyticseasypro.logfor[SendXxxEvent]entries to confirm events are dispatching.
Enable Measurement Protocol Validation mode = Yes while testing. Events are validated but not recorded in GA4 until you turn Validation mode off.
Setting up Google Ads conversions (Pro)
-
Go to: Stores > Configuration > Moogento > AnalyticsEasy Pro > Ads (Google Ads) > General
-
Set:
- Ads: Conversion ID = your Google Ads Conversion ID (digits only, e.g.
1066481234) - Ads Tag Sitewide: Enable = Yes
- Ads: Conversion ID = your Google Ads Conversion ID (digits only, e.g.
-
Go to: Stores > Configuration > Moogento > AnalyticsEasy Pro > Ads (Google Ads) > Conversions
-
Set:
- Conversions: Enable = Yes
- Ads: Conversion label = your Conversion Label code (e.g.
BKWdCOLgjIEaEPZsxQeP) - Ads: Conversion currency code = your store's currency (default:
USD) - Ads: Skip conversion code for zero total orders = Yes if free-order promotions should not count as conversions
-
Save Config.
Advanced configuration
Using Measurement Protocol alongside GTM
If you use GTM to fire a GA4 tag and also enter a Measurement ID directly in AnalyticsEasy, GA4 will receive two hits for each event - one from the GTM tag and one from AnalyticsEasy's direct integration. This causes inflated event counts.
How to avoid double-counting
Option A - GTM-only: Enter your GTM credentials in the GTM section, leave the Measurement ID blank in the GA4 section. Let GTM manage the GA4 tag internally.
Option B - Direct-only: Enter the Measurement ID in the GA4 section, but do not deploy a GA4 Configuration tag inside GTM (pause or delete that tag in GTM).
Notes
- The AnalyticsEasy-generated GTM container JSON is designed for the direct integration model (Option B) - it does not include a GA4 Configuration tag, so importing it alongside Option B is safe.
- If you import the generated JSON and also have a legacy GA4 tag in GTM, pause the legacy tag to prevent duplicate events.
- With Pro's Measurement Protocol, also pause any overlapping GTM purchase/checkout tags to prevent triple-counting.
Moogento attribution events (Pro)
When Track Moogento attribution events is enabled (Stores > Configuration > Moogento > AnalyticsEasy Pro > GA4 > Measurement Protocol > Track Moogento attribution events), Pro listens to the moo_core_convertible_event Magento event. Each time a sale is completed that was influenced by a Moogento feature, the module sends a campaign_details GA4 event containing UTM parameters and the source module name.
- This setting has no effect if Measurement Protocol is disabled or the API secret is blank.
- Attribution events are sent in addition to the standard
purchaseevent. - To view attribution in GA4, look for the
campaign_detailsevent in the Events report and filter by thesourceparameter.
Tips & best practices
- Run
php bin/magento cache:cleanevery time you save configuration changes - cached full-page content won't pick up the new tracking code until the cache is cleared. - Enable GA4 Debug Mode during initial setup; check DebugView in Google Analytics to confirm
purchaseevents arrive with the right item count and order value before turning debug mode off. - Use the GTM container generator to bootstrap your GTM setup rather than building tags manually - it ensures the data layer variable names match exactly what AnalyticsEasy pushes.
- Set Prices including tax to match your storefront's display setting. If your product pages show tax-exclusive prices but analytics reports tax-inclusive revenue, your average order value figures will mislead your team.
- For multi-store setups, configure the Measurement ID at the website or store view scope to send data to the correct GA4 property for each region.
- Test Google Ads conversion tracking with Google Tag Assistant (Chrome extension) before launching a campaign - confirm the conversion fires once on the order success page and not on any other page.
- (Pro) Select only the Measurement Protocol events you genuinely need - every server-side call adds a small amount of latency to the originating request. Start with Purchase and expand if needed.
- (Pro) Enable Skip: Customer pages in the GTM group to avoid GTM events firing on account, login, and registration pages.
- (Pro) For User-ID tracking, pick a stable identifier - Customer ID never changes; email address can change if a customer updates their account.
Troubleshooting
No data appearing in GA4 after saving configuration
Analytics data is not reaching your Google Analytics property after enabling the module and entering a Measurement ID.
- Cause: The tracking code was not injected because the module is disabled, the Measurement ID format is wrong, or full-page cache is serving stale pages without the new code.
- Check: Confirm Enable: AnalyticsEasy is set to Yes. Verify the Measurement ID is in
G-XXXXXXXXformat. View the storefront page source and search for your Measurement ID to confirm the script tag is present. - Resolution: Save Config, run
php bin/magento cache:clean(and flush Varnish if applicable), then reload a storefront page and re-check the page source.
Purchase events not appearing in GA4
The module is running and GA4 receives page_view events, but purchase events do not appear after an order is placed.
- Cause: Cookie consent is blocking the event, or the checkout success page layout has been customised and the tracking block is no longer rendered.
- Check: Complete a test order with cookie consent granted. Open GA4 > Reports > Realtime and place the order - the purchase event should appear within seconds. Enable GA4 Debug Mode for detailed console output.
- Resolution: If cookie consent is the cause, ensure your consent management platform grants analytics cookies before the checkout success page loads. If the layout is customised, verify
checkout_onepage_success.xmlfrom another theme or custom layout override has not removed the AnalyticsEasy block.
Incorrect prices appearing in analytics
Order values in GA4 or Google Ads do not match the amounts shown in Magento's order grid.
- Cause: The Prices including tax setting does not match your store's displayed price logic, or catalog price rules are affecting the tracked value.
- Check: Go to Stores > Configuration > Moogento > AnalyticsEasy > GA4 > Data Points and check the Prices including tax setting. Compare a known order's GA4 event value against the order total in Magento (with and without tax).
- Resolution: Set Prices including tax to match your tax display preference and save. Clear cache. Place a test order and verify the reported value in GA4 DebugView.
GTM tags not firing correctly
Tags configured in GTM are not triggering as expected, even though GTM is installed.
- Cause: The GTM container ID or head/body snippets are entered incorrectly, the container is not published, or data layer variable names in GTM do not match what AnalyticsEasy pushes.
- Check: Open GTM Preview mode and load a storefront page. Confirm the container fires on page load. Inspect the data layer in the GTM debugger - verify
transactionId,transactionTotal, andtransactionProductsare present on the checkout success page. - Resolution: Re-enter the GTM credentials carefully (Account ID, Container GTM ID, Container numeric ID). Save Config and clear cache. If variable names don't match your existing GTM tags, use the container JSON generator to get correctly-named variables, import them into GTM, and update your tag variable references.
Measurement Protocol events not recording in GA4 (Pro)
Server-side events are dispatched (log entries are present) but don't appear in GA4 reports.
- Cause: The API secret key is missing, expired, or the Measurement ID doesn't match the data stream the secret belongs to.
- Check: In GA4, go to Admin > Data streams > your stream > Measurement Protocol API secrets and confirm the secret is still valid. Check
var/log/moogento_analyticseasypro.logfor[SendXxxEvent]entries and any error responses from Google. - Resolution: Regenerate the API secret in GA4, paste the new value into Stores > Configuration > Moogento > AnalyticsEasy Pro > GA4 > Measurement Protocol > Secret Key, save, and clear cache. Confirm Validation mode is Off - when Validation mode is On, events are tested but never recorded.
Duplicate events in GA4 (Pro)
The same event (e.g. purchase) appears twice for every order.
- Cause: Both GTM client-side tags and Measurement Protocol are firing for the same event.
- Check: In GTM Preview mode, identify which tags fire on the order success page. Compare with the Events selected in Measurement Protocol config.
- Resolution: In your GTM container, pause or remove the tags that overlap with Measurement Protocol events. Alternatively, deselect those events from the Measurement Protocol Events multiselect (Stores > Configuration > Moogento > AnalyticsEasy Pro > GA4 > Measurement Protocol > Events).
CSP blocks tracking scripts (Pro)
Browser console shows Content Security Policy violations for GTM or GA4 domains.
- Cause: Magento's default CSP policy doesn't allow inline scripts or connections to Google's tracking endpoints.
- Check: Open browser devtools > Console and look for CSP violation messages referencing
www.googletagmanager.com,analytics.google.com, orwww.google-analytics.com. - Resolution: Add the required domains to your CSP whitelist. The Pro module's own
config.xmlalready allows these domains for the checkout success page; other pages may need additional CSP rules.
FAQs
How do I set up GA4 ecommerce tracking in Magento 2?
Install AnalyticsEasy, enable it under Stores > Configuration > Moogento > AnalyticsEasy > General, then enter your GA4 Measurement ID (format: G-XXXXXXXX) in the GA4 section - purchase events and page views start flowing automatically. See Connect GA4 to your store for the full step-by-step.
Why are my GA4 purchase events not showing up?
Confirm the module is enabled, the Measurement ID is correctly formatted, and your storefront cache has been cleared after saving config. Cookie consent blocking analytics cookies is the other common cause - ensure consent is granted before the checkout success page loads.
Can I use AnalyticsEasy with Google Tag Manager instead of direct GA4?
Yes. Enter your GTM Account ID, Container GTM ID, and head/body snippets in the GTM section, and AnalyticsEasy will populate the data layer for GTM to read. Use the built-in container JSON generator to import pre-built GA4 ecommerce tags directly into GTM. See Connect Google Tag Manager.
How do I stop GA4 from counting events twice when using GTM?
If you have a GA4 Configuration tag inside GTM and also enter a Measurement ID in AnalyticsEasy, events are sent twice. Choose one path: either use the direct Measurement ID (and remove the GA4 tag from GTM) or use GTM exclusively (and leave the Measurement ID blank in AnalyticsEasy). See Advanced configuration for guidance.
Does AnalyticsEasy send prices with or without tax?
You control this with the Prices including tax toggle in Stores > Configuration > Moogento > AnalyticsEasy > GA4 > Data Points. Set it to match how your storefront displays prices so analytics revenue figures align with what customers see.
What is the GTM container JSON generator and when should I use it?
The generator creates a ready-to-import GTM container file that includes tags, triggers, and data layer variables pre-configured for GA4 ecommerce tracking with AnalyticsEasy. Use it when setting up GTM from scratch - import it into GTM (Admin > Container > Import Container) using the Merge option to avoid overwriting your existing tags.
Does AnalyticsEasy work with Hyvä, Luma, and Porto themes?
Yes. AnalyticsEasy injects tracking code through Magento's standard layout XML system and is compatible with Luma, Porto, and Hyvä themes.
What happens when I disable AnalyticsEasy?
Disabling the module (setting Enable to No) removes all tracking code from the storefront immediately after a cache clear - no GTM snippets, no GA4 script tags, and no conversion events are sent. Your GTM container configuration and GA4 property remain untouched; they simply receive no data until the module is re-enabled.
Which features require AnalyticsEasy Pro?
Google Ads sitewide tag, conversion tracking, and remarketing all require an AnalyticsEasy Pro license. Several data point options (brand, variant, stock status, custom product attributes, customer ID, and customer group tracking) are also Pro features. Measurement Protocol (server-side GA4 tracking) and Moogento attribution tracking are Pro-only. The upgrade link is visible next to each Pro field in the admin config.
What does upgrading to AnalyticsEasy Pro add?
Pro adds server-side GA4 Measurement Protocol tracking (so events reach GA4 even when browsers block JavaScript), richer data points (brand attribute, stock status, variant, two custom product attributes, customer User-ID, customer group), a dedicated Google Ads Conversion ID field with zero-total-order exclusion, a remarketing conversion label field, and Moogento attribution tracking that maps SmartListings boosts, HelloCustomer campaigns, GiftEasy gift cards, and NotifyMe alerts to the purchases they drove. Pro also adds a GTM "Skip customer pages" option and a Measurement Protocol Validation mode for pre-launch testing.
How do I send GA4 events even when customers block cookies or use an ad-blocker?
Upgrade to AnalyticsEasy Pro and enable Measurement Protocol under Stores > Configuration > Moogento > AnalyticsEasy Pro > GA4 > Measurement Protocol. Pro sends selected events directly from your Magento server to GA4, bypassing the browser entirely. You need a GA4 API secret from your data stream settings to activate it.
Does AnalyticsEasy Pro track conversions from other Moogento modules like SmartListings or HelloCustomer?
Yes - when Measurement Protocol is enabled, the Track Moogento attribution events toggle (on by default) forwards campaign_details GA4 events whenever a SmartListings boost, HelloCustomer campaign, GiftEasy gift card, or NotifyMe alert drives a sale.
How much does AnalyticsEasy cost?
Pricing and plan options are listed on the AnalyticsEasy product page at moogento.com. A license key is required per install domain - add the domain to your key in My Plugins before installing.
Related guides
- SmartListings - category merchandising module that emits Moogento attribution events tracked by AnalyticsEasy Pro's Measurement Protocol integration
- HelloCustomer - customer engagement campaigns; attribution tracked by AnalyticsEasy Pro
- GiftEasy - gift card module; gift card usage attribution tracked by AnalyticsEasy Pro
- NotifyMe - back-in-stock alerts; conversion attribution tracked by AnalyticsEasy Pro
- SmartCart - recommendation engine; impression and add-to-cart events tracked automatically by AnalyticsEasy Pro via Measurement Protocol
Need help?
- moo@moogento.com
- Include:
- Magento version
- Module name
- What you're trying to do