Overview
ThanksEasy turns the Magento 2 thank you page into a customisable, conversion-focused experience. The moment a customer completes checkout they land on a page that can greet them by name, show order details, display a countdown-backed discount offer, present targeted upsell products, and link directly to shipment tracking.

This module helps you:
- Make the order-success page feel like a brand touchpoint rather than a dead end
- Generate incremental revenue with time-limited discount offers and cross-sell or BOGO product blocks
- Reduce customer-service enquiries by surfacing shipping timelines and tracking links immediately after purchase
- Invite guest customers to create an account right on the success page
- Track every click from the success page in Google Analytics with configurable UTM parameters
When to use this
Use ThanksEasy when you want to:
- Greet customers with a personalised thank-you message that includes their order number and a link to their order
- Show a fullscreen promotional popup or an inline product block with a ticking countdown discount
- Display a "Shipped By" and "Delivered By" date estimate so customers know when to expect their order
- Offer a calendar download or QR code so customers can track delivery without contacting support
- Prompt guest customers to create an account after their first purchase
- Measure which success-page offers actually convert using Google Analytics UTM tracking
Key capabilities
- Branded page design - custom background image, tiled pattern, solid colour, confetti animation, and custom CSS
- Personalised success message - editable copy with order-ID, order-link, PO-number, and emoji shortcodes
- Fullscreen popup offer - cross-sell or BOGO product strategy with percent/fixed discount, price floor guard, and auto-close timer
- Inline product blocks (Section 1 and Section 2) - cross-sell grid, single featured product, or custom CMS/HTML block, each with independent discount and countdown
- Order details panel - ordered items, shipping address, paid-with method, Shipped By Date, and Delivered By Date
- Calendar and QR tools - Apple Calendar (.ics) download, Google Calendar link, and TrackEasy QR code on the Delivered By tile
- Guest account creation prompt - Pro-plan card on the success page that invites guests to create an account via Magento's standard delegateCreate flow
- Instant Buy button - customisable labels for Instant Purchase-eligible and non-eligible products
- Time-limited free shipping - cart-level free shipping with an expiry clock; integrates with Magento's Delivery Methods config
- Google Analytics UTM tagging - configurable source, medium, and campaign for promo and non-promo product clicks
- Live preview - enter any order ID in config to preview the page without placing a test order
Installation
ThanksEasy installs via Composer, then activates with a license key from your Moogento.com account. The whole flow takes about 5 minutes.
Step 1: Get your Composer keys from Moogento.com
- Sign in at https://www.moogento.com and open My Plugins in your account menu.
- Find ThanksEasy in the list of plugins you own.
- Generate (or reveal) the Composer access keys for that plugin - a public key and a private key.
- Add your install domain to the key. Each Composer key is tied to a specific domain - if you're installing on
yourstore.com, addyourstore.comto the key's allowed domains. The Composer download will be rejected on any other domain.
If you run staging and production on different domains, add both - separate keys per environment are fine too.
Step 2: Install the module with Composer
From your Magento 2 root directory:
composer require moogento/m2-thankseasy
When Composer asks for credentials, paste the public key as the username and the private key as the password. They'll be cached in ~/.composer/auth.json for future runs.
Step 3: Enable the module in Magento
php bin/magento setup:upgrade
php bin/magento setup:di:compile
php bin/magento cache:clean
Run php bin/magento module:status Moogento_Thankseasy to confirm it is listed as enabled.
Step 4: Add your license key in the Moogento admin
- Still on https://www.moogento.com > My Plugins, copy the license key for ThanksEasy (separate from the Composer keys).
- In your Magento admin, go to Stores > Configuration > Moogento > Licenses.
- Find the row for ThanksEasy and paste the license key.
- Click Save Config, then run
php bin/magento cache:cleanonce.
The license validates within a few seconds. If the module stays inactive, check that the domain on your license matches the domain you installed on - domain mismatch is the most common cause.
Setup overview
All ThanksEasy configuration lives in:
Stores > Configuration > Moogento > ThanksEasy
You'll mainly work with:
- General - enable the module, button labels, free-shipping offer, offer expiry, price floor and qty limits
- Fullscreen Popup Offer - popup product strategy, discount, display limits
- Thanks Page > General - page background, confetti, custom CSS
- Thanks Page > Top Section - success message content and colour
- Thanks Page > Order Details Section - which order info blocks appear
- Thanks Page > Page-base Section 1 and Section 2 - inline product/content blocks with discounts
- Pro: Guest Account Creation Prompt - invite guest customers to register after purchase
- Google Analytics - UTM parameters for click attribution
Common setups
Display a personalised thank-you message with the order number
Customers want confirmation that their order went through - a message with their order number removes doubt.
How to set it up
-
Go to: Stores > Configuration > Moogento > ThanksEasy > Design: Thanks Page > Design: Top Section
-
Set:
- Thanks message: Position = your preferred position (above or below the order details)
- Thanks message: Content = your message copy, using template variables:
{{order_id}}- inserts the order increment ID (e.g.#100000042){{order_link}}- a URL to the order detail page; use as anhrefvalue{{purchase_order_id}}- PO number if set, otherwise empty (Growth and Pro plans){{tick}}- a green tick icon{{email}}- an email icon:):D<3- emoji shortcodes
-
Save config and run
php bin/magento cache:clean
Notes
- For guest orders,
{{order_link}}falls back to#<incrementId>since guests cannot log in to view the order - Use
{{purchase_order_link}}only outside anhrefattribute - it renders a complete<a>element
Show a fullscreen popup offer immediately after checkout
A fullscreen popup with a time-limited discount is the highest-visibility upsell placement ThanksEasy provides.

How to set it up
-
Go to: Stores > Configuration > Moogento > ThanksEasy > Design: Fullscreen Popup Offer
-
Set:
- Enable = Yes
- Offer: Offered product strategy - choose one:
- Cross-sell - products linked as cross-sells to items in the order
- BOGO - one of the products already in the order
- Cross-sell then BOGO - cross-sells first; falls back to BOGO if none qualify
- Discount: Type = Percent or Fixed
- Discount: % Amount (or Fixed amount) = your discount value
- Popup: Duration = minutes before auto-close (default 1)
- Limits: Per customer per day = Yes to prevent repeat displays
-
Optionally set:
- Filter-in by: Product attribute - restrict offered products by any product attribute
- Filter-in by: Category - restrict to products in specific categories
- Filter-in by: Minimum final price - skip products below a price threshold
- Offer text for: Cross-sell products / Offer text for: BOGO products - customise the headline using
{{product_name}},{{discount}},{{price}},{{countdown}}
-
Save config
Notes
- If no qualifying products are found (all out-of-stock, missing images, or priced at $0 after discount), the popup is suppressed rather than shown empty
- Popup and countdown features are gated by your license plan - confirm your plan on moogento.com if these fields are greyed out
Add inline cross-sell or featured-product blocks below the order details
The page-base sections let you add a product grid or a single featured product directly on the thank-you page, each with an independent discount and countdown.

How to set it up
-
Go to: Stores > Configuration > Moogento > ThanksEasy > Design: Thanks Page > Design: Page-base Section 1
-
Set:
- Enable = Yes
- Which: Block - choose Cross-sell products, Single product, CMS block, or HTML
- For Cross-sell products: set attribute/category filters, product count (default 4), and whether to fill empty slots with random in-stock products
- For Single product: enter the product SKU and choose button action (Add to Cart or View Product)
- Discount: Type = Percent, Fixed, or None
- Discount: Countdown timer = Yes to show a countdown clock; set Countdown time limit in minutes (default 5)
- Limits: Per customer per day = Yes to avoid repeat discounts
-
Optionally configure Design: Page-base Section 2 for a second independent block below Section 1
-
Save config
Notes
- Title fields change based on discount and countdown state - there are separate fields for: Discounts during countdown, Discounts after countdown, Discounts no countdown, and No discount
- Use
{{countdown_promo}}in the title to render the animated countdown clock (ThanksEasy Pro) or a fixed number - Discounts applied via ThanksEasy are time-limited: customers have the duration set in General > Time limit (hours) to complete checkout before prices revert
Show delivery timeline and calendar tools
Telling customers exactly when to expect their order - right on the success page - reduces "where is my order?" emails.
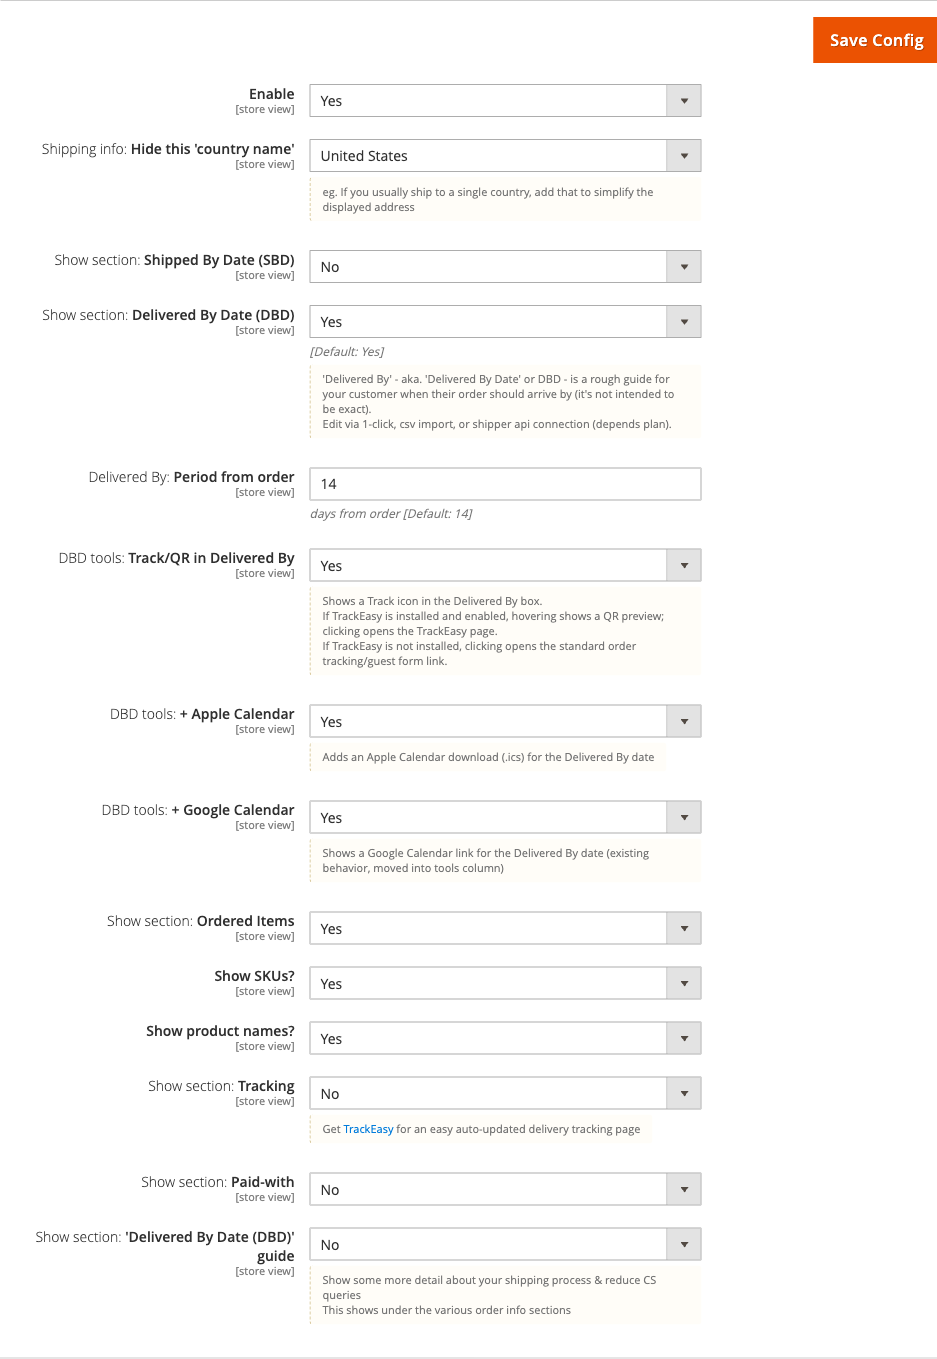
How to set it up
-
Go to: Stores > Configuration > Moogento > ThanksEasy > Design: Thanks Page > Design: Order Details Section
-
Set:
- Enable = Yes
- Show section: Shipped By Date (SBD) = Yes; set SBD: Period from order in days (default 5)
- Show section: Delivered By Date (DBD) = Yes; set Delivered By: Period from order in days (default 14)
- DBD tools: + Apple Calendar = Yes to add an
.icsdownload button for the Delivered By date - DBD tools: + Google Calendar = Yes to add a Google Calendar link
- DBD tools: Track/QR in Delivered By = Yes to show a tracking icon; if TrackEasy is installed, hovering reveals a QR code preview and clicking opens the TrackEasy tracking page
-
Optionally set guide copy:
- Show section: 'Shipped By Date (SBD)' guide = Yes and fill in Content with plain-language copy explaining your shipping process
- Show section: 'Delivered By Date (DBD)' guide = Yes and fill in Content with delivery-estimate context
-
Save config
Notes
- Shipped By and Delivered By dates are estimates calculated from the order date - they are not connected to carrier APIs unless TrackEasy is also installed
- Apple Calendar (
.ics) and Google Calendar tools require a Pro plan; the Track/QR icon requires a Growth plan - To suppress the country name from the shipping address (useful for single-country stores), set Shipping info: Hide this 'country name'
Enable time-limited free shipping on the success page
Offer free shipping as an incentive to add another item within a short window after purchase.
How to set it up
-
First, activate the shipping method:
- Go to Stores > Configuration > Sales > Delivery Methods
- Find ThanksEasy Free Shipping and set Enabled = Yes
-
Then configure the offer:
- Go to Stores > Configuration > Moogento > ThanksEasy > General
- Set Discounts: Enable time-limit on free shipping? = Yes
- Set Discounts: Time limit = number of hours the offer remains valid (default 1)
-
Save config
Notes
- When the time limit expires, the free shipping is automatically removed from the cart and product prices revert to normal
- The countdown affects both the fullscreen popup offer and the page-base inline blocks simultaneously
Set up Google Analytics UTM tracking
Every product link on the success page can carry UTM parameters so you can measure which offer generates revenue.
How to set it up
-
Go to: Stores > Configuration > Moogento > ThanksEasy > Setup: Google Analytics
-
Set:
- General: utm_source - identifies ThanksEasy traffic (default:
thankseasy) - General: utm_medium - identifies the link type (default:
cta) - Promo products: utm_campaign - campaign name for discounted product clicks (default:
TX pro) - Non-promo products: utm_campaign - campaign name for non-discounted product clicks (default:
TH reg)
- General: utm_source - identifies ThanksEasy traffic (default:
-
Save config
Notes
- UTM settings are global (not per store view)
- Changes only apply to links generated for new orders - existing cached pages are not affected
Features reference
Confetti animation
- Plays a falling-confetti animation on page load to celebrate the purchase
- Toggle at: Stores > Configuration > Moogento > ThanksEasy > Design: Thanks Page > Design: General > Show: Confetti
- Config path:
moogento_thankseasy/moo/general_show_animation - Works on Luma, Porto, and Hyvä themes
Page background
- Supports three modes: Full (single image or built-in ThanksEasy design), Tiled (repeating pattern), and Color (solid hex colour)
- Custom image upload available for both full and tiled modes; accepted formats: PNG, GIF, JPG, JPEG
- Config path:
moogento_thankseasy/moo/general_background_yn - On Hyvä, background mode values are stored as strings (
full,tiled,color) - do not re-save this field from a non-Hyvä admin session if the value has been customised for Hyvä compatibility
Custom CSS
- Paste arbitrary CSS into Design: Thanks Page > Design: General > Custom CSS to override colours, fonts, or layout without editing template files
- Config path:
moogento_thankseasy/moo/general_custom_css - The config field includes examples for changing countdown timer colours and background-image behaviour
Offer price floor and quantity cap
- Minimum offered price (% of current price) - set a floor as a percentage of the product's current price to prevent offers that are too aggressive (e.g. 50 blocks offers below half price). Set to 0 to disable. Config path:
moogento_thankseasy/general/min_price_floor_pct - Maximum quantity per ThanksEasy offer - caps how many units are included in a single offer (default 1). Raise only for qty-multiplier promotions. Config path:
moogento_thankseasy/general/max_offered_qty - Both fields are under Stores > Configuration > Moogento > ThanksEasy > General
Guest account creation prompt (Pro)
- Shows a dismissible card on the success page inviting guest customers to create an account
- Uses Magento's built-in
checkout/account/delegateCreateflow - no custom data collection - Configurable: position (top/bottom), headline, sub-copy, up to three benefit bullet points, button label, and dismiss link label
- Config path:
moogento_thankseasy/accountprompt/* - Requires a Pro plan license; only renders for guest customers
Instant Buy button labels
- The buy button label differs based on whether Instant Purchase is available for the customer
- Buy button label: Instant Buy - shown when Instant Purchase is enabled (e.g. "Instant Purchase", "Buy Now")
- Buy button label: Add to Cart - shown when Instant Purchase is not available (e.g. "Add to Cart", "Get It!")
- Config path:
moogento_thankseasy/general/button_textandmoogento_thankseasy/general/button_text_not_instant
Live preview
- Enter any order increment ID in Design: Preview > Preview order id to load the thank-you page for that order without navigating through checkout
- Useful for checking layout and copy changes before customers see them
Advanced configuration
TrackEasy integration
What it does
When TrackEasy is installed and enabled, ThanksEasy embeds a tracking link and optionally a QR code directly in the Delivered By tile. Customers can scan the QR code on mobile to open the TrackEasy tracking page without having to search their email for a tracking link.
Setup
- Install and enable the TrackEasy module (sold separately)
- In ThanksEasy config, go to Design: Thanks Page > Design: Order Details Section
- Set Show section: Tracking = Yes
- Set Include: TrackEasy QR code = Yes to add the QR code alongside the tracking link
- Set DBD tools: Track/QR in Delivered By = Yes to show the tracking icon on the Delivered By tile
Notes
- If TrackEasy is not installed, the tracking icon falls back to Magento's standard order-tracking/guest-form link
- QR codes are generated from an external image service, so the store needs outbound HTTPS to display them
- When ShipperHQ is installed alongside TrackEasy with the ShipperHQ bridge enabled, the Delivered By date is sourced from the ShipperHQ selected delivery date automatically - no additional ThanksEasy configuration is needed
Swissup Sold Together integration
ThanksEasy can render a Sold Together block (from Swissup's Sold Together extension) as the content for a page-base section. This is configured by selecting the Sold Together block type when setting up Section 1 or Section 2 - no additional settings are required beyond having the Swissup module installed and configured with product associations.
Theme compatibility
ThanksEasy is compatible with Luma, Porto, and Hyvä themes.
- Luma: full support; all blocks render using standard Magento layout handles
- Porto: full support; the enhanced page layout works within Porto's checkout success handle
- Hyvä: full support; background mode values (
full,tiled,color) are stored as strings - the module preserves these values and does not cast them to integers, which would prevent the configured background from rendering
If you switch between Hyvä and a non-Hyvä theme on the same store, re-check the Page: Background setting and save it from the correct theme context to ensure the stored value matches what the active theme expects.
Tips & best practices
- Keep the Discounts: Time limit short enough that you can still combine shipments - 1 hour is the default
- Use Limits: Per customer per day on all discount blocks to avoid customers feeling they are being aggressively upsold on every visit
- Set a Minimum final price filter on cross-sell popups to avoid offering very low-value products as the main post-purchase pitch
- Use the Minimum offered price (% of current price) floor in General to prevent any automated offer from discounting too steeply - 50% is a safe default starting point
- Write countdown title copy that conveys urgency without sounding artificial -
Get {{discount}}% off before {{countdown_promo}} runs outconverts well - Use the live Preview order id field to review every config change before saving; you can iterate quickly without placing test orders
- Set per-store-view translations for the success message and block title fields if you operate in multiple languages - the config is store-view scoped
- Enable the Guest account creation prompt on stores where repeat purchase rate matters - inviting guests at the point of peak satisfaction is more effective than a follow-up email
Troubleshooting
The popup or countdown fields are greyed out in the admin
Popup and countdown features require a higher license tier.
- Check: Go to Stores > Configuration > Moogento > Licenses and confirm ThanksEasy is showing as active on your current domain
- Resolution: Upgrade your ThanksEasy plan on moogento.com, or verify your license key is entered correctly for the right domain
The Delivered By date is wrong
The Delivered By date is calculated as a fixed number of days from the order date, not from a carrier API.
- Cause: The default offset (14 days) may not match your actual fulfilment time
- Check: Go to Design: Order Details Section > Delivered By: Period from order
- Resolution: Change the value to match your average delivery window; for carrier-accurate dates, install TrackEasy
The background image is not showing on Hyvä
Hyvä stores the background mode as a string value; re-saving from a non-Hyvä context can overwrite it with an integer.
- Cause: The
general_background_ynconfig value was cast to an integer, which Hyvä does not recognise - Check: Go to Design: Thanks Page > Design: General > Page: Background and note the current value
- Resolution: Re-select the desired background mode and save config from the Hyvä-themed store view; run
php bin/magento cache:clean
Cross-sell products not appearing in the popup or page blocks
The popup and inline blocks apply several filters before displaying a product.
- Cause: All candidate products were filtered out (out-of-stock, missing product image, discounted price would reach $0, or below the minimum final price threshold)
- Check: Verify the ordered products have cross-sell associations set in the product catalogue, that those products have images, and that they are in-stock
- Resolution: Add at least one qualifying cross-sell, or switch the strategy to BOGO if cross-sell associations are sparse; lower or disable the minimum final price filter if it is excluding valid products
The free-shipping offer is not applying in the cart
The ThanksEasy Free Shipping carrier must be enabled separately in Magento's Delivery Methods.
- Cause: The carrier was not enabled in Delivery Methods, or the time limit has already expired
- Check: Go to Stores > Configuration > Sales > Delivery Methods and confirm ThanksEasy Free Shipping is set to Enabled = Yes
- Resolution: Enable the carrier, save, and clear cache; remind customers the offer is time-limited
FAQs
How do I customise the thank-you message shown after checkout?
Go to Stores > Configuration > Moogento > ThanksEasy > Design: Thanks Page > Design: Top Section and edit the Thanks message: Content field. You can include the order number with {{order_id}}, a link to the order with {{order_link}}, icons like {{tick}}, and emoji shortcodes such as :).
How do I show a discount offer to customers right after they place an order?
Enable either the Fullscreen Popup Offer group or one of the Page-base Section groups in ThanksEasy config. Set the offered-product strategy (Cross-sell or BOGO), choose Percent or Fixed discount type, and enter the discount value. Popup and countdown features require a Growth or higher license plan.
Does ThanksEasy work with Hyvä theme?
Yes, ThanksEasy is fully compatible with Hyvä. Background mode values are stored as strings (full, tiled, color) and the module preserves them so the correct background renders on Hyvä. See the Theme compatibility section for details on switching between themes.
Does ThanksEasy work with Porto theme?
Yes, ThanksEasy is fully compatible with Porto. The enhanced success-page layout works within Porto's checkout success layout handle without any additional configuration.
How do I add a calendar download so customers can save their delivery date?
In the Design: Order Details Section config group, enable Show section: Delivered By Date (DBD) and then set DBD tools: + Apple Calendar = Yes for an .ics download, and DBD tools: + Google Calendar = Yes for a Google Calendar link. Apple Calendar and Google Calendar tools require a Pro plan.
Can I show a QR code for shipment tracking on the thank-you page?
Yes - install TrackEasy (sold separately) alongside ThanksEasy, then set Show section: Tracking = Yes and Include: TrackEasy QR code = Yes in the Order Details Section config. Customers can scan the QR code on mobile to open their tracking page immediately.
What happens to the discount if the customer does not complete checkout in time?
When the countdown expires (controlled by General > Discounts: Time limit), the free shipping is automatically removed from the cart and any ThanksEasy-discounted product prices revert to their normal prices. Customers can still check out, just without the offer applied.
How do I stop the popup from appearing to the same customer every day?
Set Limits: Per customer per day = Yes in the Fullscreen Popup Offer group. When enabled, each customer will only be shown the discounted popup offer once per day.
Can I preview the Magento 2 thank you page without placing a test order?
Yes. Enter an existing order increment ID in Stores > Configuration > Moogento > ThanksEasy > Design: Preview > Preview order id and the thank-you page will load for that order, so you can review layout and copy without going through checkout.
Which Google Analytics data does ThanksEasy send?
ThanksEasy adds UTM parameters to every product link on the success page. You can configure utm_source, utm_medium, and separate utm_campaign values for discounted and non-discounted product links at Stores > Configuration > Moogento > ThanksEasy > Setup: Google Analytics. Changes only apply to links generated for orders placed after you save.
Can I invite guest customers to create an account on the thank-you page?
Yes - the Guest Account Creation Prompt (Pro plan) adds a dismissible card on the success page using Magento's built-in account delegation flow. Enable it at Stores > Configuration > Moogento > ThanksEasy > Pro: Guest Account Creation Prompt and customise the headline, sub-copy, benefit bullets, and button label. The prompt only shows to guest customers and is dismissed via a cookie once closed.
How do I prevent ThanksEasy from offering products at too steep a discount?
Set a Minimum offered price (% of current price) value in the General config group (e.g. 50 prevents any offer below half the current price). You can also cap the maximum units offered per transaction with Maximum quantity per ThanksEasy offer. Both settings apply globally to all offer blocks.
Related guides
- TrackEasy - carrier-accurate delivery tracking with a branded tracking page; integrates directly with ThanksEasy's QR code and Delivered By tile
Need help?
- moo@moogento.com
- Include:
- Magento version
- ThanksEasy version
- Theme name (Luma, Porto, or Hyvä)
- What you are trying to do