

This page is part of the SmartListings guide. Start there for what the extension does, installation and the frequently asked questions.
Push out-of-stock products to the bottom of every category
This is the core Seed feature. Once enabled, customers automatically see available products first on every category page.
How to set it up
-
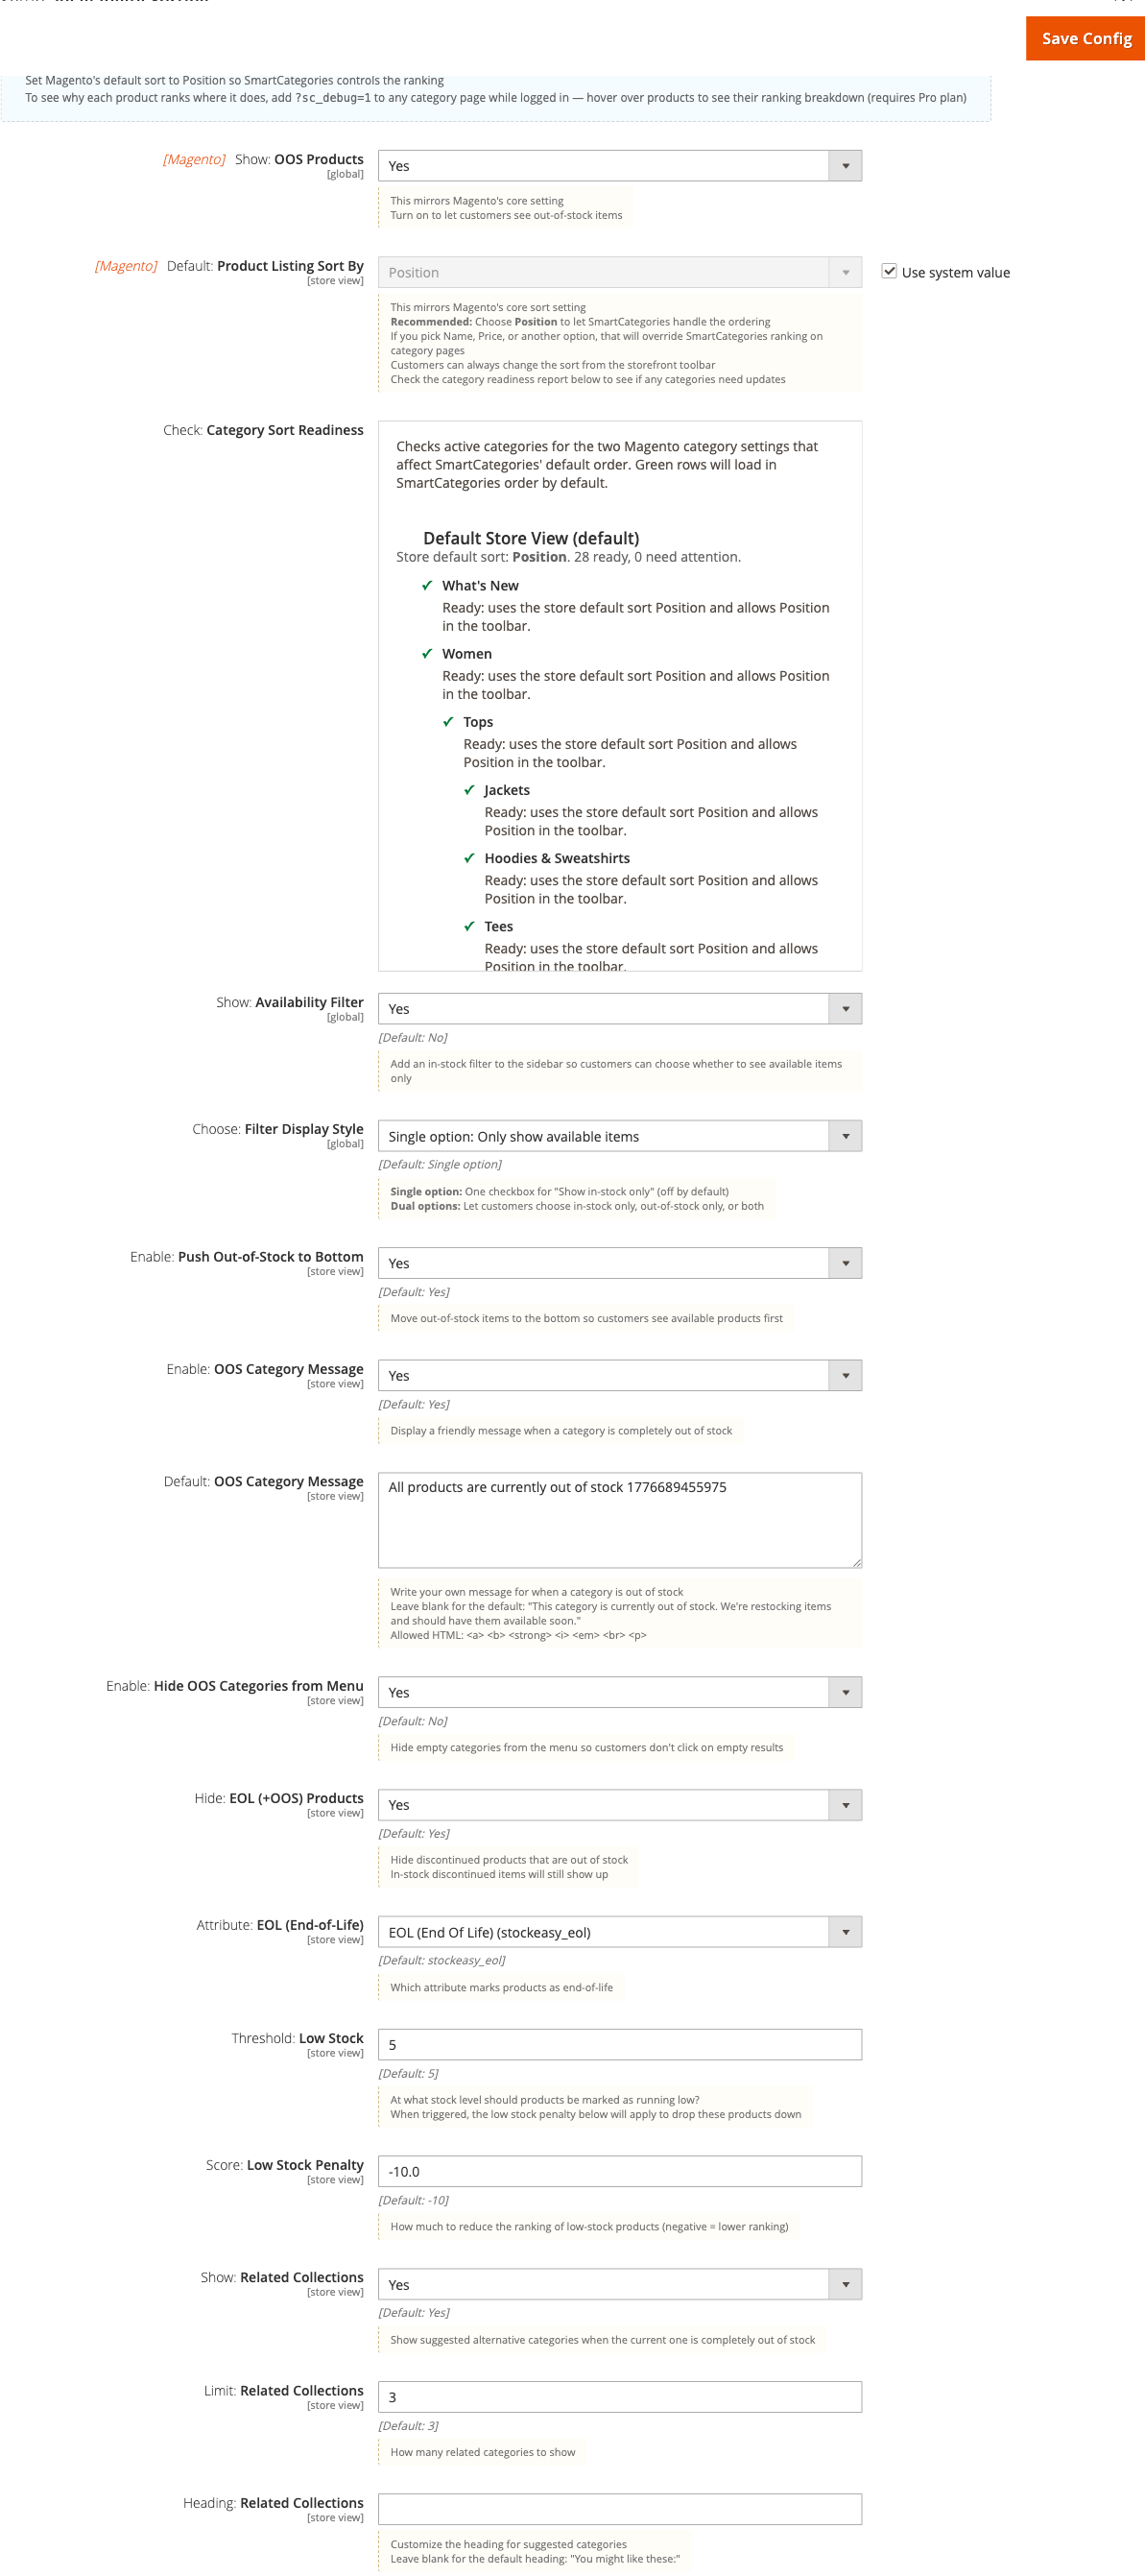
Go to: Stores > Configuration > Moogento > SmartListings > Availability Sorting
-
Set:
- [Magento] Show: OOS Products = Yes (customers can still see OOS items, just ranked lower)
- [Magento] Default: Product Listing Sort By = Position (lets SmartListings control ranking)
- Enable: Push Out-of-Stock to Bottom = Yes
-
Save Config, then run:
php bin/magento smartlistings:score:refresh
php bin/magento cache:clean
Notes
- SmartListings only controls ranking when the storefront sort is Position. If a shopper selects Name or Price, that overrides SmartListings for their session.
- Check the Category Sort Readiness diagnostic in the same config section - it lists categories whose individual sort settings may override the global default.
Show a custom message and alternative categories when a category sells out
When a category has no in-stock products left, SmartListings can show a tailored message and suggest sibling categories so the shopper has somewhere to go.
How to set it up
-
Go to: Stores > Configuration > Moogento > SmartListings > Availability Sorting
-
Set:
- Enable: OOS Category Message = Yes
- Default: OOS Category Message = your message text (leave blank for the built-in default)
- Show: Related Collections = Yes
- Limit: Related Collections = 3 (or your preferred count)
- Heading: Related Collections = "You might also like" (or custom text)
-
Save Config and run
php bin/magento cache:clean.
To override the message for a specific category, go to Catalog > Categories > [your category] > SmartListings tab and enter the per-category message. Leave blank to inherit from the parent or global config.
Notes
- The message inherits in waterfall order: category -> parent -> grandparent -> global config -> built-in default.
- Related collections only appears when the current category has a parent with at least one active sibling.
- Allowed HTML in the message:
<a>,<b>,<strong>,<i>,<em>,<br>,<p>.
Create a time-limited product boost for a promotion (Growth+)
Use Product Boosts to manually promote specific products in category rankings during a campaign. Boosts add a score value on top of normal ranking and expire automatically.
How to set it up
-
Go to: Moogento > SmartListings > Product Boosts
-
Click Add New Boost and complete the form:
- Products - select one or more products using the product picker
- Boost Value - enter a value between -100 and +100 (positive = promote; negative = demote)
- Label - an admin-facing label such as "Summer Sale" or "VIP Range"
- Start Date / Expiry Date - set campaign dates; the boost activates and deactivates automatically
- Categories - leave blank to apply to all categories, or select specific ones
-
Click Save. The boost is active immediately; no score refresh is needed.
Notes
- A single boost rule can target multiple products - useful for promoting a full supplier range without creating separate rules.
- Manual boosts never override in-stock prioritisation: an OOS product with a high boost still appears below in-stock products when Push Out-of-Stock to Bottom is enabled.
- Use the CSV export/import commands (
smartlistings:boost:export/smartlistings:boost:import) for bulk operations.
Headless and PWA storefronts (Pro)
If your storefront reads categories from Magento's GraphQL API (a PWA or headless build), SmartListings on the Pro plan ranks its category pages the same way as your normal category pages. There is nothing to set up:
- Boosts and priority bands apply.
- With Push Out-of-Stock to Bottom on, out-of-stock products sit at the bottom.
- With Hide: EOL (+OOS) Products on, products that are both end-of-life and out of stock are left out.
- Manual cross-category inserts appear in the same slots. Behaviour-driven inserts appear on the Magento storefront only.
- Product counts, page counts and filter counts match your normal category pages.
A few things work differently:
- It applies to category queries, including
productsfiltered by category and a category's ownproductslist. Search results keep Magento's relevance order. - With the built-in search engine and Push Out-of-Stock to Bottom turned off, headless pages rank across the whole category, so the products on a given page can differ from the storefront.
- To offer the in-stock / out-of-stock filter, add
smartlistings_stock: {eq: "instock"}(or"outofstock") to thefilterof a category query. It works only when Show: Availability Filter is on, and is ignored on other plans. - Personalised results apply to the Magento storefront only. Headless pages show the same order to every shopper.
Enable personalised category results for returning customers (Pro)
On the Pro plan, SmartListings can reorder category products based on each visitor's browsing and purchase history.
How to set it up
-
Go to: Stores > Configuration > Moogento > SmartListings > Behaviour-Based Merchandising
-
Set:
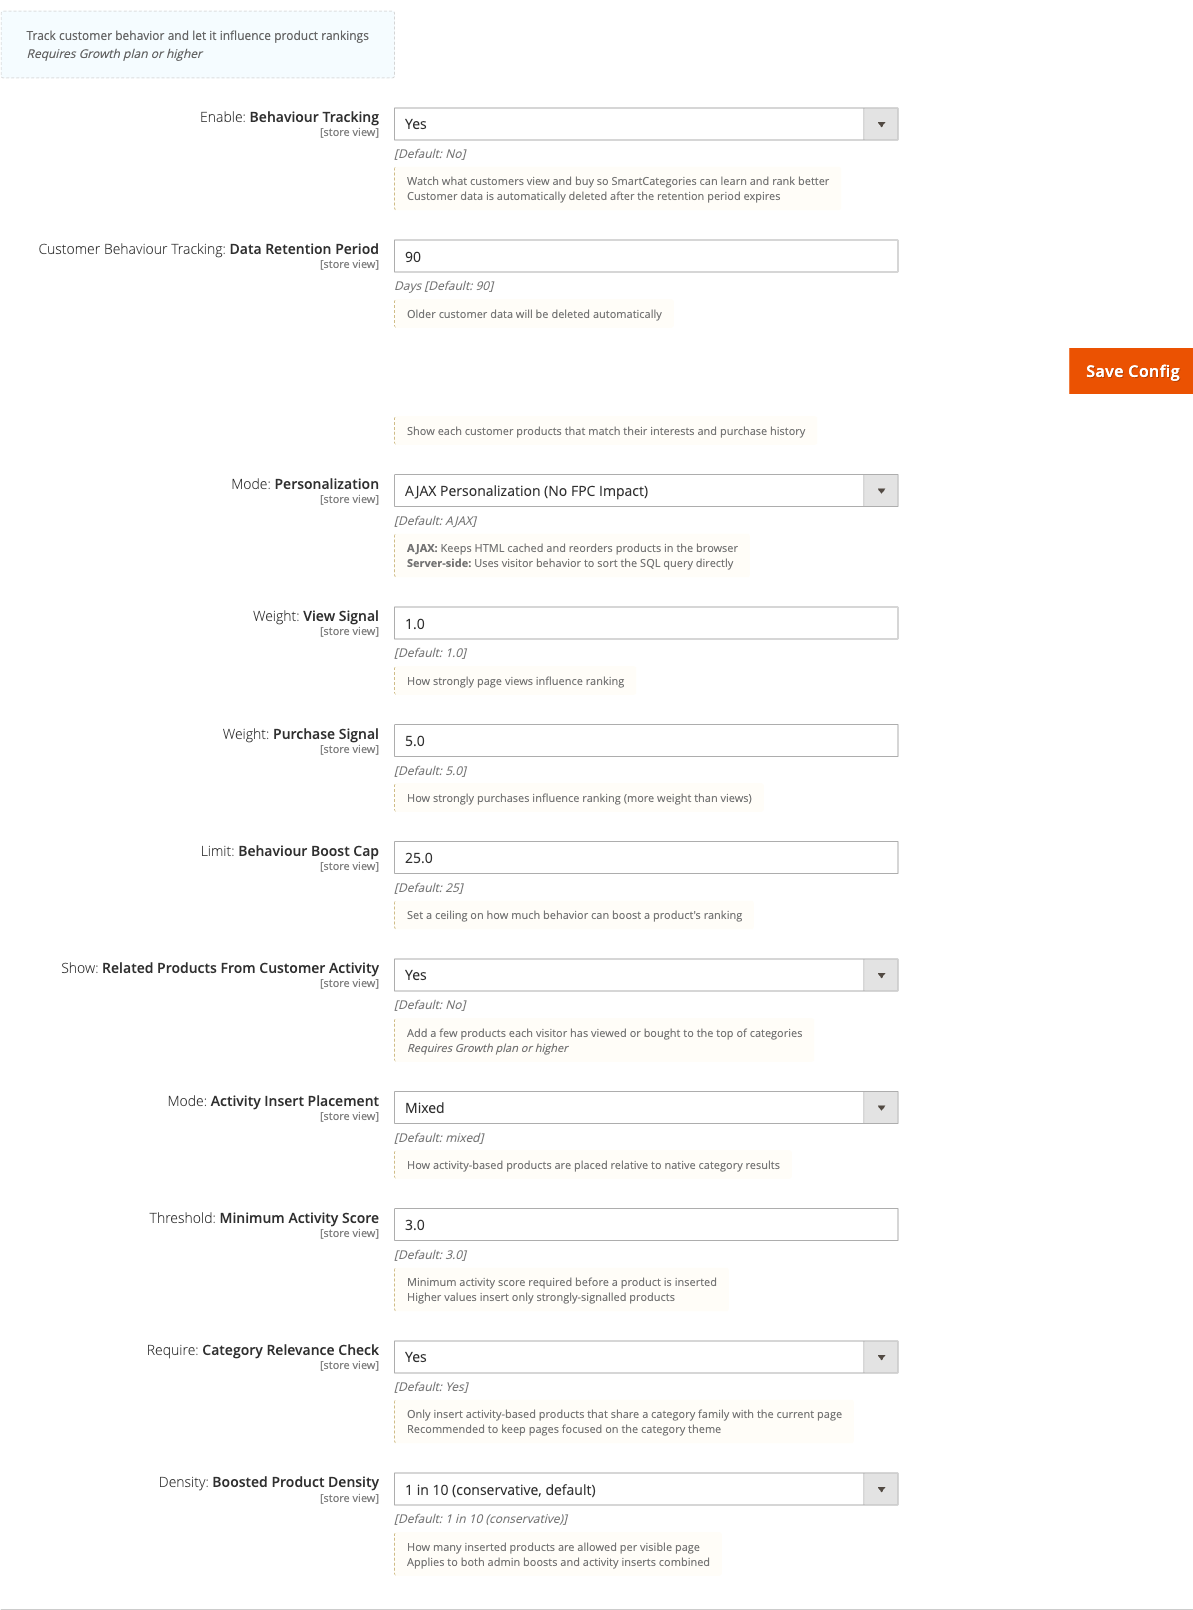
- Enable: Behaviour Tracking = Yes
- Enable: Personalized Results = Yes
- Mode: Personalization = AJAX (recommended; keeps HTML cached and reorders in the browser) or Server-side (ranks at the SQL level)
- Customer Behaviour Tracking: Data Retention Period = 90 (days; older signals are deleted automatically)
-
Save Config and run
php bin/magento cache:clean.
Notes
- Behaviour data starts accumulating from the moment tracking is enabled. Personalisation quality improves as signals build up.
- On Growth plan, tracking is enabled but behaviour signals are used for attribution only - not for reranking. Reranking requires Pro.
- AJAX mode is fully compatible with Magento's full-page cache because personalisation happens in the browser after the cached page is served.
Stop re-suggesting a product a shopper just bought
Someone who has just bought a water filter does not want that filter at the top of their next visit. SmartListings can hold a product back from that shopper's personalised results until enough time has passed for them to need it again, then bring it back when they are due to reorder.
This runs on the Pro plan, alongside personalised results.
How to set it up
-
Go to: Stores > Configuration > Moogento > SmartListings > Behaviour-Based Merchandising
-
Set:
- Enable: Behaviour Tracking = Yes
- Enable: Personalized Results = Yes (the wait applies to personalised ranking, so this must be on for it to have any effect)
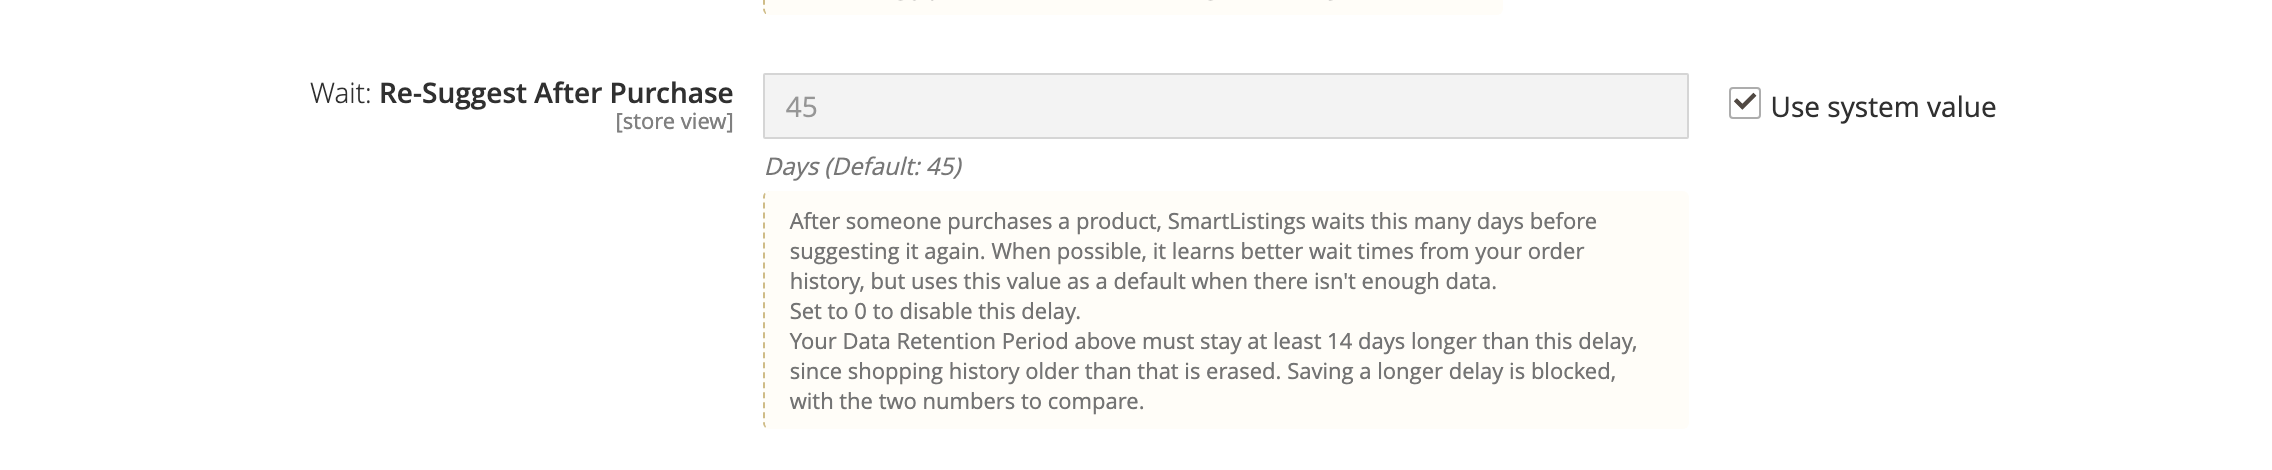
- Wait: Re-Suggest After Purchase = 45 (days, or whatever suits your catalogue)
-
Save Config.
How the wait is worked out
SmartListings uses the most specific figure it has for each shopper and product:
- What that shopper does. If they have bought the product more than once, SmartListings measures the gaps between those purchases and uses the middle value. Someone who reorders coffee every three weeks gets three weeks.
- What everyone does. With no repeat history for that shopper, SmartListings uses the typical gap across all customers who have repeat-bought that product.
- Your setting. With neither of the above, the number in Wait: Re-Suggest After Purchase applies.
Learned figures are worked out overnight and are kept between 7 and 60 days, so an unusual one-off gap cannot produce a wait of several years.
When the wait is over
Once the wait has passed, the product returns to the shopper's personalised results at its full purchase weight. It is not held back any longer and it is not weakened by how long ago the purchase was, so a product that is genuinely due to be reordered competes on the same footing as one bought yesterday.
Notes
- Guest orders are not affected. The wait needs a customer account to know who bought what.
- Views and cart activity still count during the wait. Only the purchase itself is held back, so a shopper who keeps browsing the product still sees it.
- Set the field to 0 to switch the whole thing off, including the overnight learning.
- Your Data Retention Period must stay longer than the wait. Shopping history is deleted once it passes that age, so a wait that reaches it would mean the product never comes back at all. Admin blocks a combination that would do this and tells you which number to change.
Add a Related Products widget to product pages
The SmartListings Product Block widget can act as a smart related-products panel on product detail pages (PDPs). It cascades through Magento related products, upsell products, cross-sell products, and category siblings - returning the first non-empty group sorted by SmartListings composite score.
How to set it up
-
Go to: Content > Pages (or Content > Blocks) > [page] > Insert Widget > SmartListings Product Block
-
Set:
- Source Mode = Related Products (PDP cascade, sorted by SmartListings)
- Cascade Stages - choose which stages to include and their order: Related, Upsell, Cross-sell, Category siblings. The widget tries each stage in the listed order and uses the first one that returns products (unless First Match Wins is off).
- Show Only When Source Product OOS - set to Yes to display this panel only when the source product is out of stock; leave No to always show it.
- Category Fallback Scope - for the Category Siblings stage, Primary uses the deepest assigned category; Any expands to all shared categories.
-
Set the Title (leave blank to hide the heading) and configure display options (Navigation Style, Add to Cart, Show Reviews, etc.).
-
Save the page or block.
Notes
- When the widget is on a PDP, it automatically reads the current product from the page context. No need to enter a product ID.
- Products are sorted by their store-wide composite score - no category context is used in the scoring for this mode.
- Products without a score-cache row sort last rather than being excluded.
- Attribution: when a shopper adds a product to cart from this widget, the sale is credited to SmartListings in ProfitEasy reports with
widget_contextset to the resolved cascade stage (related, upsell, crosssell, category, or mixed).
Show only in-stock products in CMS widgets
CMS Product Block widgets (carousels, grids placed on CMS pages and blocks) hide out-of-stock products by default. If every product in the configured group is out of stock, the widget falls back to showing them so the carousel never renders empty.
How to set it up
-
Go to: Content > Pages (or Content > Blocks) > [page] > Insert Widget > SmartListings Product Block
-
Configure the widget as usual (source mode, categories or SKUs, image preference, etc.).
-
Set:
- Include Out-of-Stock Products = Default (hide out-of-stock; show them if all products are unavailable) (recommended)
- Yes if you want the widget to always show out-of-stock products
- No if you want the widget to always hide out-of-stock products even when the result would be empty
-
Save the page or block. No
cache:cleanneeded for new widgets.
Notes
- The default applies automatically to new widget instances; no manual setup is required to keep out-of-stock products out of carousels.
- Earlier versions followed the global Magento setting Stores > Configuration > Catalog > Inventory > Display Out of Stock Products. The widget now decides on its own. If a store had that global set to Yes and relied on widgets following it, set the widget's Include Out-of-Stock Products parameter to Yes to restore the previous behaviour on a per-widget basis.
- The fallback runs only in Default mode. Yes never hides; No never falls back.
- Cache: when a hidden product later returns to stock, the cached widget HTML may still omit it until the page's full-page cache TTL expires or
cache:cleanis run. This is a limitation of Magento's block cache, not a SmartListings quirk.
Filter a widget by product attributes
Use Conditions on a SmartListings Product Block widget to show only products that match attribute rules, for example only one brand or only products in a given colour. The rules work the same way as the conditions on Magento's own product list widget.
How to set it up
-
Go to: Content > Pages (or Content > Blocks) > [page] > Insert Widget > SmartListings Product Block
-
Choose a Source Mode other than Related Products (PDP cascade). Conditions apply to Products on special, New arrivals, Products from selected categories, Manually selected products and Products with active boosts.
-
Open Conditions, add a rule (for example, Brand is one of a chosen value), and add more rules if needed. Choose whether all rules or any one rule must match.
-
Save the page or block.
Notes
- Each attribute used in a rule must have Use for Promo Rule Conditions set to Yes (Stores > Attributes > Product, open the attribute, then the Storefront Properties tab). Attributes without it do not appear in the rule builder.
- Rules check each product itself. If an attribute is only set on the child products of a configurable product (for example colour on each simple), the parent configurable does not match it. Set the attribute on the configurable product as well, or use a different attribute.
- Manually selected products that do not match the rules are left out of the widget.
- Related Products (PDP cascade) ignores the conditions. Its stages are chosen by the cascade, not by these rules.
- If the saved conditions cannot be used (for example the stored rules are damaged), the widget shows no products rather than unfiltered ones. Open the widget, check the Conditions and save it again.
- Rules on Price use the price shown to the shopper's customer group, so each customer group gets its own saved product set for that widget.
- Allow Behaviour Inserts can still add products from the shopper's recent browsing, even when they do not match the rules. If the rules must be strict, set Allow Behaviour Inserts to No.
Choose the order of a widget's products
Use Sort By on a SmartListings Product Block widget to choose the order its products appear in.
How to set it up
-
Go to: Content > Pages (or Content > Blocks) > [page] > Insert Widget > SmartListings Product Block
-
Pick a Sort By option:
- Source default: keeps the order each source mode has always used. Existing widgets use this, so nothing changes until you pick something else.
- SmartListings ranking: best-performing products first, with your manual boosts applied.
- Newest first: newest products first, by the date they were added (or Set Product as New From, if your store uses that date for SmartListings). Products added on the same day follow SmartListings ranking.
- Best sellers: products that sell fastest first.
- Price: low to high and Price: high to low: by the price each shopper's customer group sees.
- Order entered: the order you typed the products in. Only for Manually selected products.
-
Save the page or block.
Notes
- When Push out-of-stock products to the bottom is on, in-stock products always come first, whatever the sort.
- Best sellers uses sales data from the Pro plan. Without it, the widget falls back to SmartListings ranking. After an upgrade, sales data fills in at the next score refresh (within a few hours).
- Any order other than Source default or SmartListings ranking switches off per-shopper personalisation and behaviour inserts for that widget, so shoppers see exactly the order you chose.
- Related Products (PDP cascade) ignores Sort By. Its stages decide the order.
Advanced configuration
Category-level overrides
What it does
Every category has a SmartListings tab in the category edit form (Catalog > Categories > [category] > SmartListings tab). Settings here override global configuration for that category only.
Available per-category settings:
- Enable or disable SmartListings for the category
- OOS message override (inherits from parent if left blank)
- Hide from menu when OOS
- Optimisation mode: Performance-First, Behaviour-First, or Balanced (Pro)
Setup
- Open Catalog > Categories and select a category.
- Click the SmartListings tab.
- Change the settings and save the category.
Notes
- The OOS message resolves by walking up the category ancestor chain: current category -> parent -> grandparent -> global config -> built-in default.
- Category-level overrides are only available after the category has been saved at least once.
Priority Bands (Pro)
What it does
Priority Bands let you pin specific products permanently to the top or bottom of every category they belong to, regardless of stock, behaviour, or performance scores.
- Always Promote - product is forced to score 999,999 (appears first)
- Never Promote - product is forced to score -999,999 (appears last)
Setup
Set the Priority Band on a boost rule in Moogento > SmartListings > Product Boosts.
Notes
- Always/Never Promote overrides all other scoring including manual boosts.
- Use sparingly: pinning too many products reduces the value of automated ranking.