

This page is part of the ProfitEasy guide. Start there for what the extension does, installation and the frequently asked questions.
Enable ProfitEasy and show profit on the dashboard
Turn the module on and confirm profit and AOV widgets are visible on the admin dashboard.
How to set it up
-
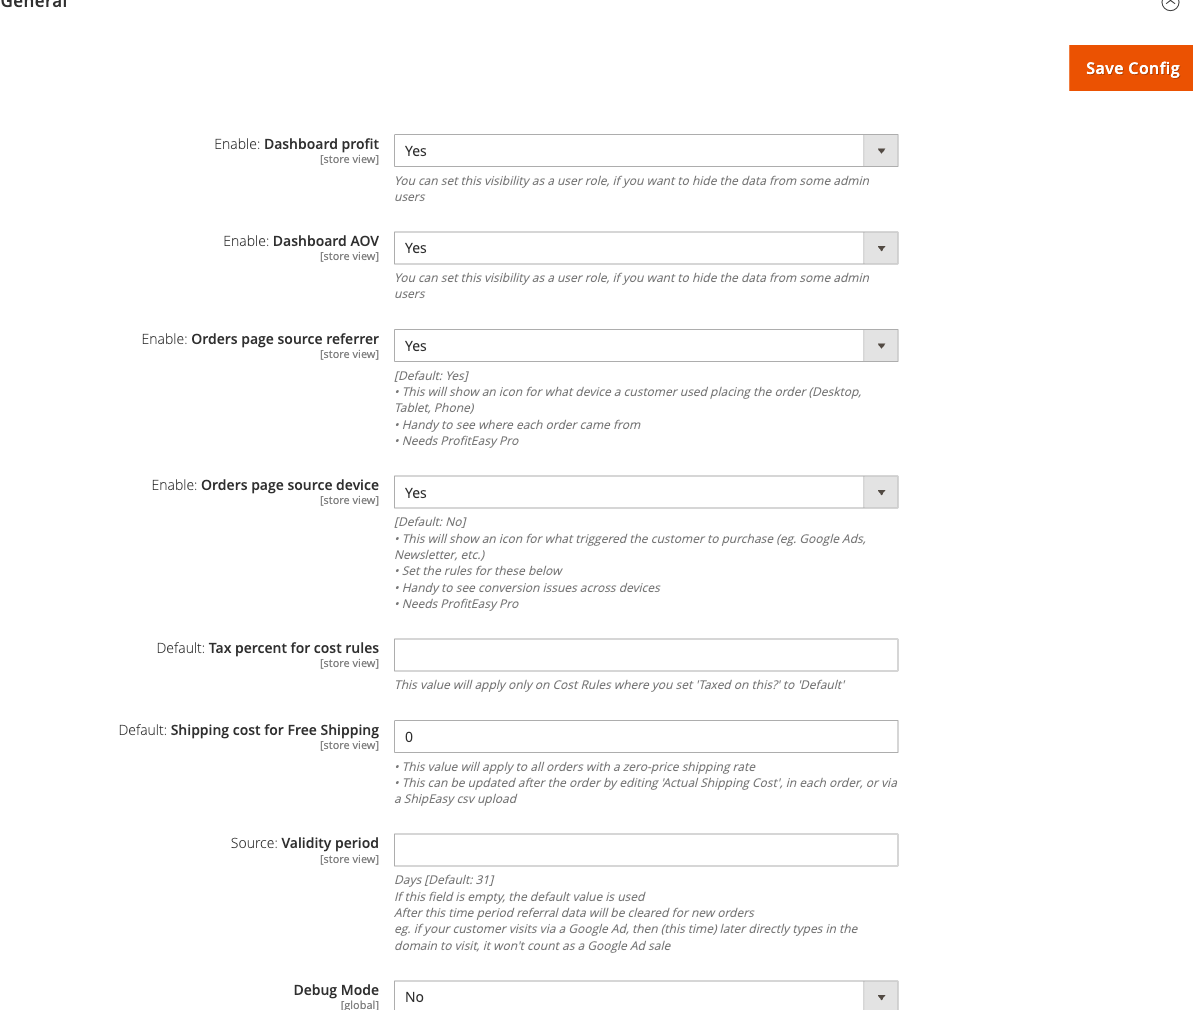
Go to: Stores > Configuration > Moogento > ProfitEasy > General
-
Set:
- Enable = Yes
- Enable: Dashboard profit = Yes
- Enable: Dashboard AOV = Yes (
moogento_profiteasy/moo/show_dashboard_section_aov)
-
Click Save Config, then run
php bin/magento cache:clean.
Notes
- Dashboard AOV requires a Pro license - the widget will not appear on a Seed plan even if this setting is Yes.
- You can set each dashboard toggle as a user-role permission to hide profit data from specific admin accounts.
Set up cost rules so profit figures are accurate
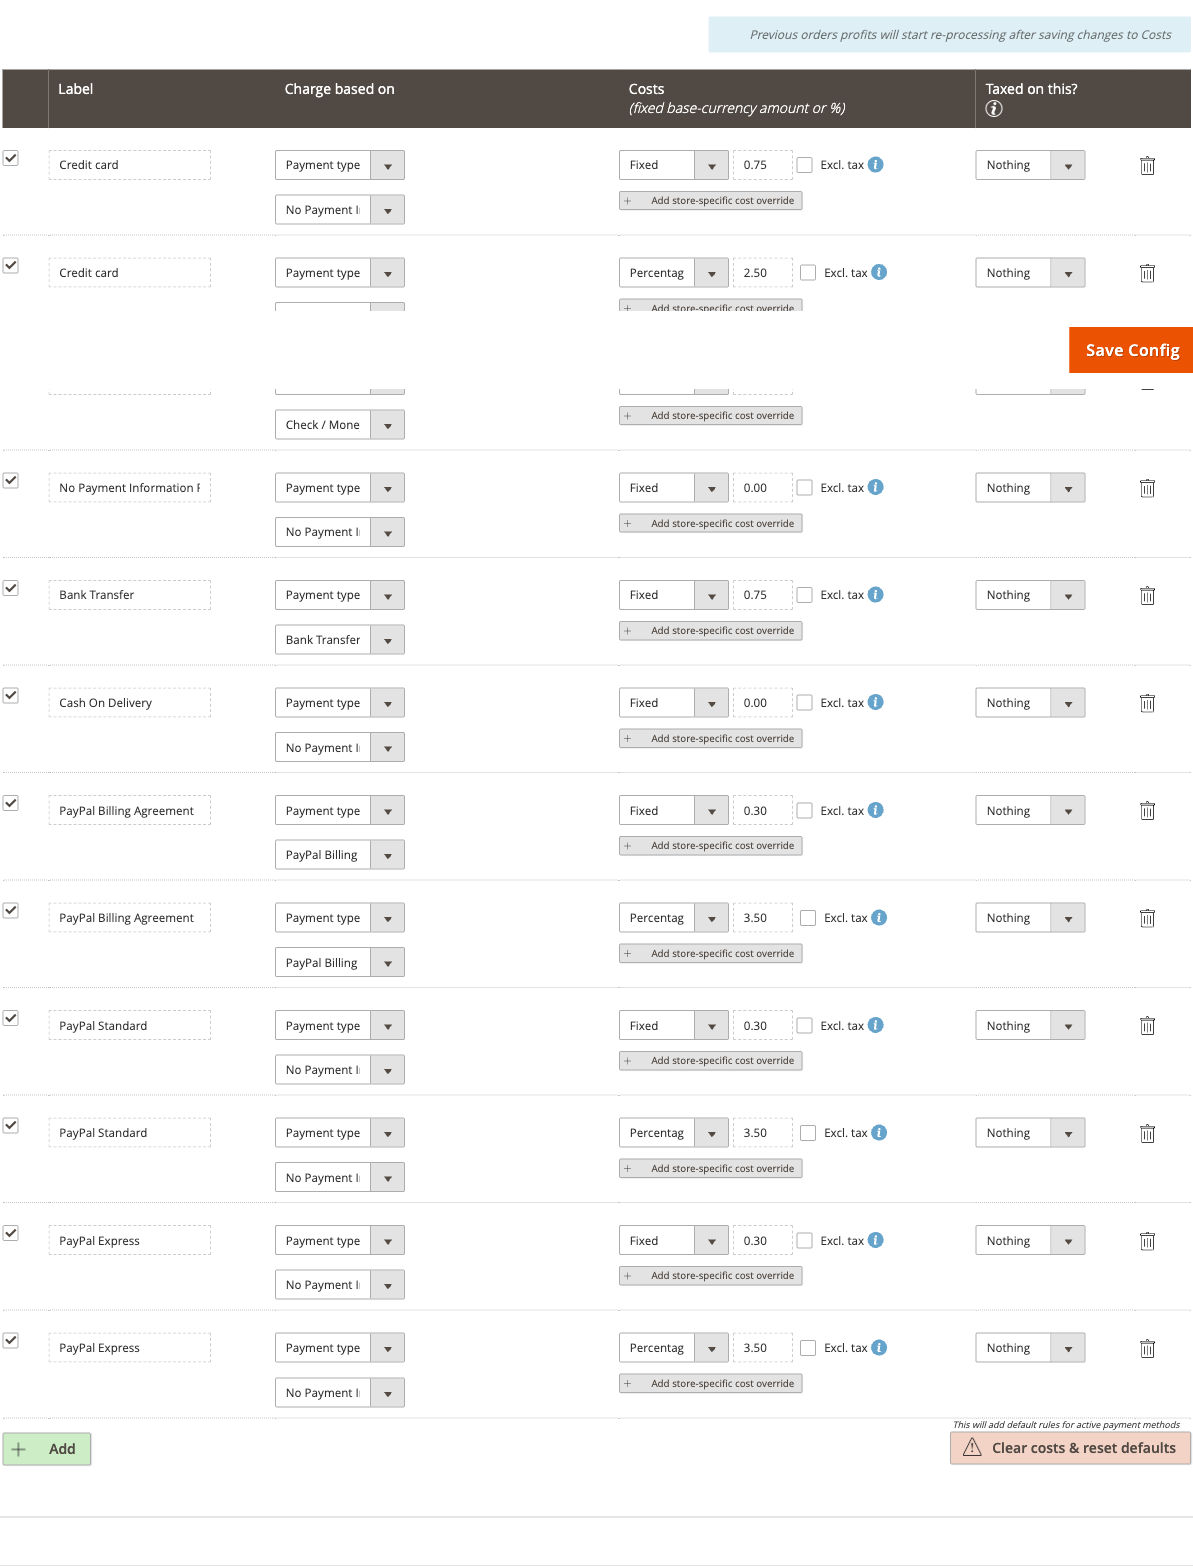
ProfitEasy calculates profit by subtracting cost rules from each order's revenue. Until you configure at least a product cost rule, profit figures will equal revenue.
How to set it up
-
Go to: Stores > Configuration > Moogento > ProfitEasy > Cost rules
-
In the cost rules table, click Add Cost and configure each row:
- Name - a human-readable label (e.g. "Default shipping cost")
- Type - Fixed amount, Percentage of order total, or Payment method fee
- Taxed on this? - set to Default to apply the global tax rate you set in General, or enter a specific rate
-
Set Default: Tax percent for cost rules (
moogento_profiteasy/moo/default_tax) in the General group to your standard tax rate so "Default" rules deduct the right amount. -
Set Default: Shipping cost for Free Shipping (
moogento_profiteasy/moo/free_shipping_cost) to your average fulfilment cost. This value is applied to all orders with a zero-price shipping rate. You can override it per order by editing Actual Shipping Cost on the order view, or in bulk via a ShipEasy CSV upload. -
Click Save Config.
Notes
- A fresh install seeds common payment-method cost rows automatically - review these before going live.
- Per-order shipping cost can always be adjusted after the order is placed; the cron recalculates profit every 10 minutes.
Configure traffic source attribution
Source rules classify the referrer URL stored with each order on Growth or Pro. Showing the referral column on the orders grid requires Pro.
How to set it up
-
Go to: Stores > Configuration > Moogento > ProfitEasy > Sources

-
In the sources table, add or edit rules:
- Pattern - a URL pattern or UTM parameter value to match (e.g.
google.com,utm_medium=email) - Icon - the icon shown in the orders grid for matching orders
- Priority - higher-priority rules win when multiple rules match the same referrer
- UTMs optional - when enabled, a visit with no UTM parameters (or UTMs that do not match the rule's values) does not disqualify the rule. The rule can still win on a matching domain alone. Disable this on CPC or paid-ads rules where UTM presence is required to distinguish paid from organic traffic. Default rules for AI referrers (ChatGPT, Claude, Gemini, and others) and organic search engines (Google, Bing, DuckDuckGo) have this enabled out of the box.
- Pattern - a URL pattern or UTM parameter value to match (e.g.
-
On Pro, set Enable: Orders page source referrer = Yes (
moogento_profiteasy/moo/show_orders_source_referrer) in the General group to display the referrer icon column on the Sales > Orders grid. -
On Pro, optionally set Enable: Orders page source device = Yes (
moogento_profiteasy/moo/show_orders_source_device) to display the device icon column. -
Set Source: Validity period (
moogento_profiteasy/moo/referer_expires) to the number of days a referral cookie remains valid (default: 31). After this window, a returning customer who types the domain directly is counted as Direct, not attributed to the original campaign. -
Click Save Config.
Notes
- Source attribution requires a Growth or Pro license.
- SmartListings and SmartCart attribution is automatic - orders influenced by those modules appear under their respective source channels without manual rules. For what the SmartListings boost types and widget-placement labels on the order view mean, see Sale source and boost types in the SmartListings guide.
- Payment services are never recorded as a sale source. When a shopper passes through PayPal, Stripe, Braintree, Klarna, Afterpay, Zip, humm, Latitude, Laybuy, Square, Adyen or a bank's card-check page on the way to paying, that step is skipped. Orders placed before this change keep the sources they already have.
- When SmartCart helped an order, the order view says how many items it helped sell, for example "SmartCart helped sell 5 of 15 items", and lists every order line with its quantity and line total. Lines SmartCart did not touch are shown as "Not from SmartCart", and each helped line has one sentence explaining where the suggestion was shown. Campaign tags and the referring domain for each source sit behind a details toggle.
See untagged referring domains before you add a source rule
Above the Sources rule table, ProfitEasy lists referring domains that produced orders in the recent order history but carried no campaign tags, so no source rule could match them. Use it to spot which domains are worth writing a rule for next.
How to set it up
There is nothing to turn on - the panel appears automatically on the Sources page whenever there is something to report.
-
Go to: Stores > Configuration > Moogento > ProfitEasy > Sources
-
Each listed domain shows how many orders in the window arrived from it with no campaign tags. Click Add a source rule for this domain to add a pre-filled row to the rules table below it, ready to review and save.
-
Optionally set Untagged Traffic Window (days) (
moogento_profiteasy/mooreferer/untagged_window_days) to change how far back the scan looks (default: 90 days, maximum 730).
Notes
- The panel counts orders, not visits - a referral that never turned into an order does not appear here, even if it carried no campaign tags.
- It lists the busiest 10 domains. A footnote tells you how many more were found when there are more than that.
- Each scan reads the 5,000 most recent referrals in the window. A footnote appears when that limit is hit, since there may be more untagged domains further back than the scan reached.
- Results are cached for about an hour, so a domain can take a little while to drop off the list after you add a rule for it.
- A domain already covered by an enabled rule that would still match an untagged referral is left off the list, since a rule already exists for it.
- Domain names longer than 50 characters do not get the quick-add button - add a rule for them by hand instead.
Tag email links with campaign values automatically
Adds moo_utm_* template variables that tag the links in your transactional and newsletter emails with campaign values, so renaming a campaign never means re-editing every email template.
How to set it up
-
Go to: Stores > Configuration > Moogento > ProfitEasy > Emails: Link Tagging
-
Set:
- Enable (
moogento_profiteasy/email_utm/enable) = Yes - utm_source (
moogento_profiteasy/email_utm/utm_source) - utm_medium (
moogento_profiteasy/email_utm/utm_medium) - utm_campaign (
moogento_profiteasy/email_utm/utm_campaign) - leave blank to use each email template's own code as the campaign value, so every email reports separately
- Enable (
-
Add one of the variables to a link in the body of an email template:
moo_utm_link_query- for a link with no query string yet; carries its own leading?moo_utm_amp_query- for a link that already has a?; carries its own leading&moo_utm_query- the bareutm_source=...&utm_medium=...&utm_campaign=...fragment, for building the query yourselfmoo_utm_source/moo_utm_medium/moo_utm_campaign- the individual values
For example:
<a href="https://moogento.com/checkout/cart{{var moo_utm_link_query}}">Your cart</a> -
Click Save Config.
Notes
- Only letters, numbers,
_,.and-are accepted in utm_source, utm_medium and utm_campaign - anything else is left out of the tag. - The variables work in the body of an email template only; email subject lines are not covered.
- Directives cannot be nested, so a
{{var moo_utm_...}}variable cannot go inside a{{store}}directive's parameters. For a{{store}}link that already carries a query, such ashttps://moogento.com/catalogsearch/result?q=shoes, add the tags inside the link instead with_query_utm_source,_query_utm_mediumand_query_utm_campaign. - These variables also reach newsletter templates. A medium of
transactionalconfigured here would label newsletter clicks as transactional too, so tag newsletter links yourself if you send both kinds of email. - When link tagging is off, every variable resolves to an empty string, so links keep working with no stray
?or&.
Find and tag the email links that are still missing campaign tags
Scans your saved and shipped email templates for links that could carry campaign tags but don't, then gets you into Magento's own template editor with the fix already typed in. ProfitEasy never edits a template itself - Magento's own Save button does the write, so you stay in control of what changes.
How to set it up
-
Go to: Moogento > ProfitEasy > Email Link Tagging
-
Each template with something to report gets a row showing how many links fall into each group: links using a
{{store}}directive or one of your own web addresses that ProfitEasy can tag automatically, links built when the email is sent that can only be flagged for you to review by hand, links already tagged, and links left alone on purpose. -
Click Open and pre-fill to use the setting-driven variable form, or Open with fixed values instead to write the campaign values straight into the template. Either one takes you to Magento's own template editor with the edit already typed into the template body - review it, then press Save yourself.
-
Click Show before and after to preview the template with and without the change before opening it.
-
If a listed template ships as a file default rather than a saved database row, click Create an editable copy first, then point the setting that uses that template at the new copy in Stores > Configuration. The file default keeps rendering until you do.
Notes
- Campaign tagging must be switched on (see "Tag email links with campaign values automatically" above) for any tag added here to actually appear once the email is sent. The screen warns you when it is off and links straight to the setting.
- The variable-driven option keeps values in sync with your settings; the fixed-values option writes today's values into the template text, so a later change to utm_source, utm_medium or utm_campaign in config will not reach that template until you re-run the tagging here.
- Links built from
{{var ...}}directives at send time are reported but never rewritten automatically, since the actual web address does not exist until Magento sends the email - review and tag those by hand. - Unsubscribe and email-preference links are never tagged. ProfitEasy recognises them by wording in the web address, so a custom or translated preference-centre address may not be recognised - and those links must never carry campaign tags regardless.
- Links pointing to a domain other than your store are left alone.
- If a template changes after ProfitEasy prepared an edit for it, opening that edit refuses to pre-fill and asks you to rescan instead, so a newer edit is never silently overwritten.
- If your email service rewrites links for its own click tracking, the campaign tags still reach your store - they travel through the rewrite as part of the destination address.
Enable the product profit percentage column (Pro plan)
Add a color-coded profit percentage column to the catalog product grid so buyers and merchandisers can see margin at a glance.
How to set it up
-
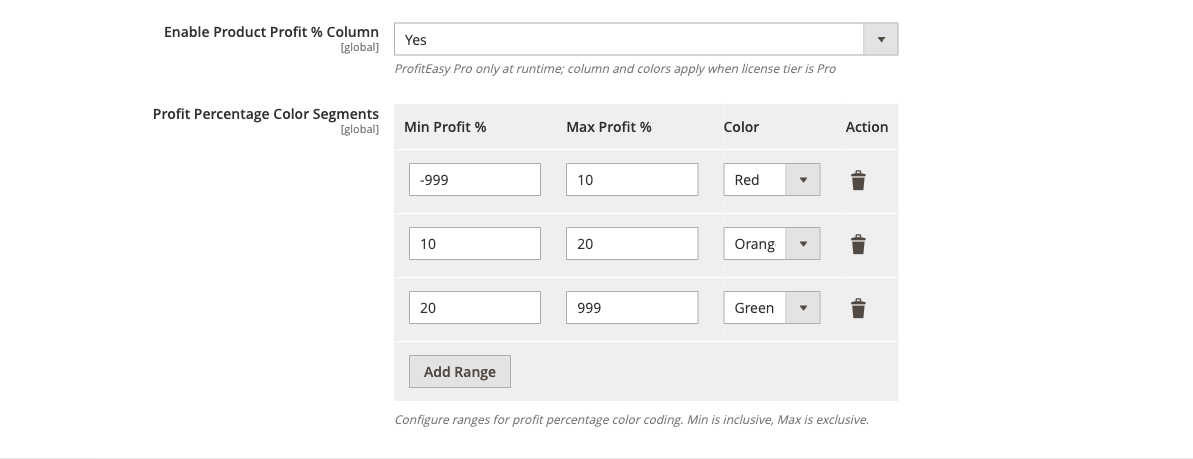
Go to: Stores > Configuration > Moogento > ProfitEasy > Product Grid Profit
-
Set:
- Enable Product Profit % Column (
profiteasy/profiteasy_grid/enabled) = Yes
- Enable Product Profit % Column (
-
In the Profit Percentage Color Segments table, configure one row per range:
- Min (inclusive) and Max (exclusive) - profit percentage boundaries
- Color - the background color applied to cells in that range
-
Click Save Config.
Notes
- This feature is enforced at runtime for Pro plan stores only. The column appears in the UI configuration on all plans, but the data only populates when the license is Pro.
- Profit percentages are recalculated nightly by the
UpdateProfitPercentQueuecron job (01:00 AM daily).
Features reference
Dashboard profit widgets
The admin dashboard gains two tiles when ProfitEasy is enabled:
- Profit widget - shows total profit for the selected date range. Controlled by
moogento_profiteasy/moo/show_dashboard_section_profit. - AOV widget - shows average order value for the period. Requires Pro plan. Controlled by
moogento_profiteasy/moo/show_dashboard_section_aov.
Both widgets automatically exclude orders in states canceled, closed, holded, and payment_review, as well as orders with status fraud, so cancelled or held orders do not inflate reported figures. The exclusion applies consistently across all three dashboard time panels (24 hours, 7 days, 30 days).
Both widgets respect admin user-role permissions. To hide profit data from a particular admin account, restrict access at the role level rather than toggling these settings globally.
Customer profile analytics
On every customer's edit page in the admin, ProfitEasy adds an analytics tab showing:
- CLV - cumulative revenue from that customer
- AOV - average of their order totals
- Order count - total number of orders
- Account age - days since registration
- Order age - days since their last order
- Order age spread - range between first and last order dates
- Initial and last device - whether they first ordered and last ordered on desktop, tablet, or mobile
Customer data is refreshed nightly by the UpdateCustomerData cron job (01:15 AM daily).
These fields require a Growth or Pro license.
Orders grid source and device columns
When Enable: Orders page source referrer is Yes, a referrer-source icon appears in Sales > Orders for each order. Hovering reveals the source label (e.g. "Google Ads", "Newsletter", "Direct").
When Enable: Orders page source device is Yes, a device icon (desktop/tablet/phone) appears alongside it.
Config path: moogento_profiteasy/moo/show_orders_source_referrer and moogento_profiteasy/moo/show_orders_source_device.
Both columns require a Pro license.
Order view source attribution cards
When you open an order in the admin, a Moogento module that helped with the sale can show a "How it helped" card in the Sale Source panel. SmartCart shows one today, and other Moogento modules add theirs as they are updated. A card that says "Matched by" is a best match rather than a recorded link, and a card titled "probably helped" is a likely connection that was not recorded.
When a module's card cannot point to specific items on the order, it shows the order's own value instead - for example "Order value: 2 items · $41" - so you can still see the scale of the sale without the card claiming credit for particular products.
StockEasy Integration
When Include Profit % in StockEasy Exports (profiteasy/stockeasy_integration/include_profit_in_export) is Yes and the StockEasy module is installed, the moo_profiteasy_profit_percent attribute becomes available in the StockEasy column selector for CSV and PDF exports.
Config path: Stores > Configuration > Moogento > ProfitEasy > StockEasy Integration
Requires Pro plan.
Advanced configuration
Product velocity attributes (Pro plan)
ProfitEasy calculates two product attributes on every product:
profiteasy_sales_velocity- distinct orders per day over the last 30 days (bulk purchases count as one order, preventing inflated velocity from high-quantity line items)profiteasy_profit_velocity- proportional profit per day over the same window, calculated as(row_total / subtotal) * order_profitfor each line item
These attributes are updated nightly by the UpdateVelocities cron job (01:30 AM daily). SmartListings reads them via ProfitEasyMetricsProviderInterface to power performance-based product ranking on category pages. Products with no sales in the lookback window are reset to 0 so stale values do not affect ranking.
Notes
- Velocity calculations only run when both ProfitEasy is enabled and the store has a Pro license. The cron exits early otherwise.
- The 30-day lookback window is not currently configurable from the admin.
Debug mode
Enable Debug Mode (profiteasy/general/debug_mode) in Stores > Configuration > Moogento > ProfitEasy > General to write detailed profit and referrer resolution logs to var/log/moogento_profiteasy.log.
Add ?moo_debug=1 to any storefront URL to trigger referrer tracking debug output in the log for that specific session.
Turn Debug Mode off on production once investigation is complete.