Difference between revisions of "picknscan Quickstart"
(Created page with "{{#description2:With Magento 1, pick products in the warehouse with a barcode scanner, then do the same to pack them directly into shipping boxes. Stop mistake shipments and s...") |
m |
||
| Line 24: | Line 24: | ||
See our [[Barcode_Scanners|scanner setup]] guide for more details. | See our [[Barcode_Scanners|scanner setup]] guide for more details. | ||
| + | ===Setup: Tablets=== | ||
| + | |||
| + | You can use this for most handheld devices. The aim is to have a single icon on the screen to click which launches the app. | ||
| + | |||
| + | It will result in the url address bar being hidden, which also provides more vertical screen space. | ||
| + | |||
| + | ====Safari / iPhone/iPad Homescreen==== | ||
| + | |||
| + | * In the Pick-n-Scan scan screen, tap the Share button (square icon with arrow heading out the top), scroll down the list of options, then tap 'Add to Home Screen'. | ||
| + | * You can then save a name (eg. Pick-n-Scan) and the appropriate icon will be saved to your device homescreen. | ||
| + | Note: The icon appears only on the device where you add it. | ||
| + | |||
| + | ====Chrome / Android/Zebra Homescreen==== | ||
| + | |||
| + | * In the Pick-n-Scan scan screen, tap the menu button (usually 3 x horizontal dots), then tap 'Add to Home Screen'. | ||
| + | * You can then save a name (eg. Pick-n-Scan) and the appropriate icon will be saved to your device homescreen. | ||
| + | Note: The icon appears only on the device where you add it. | ||
| + | |||
| + | ====Magento Tweaks==== | ||
| + | |||
| + | You can make the admin user session time long enough that once logged in the admin user won't need to re-login when the warehouse is on a standard process. | ||
| + | |||
| + | Set that (eg. to 3 x days) according to the standard [https://docs.magento.com/user-guide/stores/admin-session-lifetime.html Magento instructions]. | ||
===Setup: Label trolley boxes=== | ===Setup: Label trolley boxes=== | ||
Revision as of 21:06, 23 November 2022
Contents
Aims & Preparation
Installation is included if you get the Installation & Setup Service
Follow the Easy Install Guide to get pickNscan up and running.
Make sure you have your Magento Cron running - pickNscan uses it to calculate the profit on each order
We're going to have a look at pickNscan, and get you setup with rapid picking & packing.
pickNscan Speeds Up Order Processing with Per-item & Per-order Picking/Packing
Via a barcode scan on mobile/warehouse-optimised layout, you won't know how you got by without it.
Setup
This is fast, most standard options are preset.
Setup: Scanners
We recommend using a bluetooth laser handheld scanner, into an iPad.
See our scanner setup guide for more details.
Setup: Tablets
You can use this for most handheld devices. The aim is to have a single icon on the screen to click which launches the app.
It will result in the url address bar being hidden, which also provides more vertical screen space.
Safari / iPhone/iPad Homescreen
- In the Pick-n-Scan scan screen, tap the Share button (square icon with arrow heading out the top), scroll down the list of options, then tap 'Add to Home Screen'.
- You can then save a name (eg. Pick-n-Scan) and the appropriate icon will be saved to your device homescreen.
Note: The icon appears only on the device where you add it.
Chrome / Android/Zebra Homescreen
- In the Pick-n-Scan scan screen, tap the menu button (usually 3 x horizontal dots), then tap 'Add to Home Screen'.
- You can then save a name (eg. Pick-n-Scan) and the appropriate icon will be saved to your device homescreen.
Note: The icon appears only on the device where you add it.
Magento Tweaks
You can make the admin user session time long enough that once logged in the admin user won't need to re-login when the warehouse is on a standard process.
Set that (eg. to 3 x days) according to the standard Magento instructions.
Setup: Label trolley boxes
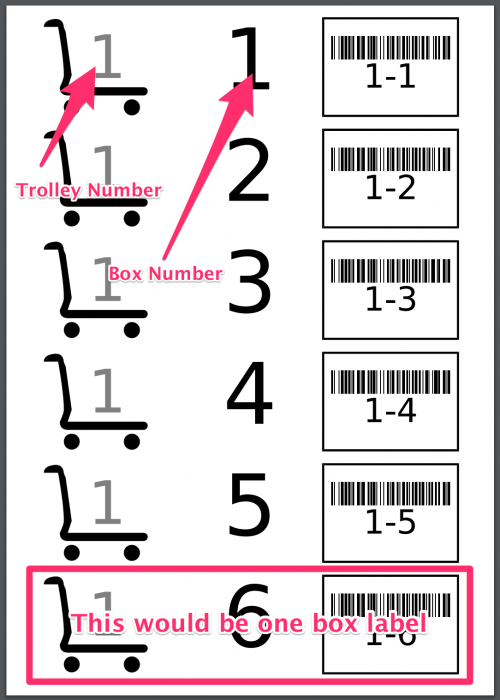
If you're picking using individual boxes on a trolley, then the first step is to label the boxes.
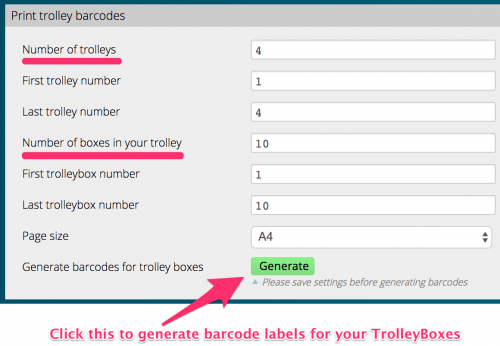
Pick-n-Scan has a handy button to create the labels:

- Head to SystemConfig > Moogento / Pick-n-Scan -> Print Trolley Barcodes
- Make the settings to match your setup (specifically, how many trolleys you're running and how many boxes you have on each trolley).
- Find the Generate barcodes for trolley boxes button
- The resulting printout can be cut and stuck onto your trolley boxes

Usage
There's a few different ways of using Pick-n-Scan, you can use them together, or on their own.
Picking Products
In the warehouse, grabbing items off shelves, for specific orders.
- Select an order, or orders, to process in the Orders page
- Click one of the new scan buttons in the same page
- You'll be directed into your new Pick-n-Scan scanning page
- It'll then show you the SKU to find, and the location to find it in
- You can also set it up to show specific product attributes, the product image, etc
Packing Orders
At the packing desk, scanning orders, and verifying each item into the order box.
- Scan the Order ID barcode (from the pickPack Packing Sheet or Picklist
- Pick-n-Scan will show each item that should be in the box
- Scan each item and out in the box
- When each order is done, Pick-n-Scan will change the order status to Shipped (or whatever status you've set in the config)
That's it! Setup is easy, using it is easy - what are you waiting for!
TrolleyBox Picking
If you're packing orders with Trolleys in your warehouse, you'll want to use the Trolleybox integration of Pick-n-Scan.
- Make sure you've got trolleyBox installed and active
- Select a couple orders and get into the Pick-n-Scan screen
- Select 'TrolleyBox Picking?'
- Enter the number of boxes on your trolley
- Start!
The standard setup here is a clipboard with your trolleyBox picklist on it, each Packing Sheet in each box, and away you go.
Pick-n-Scan will then tell you which box number to put each product in.
• Choose 'PDF TrolleyBox Picklist' from the Orders Page action menu to get the picklists printed.
• In the config, choose if you want to print the Packing Sheets at the same time.
