Overview
ShipEasy transforms the standard Magento orders grid into a full-featured order management workspace. It adds custom columns - SKUs, product images, live stock levels, revenue, shipping rules, tags, customer avatars, eBay user IDs, and custom product attributes - alongside mass-action tools, inline editing, CSV import, and a barcode-scan interface.

ShipEasy is not a rate-shopping or label-generation tool. It enriches and speeds up the orders-grid workflow your fulfilment team uses every day.
This module helps you:
- See everything about an order at a glance without opening the order detail page
- Apply bulk status changes, invoicing, shipping, and tagging to dozens of orders in one click
- Automate carrier routing by building ShipRules that match orders by weight, dimension, postcode, or shipping method
- Update order data in bulk by uploading a CSV from your carrier or 3PL
- Create Zendesk support tickets directly from an order row (Pro plan)
When to use this
Use ShipEasy when you want to:
- Process high order volumes faster by replacing repeated order-detail page visits with grid-level actions
- Route orders to the right carrier automatically based on weight, size, or destination
- Let warehouse staff scan barcodes to confirm picks and ship orders without using the mouse
- Import tracking numbers from a carrier CSV in one batch rather than entering them one by one
- Surface stock-level warnings on the grid so you can catch back-order problems before they ship
Key capabilities for Magento 2 orders grid management
- Custom grid columns - add SKUs, images, stock levels, revenue, tracking, tags, priority, and more to the orders grid
- ShipRules engine - auto-assign a routing tag to orders based on weight, max dimension, postcode, SKU count, or shipping method
- Mass actions - change status, invoice, ship-and-invoice, update tags, add/remove tracking, and print for multiple orders at once
- Inline editing - update order status, shipping address, customer email, printed flag, priority, and ShipRule without leaving the grid
- Barcode scan - scan order IDs or tracking numbers to process shipments at the warehouse
- CSV import - upload a carrier CSV to add tracking numbers and update order data in bulk
- Carrier auto-detection - infer the correct carrier from tracking number format automatically, with an editable pattern table for UK, US, and AU carriers
- Zendesk integration - open a ticket creation form from any order row (Pro plan)
- Row colorising - colour-code grid rows by order status to spot priorities instantly
Installation
ShipEasy installs via Composer, then activates with a license key from your Moogento.com account. The whole flow takes about 5 minutes.
Step 1: Get your Composer keys from Moogento.com
- Sign in at https://www.moogento.com and open My Plugins in your account menu.
- Find ShipEasy in the list of plugins you own.
- Generate (or reveal) the Composer access keys for that plugin - a public key and a private key.
- Add your install domain to the key. Each Composer key is tied to a specific domain - if you're installing on
yourstore.com, addyourstore.comto the key's allowed domains. The Composer download will be rejected on any other domain.
If you run staging and production on different domains, add both - separate keys per environment are fine too.
Step 2: Install the module with Composer
From your Magento 2 root directory:
composer require moogento/module-shipeasy
When Composer asks for credentials, paste the public key as the username and the private key as the password. They'll be cached in ~/.composer/auth.json for future runs.
Step 3: Enable the module in Magento
php bin/magento setup:upgrade
php bin/magento setup:di:compile
php bin/magento cache:clean
If you run php bin/magento module:status Moogento_Shipeasy you should see it listed as enabled.
Step 4: Add your license key in the Moogento admin
- Still on https://www.moogento.com > My Plugins, copy the license key for ShipEasy (separate from the Composer keys you used above).
- In your Magento admin, go to Stores > Configuration > Moogento > Licenses.
- Find the row for ShipEasy and paste the license key.
- Click Save Config, then run
php bin/magento cache:cleanonce.
The license validates within a few seconds. You should see the module's status flip to active. If it stays inactive, double-check the domain on the license matches where you've installed - domain mismatch is the most common cause.
Setup overview
Most setup happens in:
Stores > Configuration > Moogento > ShipEasy
You'll mainly work with these groups:
- General - enable the module, shipped-status definition, grid styling, comment suppression
- Orders Page: Columns - choose which columns appear and in what order
- Orders Page: Row Colors - configure hover highlight intensity
- Orders Page: 1-Click Emails & Comments Templates - default templates for quick emails and comments from the grid
- Orders Page: Action Menu Options - show or hide each mass-action button
- Process: Scan - enable the barcode-scan button on the orders page
- Process: CSV - enable CSV import, configure column name mappings, and manage carrier auto-detection patterns
- Order Detail: Product Grid - show product images in order detail
- ShipRules: Setup - enable the ShipRules engine and set weight unit and dimension attribute
- ShipRules: Rules - define and manage individual routing rules
- Pre-Process: Order Data - control the background cron that indexes advanced column data
- Integration: Zendesk - enter Zendesk subdomain, username, and API token (Pro plan)
Common setups
Add custom columns to the orders grid
Display richer data on each order row so your team can act without opening individual orders.
How to set it up
-
Go to: Stores > Configuration > Moogento > ShipEasy > Orders Page: Columns
-
The column picker interface lets you drag columns into position and toggle their visibility. Enable the columns your team needs - common choices are SKUs, Product Images, Stock, Revenue, Tracking, Tags, Priority, and Customer.
-
Save config, then run
php bin/magento cache:clean.
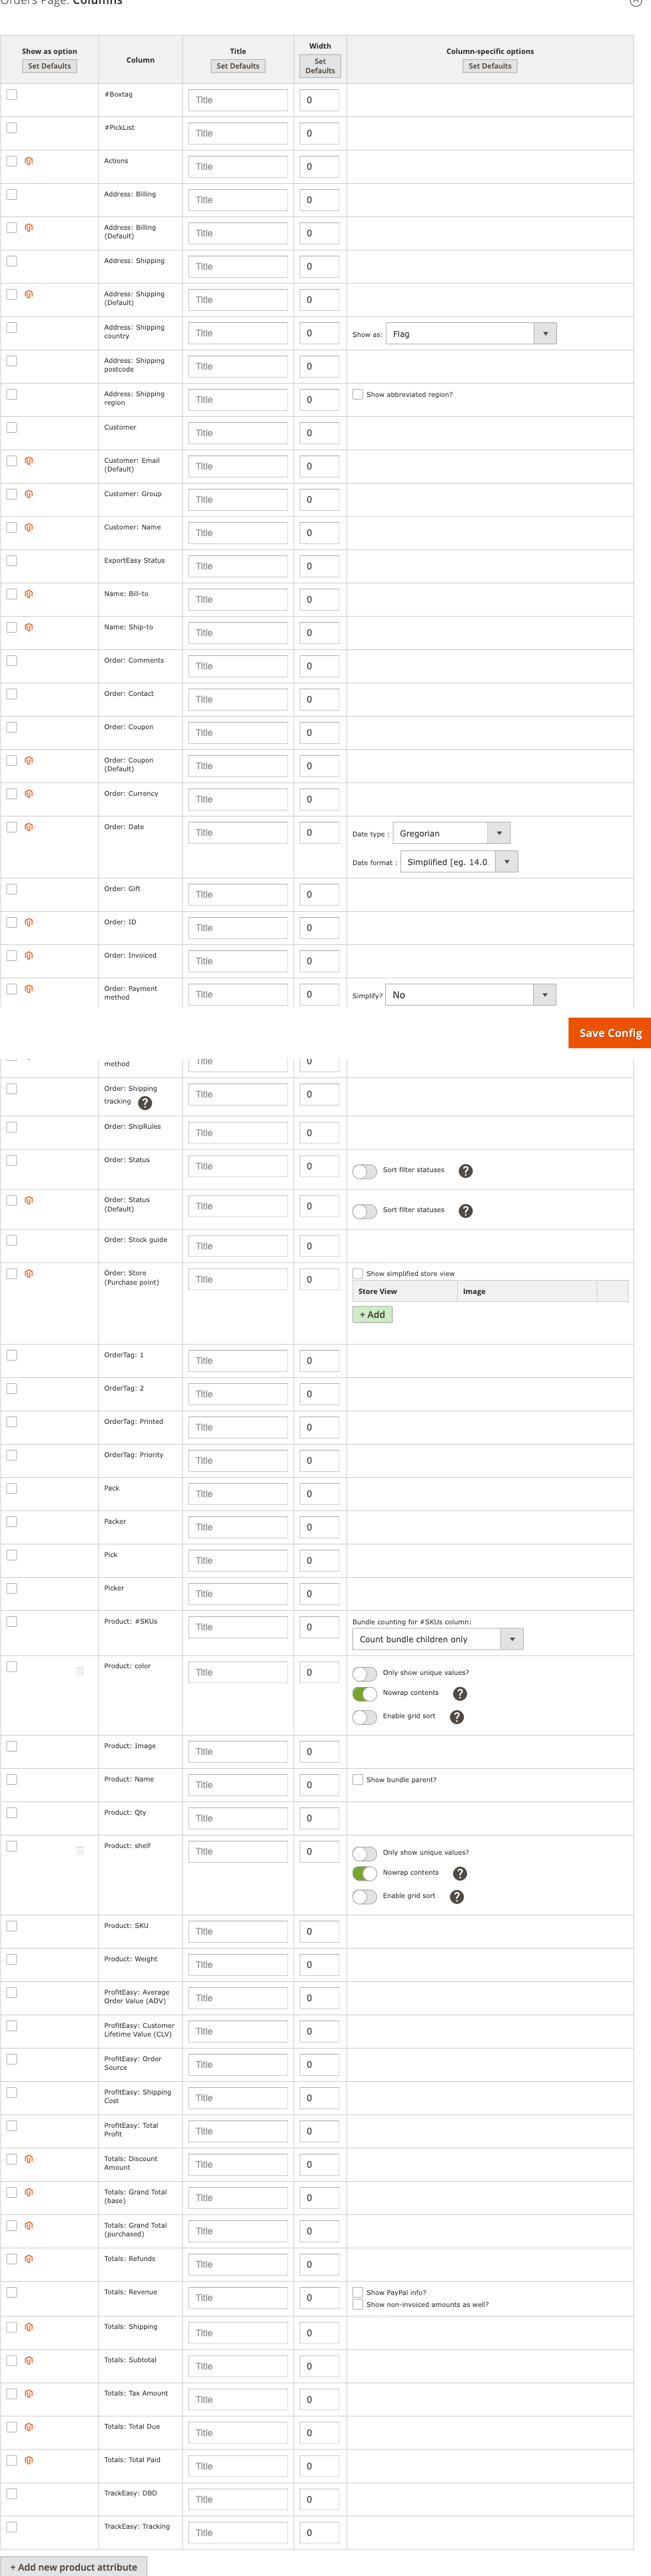
Notes
- The number of columns available depends on your plan: Seed (10 columns), Growth (20 columns), Pro (30+ columns with custom column configuration).
- Custom product attribute columns (shelf location, colour, size) are available on Pro. Configure the attribute code in the Columns picker.
- You can also manage columns from the CLI:
php bin/magento moogento:shipeasy:columns.
Set up ShipRules to auto-route orders to carriers
Automatically tag each order with the carrier or packing method it should use, based on weight, dimension, postcode, or shipping method.
How to set it up
-
Go to: Stores > Configuration > Moogento > ShipEasy > ShipRules: Setup
-
Set Enable ShipRules? = Yes.
-
Set Weight unit of measure to match the unit used on your products (e.g. grams, kg, lbs). This is a display label - the number entered in each rule must match your product weight unit.
-
(Optional) Set Product attribute: Max Dimension to the attribute code on your products that holds the maximum physical dimension. Needed only if you want to match rules by size.
-
Click Save Config.
-
Go to: Stores > Configuration > Moogento > ShipEasy > ShipRules: Rules
-
Add one rule per carrier or routing scenario. Each rule can match on weight range, max dimension, shipping method, postcodes, and SKU count. Give each rule a descriptive name - the name appears as the order tag in the grid.
-
Save config and run
php bin/magento cache:clean.

Notes
- The ShipRules engine runs via cron every 5 minutes. New orders receive their tag automatically; existing orders update on the next cron cycle.
- To test a rule against a specific order before going live:
php bin/magento moogento:shipeasy:shiprules --action=set-for-order --increment-id=100000123 --dry-run. - ShipRules is a Pro plan feature. The engine setup fields are visible on all plans but rule processing requires a Pro license.
Import tracking numbers from a carrier CSV
Upload a file from your carrier or 3PL to add tracking numbers to many orders at once.
How to set it up
-
Go to: Stores > Configuration > Moogento > ShipEasy > Process: CSV
-
Set Show 'Process: CSV' button in Orders page? = Yes.
-
Configure the CSV column name mappings to match the column headers in your carrier's export:
- CSV column title for: Order ID - the column header that holds Magento order increment IDs (required)
- CSV column title for: Tracking Info - the column header that holds tracking numbers
- CSV column title for: Carrier Title - the column header that holds carrier names (optional)
- CSV column title for: Carrier Code - the column header that holds marketplace carrier codes such as
upsorAMZL_US(Pro plan, optional) - CSV column title for: Sku and CSV column title for: Qty - for partial shipments
- CSV column title for: Admin Comment and CSV column title for: Customer Comment - to write comments from the CSV
-
Save config.
-
In the orders grid, click Process: CSV, upload your file, and review the import results.

Notes
- Every row in the CSV must have an Order ID. Rows without an Order ID, or rows where the order ID does not match any Magento order, are reported as failed and skipped.
- A row is only counted as successful after the order has been loaded and updated. Rows with blank order identifiers or unrecognised order numbers appear in the failed-rows list.
- To notify customers when a second or third tracking number is added: set Send specific transactional email if 2nd/3rd/etc. tracking number added? = Yes.
- The Delivered By Date (DBD) column requires TrackEasy Growth or Pro installed; date format must be
Y-m-d(e.g.2024-05-27). - When carrier auto-detection is enabled (see below), ShipEasy infers the carrier from the tracking number format when the carrier name column is absent or unrecognised.
Enable carrier auto-detection for CSV imports
ShipEasy can automatically identify the correct carrier - Royal Mail, UPS, Evri, Amazon Logistics, USPS, and more - from the tracking number's format instead of requiring a carrier name column in every CSV row.
How to set it up
-
Go to: Stores > Configuration > Moogento > ShipEasy > Process: CSV
-
Confirm Show 'Process: CSV' button in Orders page? = Yes.
-
Check Carrier auto-detection: Enable pattern detection? is set to Yes (it is on by default).
-
Review the Carrier auto-detection: Pattern rules table. The built-in rules cover the most common UK carriers (Royal Mail, Evri, Yodel, Amazon UK, UPS). US and Australian patterns (AMZL US, USPS, AusPost) and broad numeric patterns (FedEx, DHL, DPD) are present but disabled by default to avoid false positives - enable them if your store ships with those carriers.
-
To add a pattern for a carrier not in the list:
- Click Add row in the pattern table.
- Enter a PCRE regex fragment (no delimiters) that matches your carrier's tracking number format.
- Enter the carrier code (e.g.
mycarrier) and a display name. - Set a priority lower than any existing rule you want this to beat (lower number = higher priority).
- Save config.
-
To test a tracking number against the active patterns, use the Test button in the pattern table row.
-
Set Carrier auto-detection: Fallback carrier code and Fallback carrier title to the carrier name used when no pattern matches. Use a real carrier name such as
Local Courier- do not useCustomas Amazon treats that as an invalid carrier. -
(Optional) Enable Carrier auto-detection: Log detection decisions? alongside the General log to write per-row detection results to
var/log/moogento_shipeasy.log.
Notes
- Built-in patterns updated by a future module upgrade will only refresh rows that you have not edited (rows where created and updated timestamps match). Your custom edits are preserved.
- UK
Amazon Shippingtext in the carrier column resolves toamzl_uk. If your store is US-based, supplyAMZL_USoramzl usin the carrier column, or use the CSV column title for: Carrier Code field (Pro plan) to pass the marketplace carrier code directly. - For large CSV imports processed in multiple AJAX chunks, the final summary line showing "N rows saved as custom carrier" reflects only the last chunk. The per-row warning messages in the progress log are the reliable signal for multi-chunk imports.
Enable row colorising by order status
Give your team an instant visual read of the orders grid without scanning individual status labels.
How to set it up
-
Go to: Stores > Configuration > Moogento > ShipEasy > General
-
Set Colorize order rows based on status? = Yes.
-
(Optional) Set Hover Highlight Percent under Orders Page: Row Colors to adjust how much lighter or darker a row becomes on hover.
-
Save config and run
php bin/magento cache:clean.

Notes
- Colors are driven by the order status assigned to each row color slot. Edit the color hex values in the Row Colors group.
- The tighter grid layout options (Use ShipEasy grid design, in all admin grids? and Use ShipEasy grid design, in the Orders page?) can be enabled in the same General group. The all-grids option is a Pro plan feature.
Features reference
Pre-Process: Order Data
- What it does - a background cron job indexes order data into ShipEasy's custom database columns. Advanced columns like "# SKUs in order" and revenue calculations depend on this index being current.
- When to use it - enable after installation and leave it running. On a fresh install with many historical orders, the initial index may take several minutes to a few days depending on order count and batch size.
- Config path: Stores > Configuration > Moogento > ShipEasy > Pre-Process: Order Data (
moogento_shipeasy/indexer_order/cron_job_status) - Key settings:
- Orders indexed each run - default 500. Increase for faster initial indexing on a powerful server; reduce if the server is under load.
- Skip archived orders - default Yes. Significantly reduces processing time on Adobe Commerce installations where the archive module is active.
- Skip orders older than X days - default 1. Set to blank (no limit) for a full historical import; set to 30-90 for active stores that only need recent data indexed.
- A Manual button processes the last 50 orders immediately without waiting for cron.
Orders Page: Action Menu Options
- What it does - controls which bulk-action buttons appear in the orders-grid toolbar. You can hide actions your team doesn't use to keep the interface clean.
- When to use it - hide unused actions (e.g. hide Invoice if your accounting system invoices automatically).
- Config path: Stores > Configuration > Moogento > ShipEasy > Orders Page: Action Menu Options (
moogento_shipeasy/actionmenuoptions/*) - Toggleable actions: Invoice, Ship, Invoice & Ship, Update Status, Set OrderTag, Set OrderTag.2, Set OrderTag.Printed, Update Priority, Update Shiprule.
Orders Page: 1-Click Emails & Comments Templates
- What it does - pre-fill the subject and body used when your team sends a quick email or adds an order comment from the grid. Supports tokens:
{customer-name},{order-id},{ordered-skus},{sku-name},{ordered-product-names},{website-url},{website-name}. - When to use it - set once, then your warehouse or support team can send on-brand messages in one click without typing.
- Config path: Stores > Configuration > Moogento > ShipEasy > Orders Page: 1-Click Emails & Comments Templates (
moogento_shipeasy/emailsandcommentstemplates/*)
Process: Scan
- What it does - shows a barcode-scan button on the orders page. Clicking it opens a scan interface where warehouse staff can scan order IDs, product barcodes, or tracking numbers to process orders without touching a mouse.
- When to use it - ideal for warehouse pick-and-pack stations where speed and hands-free operation matter.
- Config path: Stores > Configuration > Moogento > ShipEasy > Process: Scan (
moogento_shipeasy/process_scan/show_process_scan)
Order Detail: Product Grid
- What it does - adds product thumbnail images to the order detail product table, so staff can visually confirm the items in the order.
- When to use it - enable for warehouses where visual product recognition reduces pick errors.
- Config path: Stores > Configuration > Moogento > ShipEasy > Order Detail: Product Grid (
moogento_shipeasy/product_grid/show_product_images)
Integration: Zendesk
- What it does - connects ShipEasy to your Zendesk account so you can create a support ticket from any order row in one click. The ticket form pre-fills with order and customer data.
- When to use it - useful for support teams who handle customer queries by searching orders and need to open tickets without switching between tabs.
- Config path: Stores > Configuration > Moogento > ShipEasy > Integration: Zendesk (
moogento_shipeasy/zendesk_integration/*) - Requirements: Pro plan. After saving Zendesk credentials, enable the Contact > Zendesk column in the Orders Page: Columns to see the Zendesk icon on each order row.
Advanced configuration
Override Magento's status-change restrictions
What it does
Magento normally prevents certain status transitions (for example, cancelling a Completed order). The Allow changing status even where Magento logic doesn't allow it? toggle in the General group lifts those guards.
Setup
- Go to Stores > Configuration > Moogento > ShipEasy > General.
- Set Allow changing status even where Magento logic doesn't allow it? = Yes.
- Save config.
Technical path: moogento_shipeasy/general/allow_se_changing_status
Notes
- Use with care. Orders that have been force-transitioned outside normal Magento state flows may behave unexpectedly if you later try to invoice, ship, or refund them through standard Magento tools.
- The Allow 'sE: Ship' without Invoice option (
moogento_shipeasy/general/allow_complete_without_invoice) is a related toggle that lets you mark an order as shipped before an invoice exists.
Define which status means "Shipped"
What it does
ShipEasy fires a "shipped" event whenever it moves an order to the status you designate as Shipped. This is used to trigger external integrations (Amazon, Etsy, 3PL services) via Magento's event system.
Setup
- Go to Stores > Configuration > Moogento > ShipEasy > General.
- Set Which status = Shipped? to the order status your store uses to represent a shipped order (default: Complete).
- Save config.
Technical path: moogento_shipeasy/general/define_shipped_status
Suppress order status comments
What it does
By default, Magento and ShipEasy both add a comment to order history every time the status changes. These can clutter the order comment thread. The General group offers three suppression options:
- Disable ShipEasy status-change comments? (
moogento_shipeasy/general/disable_szy_order_status_comment) - Disable Magento status-change comments? (
moogento_shipeasy/general/disable_magento_order_status_comment) - Pro plan - Disable M2Epro order comments? (
moogento_shipeasy/general/disable_m2epro_order_comment) - Pro plan - Allow deletion of order status comments? (
moogento_shipeasy/general/enable_delete_order_status_comment) - adds a delete button to individual comments on order/invoice/shipment/credit memo pages; Pro plan
Setup
- Go to Stores > Configuration > Moogento > ShipEasy > General.
- Toggle the options appropriate for your store.
- Save config.
Tips & best practices
- Start with fewer columns. Enable only the columns your team actually reads on the grid. A dense grid with 20 columns slows down your team; 6-8 focused columns is often faster.
- Enable the indexer and leave it on. The Pre-Process: Order Data cron is required for accurate SKU counts, revenue, and stock columns. Disabling it causes those columns to show stale or blank data.
- Test ShipRules with
--dry-runfirst. Before enabling rules in production, use the CLI dry-run to verify the correct rule matches each order type. A mis-configured rule silently overwrites tags. - Match your CSV column headers exactly. The CSV import does a case-sensitive match against the column title fields in Process: CSV configuration. If your carrier changes a column name, update the config field to match.
- Use the batch-size setting conservatively. The default of 500 orders per indexer run is appropriate for most stores. Only raise it if your server has headroom to spare; a too-large batch can cause memory pressure during peak traffic.
- Suppress comments in high-volume stores. If your order history becomes cluttered with automated status comments, enabling the comment-suppression options in General keeps order history readable.
- For US/AU carriers, enable the relevant patterns. The carrier auto-detection pattern table ships with AMZL US, USPS, AusPost, and broad numeric patterns disabled. Enable the ones you need in Process: CSV > Carrier auto-detection: Pattern rules.
- Check
var/log/moogento_shipeasy.logwhen a mass action doesn't complete. Enable logging temporarily in General, reproduce the issue, then check the log for which orders caused the problem.
Troubleshooting
Grid columns show blank or stale data
Columns like "# SKUs in order", "Revenue", and "Stock" depend on the background indexer.
- Cause: The Pre-Process: Order Data cron is disabled, or the initial index hasn't finished.
- Check: Go to Stores > Configuration > Moogento > ShipEasy > Pre-Process: Order Data and read the "Current progress" progress bar. Confirm Enabled? = Yes and that Magento's cron is running (
php bin/magento cron:runfrom CLI to test). - Resolution: Enable the indexer, confirm cron is healthy, and allow time for the initial index to complete. Click the Manual button to index the last 50 orders immediately without waiting for cron.
ShipRule tag not appearing on orders
The correct rule exists in configuration but orders aren't getting the tag.
- Cause: The ShipRules engine is disabled, the order doesn't match any rule criteria, or the cron hasn't run yet.
- Check: Confirm Enable ShipRules? = Yes in ShipRules: Setup. Then run a dry-run:
php bin/magento moogento:shipeasy:shiprules --action=set-for-order --increment-id=XXXXXXX --dry-runand read the output to see which rule (if any) matches. - Resolution: Adjust the rule weight range, postcodes, or shipping method criteria to cover the order. Save config and allow up to 5 minutes for the next cron cycle.
Mass action doesn't finish or only processes some orders
A bulk status-change or invoice action stops part-way through.
- Cause: A very large batch (20+ orders) can approach browser timeout limits; individual order-state conflicts also stop processing.
- Check: Enable logging in General and re-run the action. Review
var/log/moogento_shipeasy.logfor which order caused a halt and why. - Resolution: For large batches, use the CLI instead:
php bin/magento moogento:shipeasy:order-status --status=processing --order-ids=100000001,100000002,.... ShipEasy's batch processor handles 10 orders per internal cycle with timeout protection, so very large batches will complete but may take longer than expected in the browser.
CSV import rows are skipped
Some rows in the uploaded file don't result in any order update.
- Cause: The Order ID column header in the file doesn't match what's configured in Process: CSV, or the row has no Order ID value, or the order number isn't found in Magento.
- Check: Open the import results page after the upload. Skipped rows are listed with a reason. Compare the header row of your CSV to the CSV column title for: Order ID setting. Rows with blank identifiers or unknown order numbers appear in the failed-rows list.
- Resolution: Update the config field to match the exact column header (case-sensitive), or rename the column in your carrier export. Every row must have a valid order increment ID that resolves to a Magento order.
Carrier appears as "custom" after CSV import
Tracking is imported but the carrier is recorded as "custom" rather than the expected carrier name.
- Cause: The carrier name in the CSV didn't match any known Magento carrier title and no auto-detection pattern matched the tracking number format.
- Check: Enable Carrier auto-detection: Log detection decisions? (with the General log also on) and re-import. Check
var/log/moogento_shipeasy.logfor per-row decisions. Confirm the carrier's pattern row is enabled in the pattern table. - Resolution: If the carrier is a US or AU carrier, its pattern may be disabled by default - enable it in Process: CSV > Carrier auto-detection: Pattern rules. For carriers not in the built-in list, add a custom pattern row. For marketplace integrations requiring an exact carrier code, use the CSV column title for: Carrier Code field (Pro plan) to pass the code directly and bypass title resolution.
Duplicate tracking columns appear in the grid
Two tracking columns appear side by side - one labelled "sE: Tracking" and one "tE: Tracking".
- Cause: Both ShipEasy and TrackEasy are installed. This is expected behaviour. "sE: Tracking" shows pre-shipment tracking numbers managed by ShipEasy (editable inline). "tE: Tracking" shows post-shipment tracking data managed by TrackEasy. Only the ShipEasy column is visible by default; the TrackEasy column must be enabled deliberately in the column setup.
- Resolution: If you only need one column, disable the other in Stores > Configuration > Moogento > ShipEasy > Orders Page: Columns.
FAQs
How do I add more columns to my Magento orders grid?
Go to Stores > Configuration > Moogento > ShipEasy > Orders Page: Columns and enable the columns you want from the drag-and-drop picker. The columns available depend on your plan tier - Seed gets 10, Growth gets 20, and Pro gets 30+ including custom product attribute columns. See Common setups for the full walkthrough.
How do I automatically route orders to different carriers?
Enable ShipRules in Stores > Configuration > Moogento > ShipEasy > ShipRules: Setup, then define your routing rules in ShipRules: Rules. Each rule matches orders by weight range, max dimension, postcode, SKU count, or shipping method and stamps a tag on the order that your warehouse team can sort on. See Common setups for full steps.
How do I import tracking numbers from my carrier in bulk?
Enable CSV import in Stores > Configuration > Moogento > ShipEasy > Process: CSV, map your carrier CSV column headers to the config fields, save, then click the Process: CSV button on the orders grid and upload your file. See Common setups for details.
ShipEasy is not recognising the carrier from the tracking number - how do I enable it?
Go to Stores > Configuration > Moogento > ShipEasy > Process: CSV and confirm Carrier auto-detection: Enable pattern detection? is set to Yes. Then check the Pattern rules table - US carriers (AMZL US, USPS), Australian carriers (AusPost), and broad numeric patterns (FedEx, DHL, DPD) are disabled by default. Enable the rows for the carriers you need. See Common setups for the full walkthrough.
Does ShipEasy work with PickPack?
Yes. When PickPack is installed alongside ShipEasy, printing a packing sheet or invoice via PickPack can automatically update a ShipEasy OrderTag on the order and optionally change the order status. Configure this in Stores > Configuration > Moogento > PickPack > PDFs - each PDF type has a "Set OrderTag after printing?" option powered by ShipEasy. See PickPack for PickPack-specific setup.
Does ShipEasy work with TrackEasy?
Yes. When both modules are installed the orders grid gains a second tracking column - "sE: Tracking" (ShipEasy pre-shipment tracking, editable from the grid) and "tE: Tracking" (TrackEasy post-shipment tracking). Only the ShipEasy column is shown by default. See TrackEasy for TrackEasy-specific setup.
Which plan do I need for ShipEasy?
ShipEasy has three tiers: Seed (10 grid columns, basic bulk actions, ShipRules, barcode scan, CSV import), Growth (20 columns, advanced bulk actions, TrolleyBox integration), and Pro (30+ columns, custom column configuration, Zendesk integration, all CLI tools). Check your current plan at Stores > Configuration > Moogento > Licenses, or visit moogento.com to upgrade.
What happens when ShipEasy is disabled?
The orders grid reverts to the standard Magento grid - custom columns, row colors, and mass actions added by ShipEasy disappear. Order data stored in ShipEasy's database tables (tags, revenue, ShipRule assignments) is retained; it becomes visible again when the module is re-enabled. No order or customer data is deleted.
Is ShipEasy compatible with Hyvä, Luma, and Porto themes?
ShipEasy only modifies the Magento admin interface (the orders grid and configuration pages). It has no frontend storefront component, so your choice of Hyvä, Luma, Porto, or any other frontend theme has no effect on ShipEasy's functionality.
Why is the revenue column showing the wrong total?
The revenue column shows total_paid minus total_refunded and is pre-calculated by a background cron that runs every 15 minutes. If a refund was issued recently, the column may not yet reflect it. To refresh immediately, run the revenue recalculation cron manually: php bin/magento cron:run --group=default. If the column is consistently off, check that ShipEasy's revenue data is intact and that another extension is not overriding ShipEasy's order event listeners.
Can I create Zendesk tickets from the orders grid?
Yes, on the Pro plan. Enter your Zendesk subdomain, username, and API token in Stores > Configuration > Moogento > ShipEasy > Integration: Zendesk, then enable the Contact > Zendesk column in the Orders Page: Columns. A Zendesk icon appears on each order row; clicking it opens a pre-filled ticket creation form.
Related guides
- PickPack - print packing sheets, invoices, and labels; integrates with ShipEasy OrderTags on print
- TrackEasy - post-shipment tracking emails and delivery updates; adds a second tracking column alongside ShipEasy's
- Pick-n-Scan - barcode-scan pick workflow that coordinates with ShipEasy's scan interface
Need help?
- moo@moogento.com
- Include:
- Magento version
- Module name
- What you're trying to do