Difference between revisions of "stockEasy Setup"
m |
m |
||
| (10 intermediate revisions by the same user not shown) | |||
| Line 1: | Line 1: | ||
| − | [[File:StockEasy_Advanced_Magento_Stock_Management_Tool.png|link= | + | {{#description2:Let's dig in and setup StockEasy, your favorite inventory management solution for Magento. We'll be able to make some more advanced settings, compared to the QuickStart guide, and get your Catalog overview optimised.}} |
| + | [[File:StockEasy_Advanced_Magento_Stock_Management_Tool.png|link=https://moogento.com/stockeasy|border|323px]][https://moogento.com/stockeasy Get stockEasy today((.buy))] | ||
==Aims & Preparation== | ==Aims & Preparation== | ||
{{idea|Most of this is included if you get the [https://moogento.com/installation Installation & Setup Service]}} | {{idea|Most of this is included if you get the [https://moogento.com/installation Installation & Setup Service]}} | ||
| Line 10: | Line 11: | ||
<div style="clear:both;"> </div> | <div style="clear:both;"> </div> | ||
==What Does stockEasy Do?== | ==What Does stockEasy Do?== | ||
| − | It | + | It increases productivity in your business, by helping in 3 main areas: |
| − | # | + | #Edit & check stock levels |
| − | # | + | #Export stock reports |
| − | # | + | #Plan stock buys |
| − | |||
=='''Editing & Checking Stock Levels'''== | =='''Editing & Checking Stock Levels'''== | ||
| Line 110: | Line 110: | ||
#It will import that and then set your stock levels automatically from that. | #It will import that and then set your stock levels automatically from that. | ||
| − | ''Here's a [https:// | + | ''Here's a [https://moogento.com/sample-data/sample_import_stock.csv sample CSV stock import file]'' |
| Line 168: | Line 168: | ||
The usual attribute will be EAN or GTIN, which is just code for a specific layout of numbers that make up the barcode. | The usual attribute will be EAN or GTIN, which is just code for a specific layout of numbers that make up the barcode. | ||
| − | If you don't already have a barcode set | + | If you don't already have a barcode set for each product, then you need to enter one: |
# Make a new custom product attribute, eg. 'barcode' | # Make a new custom product attribute, eg. 'barcode' | ||
| Line 253: | Line 253: | ||
#Scan item stock qty (with the option set to 'add to', so you're adding to the current stock levels). | #Scan item stock qty (with the option set to 'add to', so you're adding to the current stock levels). | ||
#Repeat. | #Repeat. | ||
| − | |||
===via Automatic CSV Import=== | ===via Automatic CSV Import=== | ||
| Line 268: | Line 267: | ||
#Set whether you are importing an XML or CSV file. | #Set whether you are importing an XML or CSV file. | ||
#:''If CSV, set the field separator (usually a comma).'' | #:''If CSV, set the field separator (usually a comma).'' | ||
| − | #Set the full remote URL of the CSV file, including <code><nowiki> | + | #Set the full remote URL of the CSV file, including <code><nowiki>https://www</nowiki></code> if appropriate. |
#:''We also have options for connecting via FTP to a remote server, and collecting a local file-system file.'' | #:''We also have options for connecting via FTP to a remote server, and collecting a local file-system file.'' | ||
#Now, map out the incoming CSV fields to your local attribute names. | #Now, map out the incoming CSV fields to your local attribute names. | ||
| Line 458: | Line 457: | ||
- If there is not 2 years of historical stockEasy sales, it will estimate as far back as it can. | - If there is not 2 years of historical stockEasy sales, it will estimate as far back as it can. | ||
| + | |||
| + | ==Automating Product Stock Control== | ||
| + | One sometimes frustrating thing with Magento is the need to set 4 things to get a product to show: | ||
| + | |||
| + | #Qty (Inventory) | ||
| + | #Stock Availability (In Stock/Out-of-Stock) | ||
| + | #Visibility (Catalog/Search/None) | ||
| + | #Status (Enabled/disabled) | ||
| + | #: | ||
| + | #:''In addition you'll want to monitor if this next setting is set to Yes - if you're expecting Magento to adjust inventory levels with sales:'' | ||
| + | #Managed Stock (Enabled/disabled) | ||
| + | |||
| + | Even if you have 2,3,4,5 set, if you add Inventory after a product has been out of stock, your product will still not show. | ||
| + | |||
| + | In that case you need to specifically set 'Stock availability' to 'In Stock' or the product won't be available for sale. | ||
| + | |||
| + | If you just update inventory when you receive stock, your product listing page won't automatically update to show the product available for purchase. | ||
| + | |||
| + | Luckily stockEasy can help here :) | ||
| + | |||
| + | You can set it to automatically update the 'Stock availability' setting, when editing Inventory Qty. | ||
| + | |||
| + | ===How to Enable Automatic 'Stock Availability = In-Stock' Setting=== | ||
| + | # Ensure you have set 'Managed Stock' to 'Enabled' for your products. | ||
| + | #:''This won't work for products where this isn't enabled'' | ||
| + | # In stockEasy settings > General, set "Auto-set In-stock when Qty changes to 1+?" to Yes. | ||
| + | #:[[File:auto-set-in-stock-magento.png|link=|350px]] | ||
| + | |||
| + | ===How to Enable Automatic 'Stock Availability = Out-of-Stock' Setting=== | ||
| + | Another often-encountered tripping point, is if you're selling configurable products. | ||
| + | |||
| + | If you have no stock in any child products, the parent product will still show, unless you've specifically set that parent product to be out of stock. | ||
| + | |||
| + | stockEasy has another time-saving fix here. | ||
| + | # Ensure you have set 'Managed Stock' to 'Enabled' for your products. | ||
| + | #:''This won't work for products where this isn't enabled'' | ||
| + | # In stockEasy settings > General, set "Auto-set Out-of-stock when Configurable product has no children with Qty > 0?" to Yes. | ||
| + | #:[[File:auto-set-out-of-stock-magento.png|link=|350px]] | ||
| + | |||
| + | |||
| + | Also worth pointing out that stockEasy makes it visually very easy to see if you've set something wrong on products: | ||
| + | ::[[File:managed-stock-visibility-status-magento-inventory.png|link=|250px]] | ||
==Setting Up Products for stockEasy== | ==Setting Up Products for stockEasy== | ||
stockEasy adds a new section to your Product Detail page with 4 options: | stockEasy adds a new section to your Product Detail page with 4 options: | ||
| − | === | + | ===Trigger Restock Qty=== |
*:''The stock level at which stockEasy activates, when creating low-stock reports. Ie. if this is set, then stockEasy won't output a low-stock report until the stock qty is equal-or-lower than this number.'' | *:''The stock level at which stockEasy activates, when creating low-stock reports. Ie. if this is set, then stockEasy won't output a low-stock report until the stock qty is equal-or-lower than this number.'' | ||
===Min Order Qty=== | ===Min Order Qty=== | ||
*:''Usually used as a factory minimum order. Default 1. If set then any time the product passes the 'trigger restock qty', the minimum qty in the 'low stock' report will be this number.'' | *:''Usually used as a factory minimum order. Default 1. If set then any time the product passes the 'trigger restock qty', the minimum qty in the 'low stock' report will be this number.'' | ||
| − | === | + | ===Max Order Qty=== |
*:''Usually used as a sanity-check factor to prevent runaway orders. When stockEasy determines a restock qty is required, it won't go past this number.'' | *:''Usually used as a sanity-check factor to prevent runaway orders. When stockEasy determines a restock qty is required, it won't go past this number.'' | ||
| − | === | + | ===EOL=== |
*:''A way to block specific products from low-stock reports. Usually used where a factory has stopped making something, or you expect demand to drop eough that you don't want to restock this.'' | *:''A way to block specific products from low-stock reports. Usually used where a factory has stopped making something, or you expect demand to drop eough that you don't want to restock this.'' | ||
:[[File:stockeasy-product-setup-magento.png|link=|793px]] | :[[File:stockeasy-product-setup-magento.png|link=|793px]] | ||
Latest revision as of 13:22, 28 September 2020
Contents
- 1 Aims & Preparation
- 2 What Does stockEasy Do?
- 3 Editing & Checking Stock Levels
- 3.1 Edit Stock In The Catalog Grid
- 3.2 Editing products
- 3.3 Edit Stock via Manual CSV Import
- 3.4 Edit Stock via Automated CSV Import
- 3.5 Edit Stock via Barcode Scan
- 3.5.1 Setup the system for scanning stock
- 3.5.2 "But wait - barcodes... whaaaat...?! Where do I get those?"
- 3.5.3 Access the stock scanning screen
- 3.5.4 Setup scanning screen
- 3.5.5 Process for scanning stock
- 3.5.6 Setting A Custom Attribute (eg. Shelf) During Scan
- 3.5.7 Example: Adding new stock to warehouse shelves
- 3.6 via Automatic CSV Import
- 4 Exporting Stock Reports
- 5 Planning Stock Buys
- 6 Automating Product Stock Control
- 7 Setting Up Products for stockEasy
Aims & Preparation
Most of this is included if you get the Installation & Setup Service
stockEasy is an extremely powerful tool for dealing with inventory in Magento. We're going to set it up for most common tasks and see what it can do.
Follow the Easy Install Guide to get stockEasy up and running.
Make sure you have your Magento Cron running - stockEasy needs to use that.
What Does stockEasy Do?
It increases productivity in your business, by helping in 3 main areas:
- Edit & check stock levels
- Export stock reports
- Plan stock buys
Editing & Checking Stock Levels
The standard Magento way to do this is:
- Click an item, wait for it to load
- Click the Inventory tab
- Find the specific item
- Set the new qty, trying not to make a maths error
- Remember to set the status to 'In Stock' and 'Enabled' (or the product won't be available to buy)
- Scroll back up and save the product
- Click 'back' to return to the Catalog Grid
- Wait for that to load again
- Find the next item
The stockEasy way to do this is:
- Find the item
- Type the new stock level (use artithmetic in the cell if needed)
- Hit Enter
- Find the next item
- This is obviously a lot less time-consuming, and much less prone-to-errors. It's also a lot easier to train someone how to do it ("click the qty, enter the new qty" vs. "It's...a long process")
--or--
- Import a simple csv file, where the only required fields are 'sku' and 'qty'.
Handy if you're generating stock numbers on spreadsheets, or outputting from other warehouse management software.
--or--
- Scan the products as they come in the factory door with a barcode scanner.
If you set the stock at the moment it arrives in the warehouse, and use things like Purchase Orders, where the delivered qty may be different to the ordered qty, then this is a great way to streamline the process.
--or--
- Automatically import stock from your suppliers.
Ideal for dropshippers, or if you have suppliers with varying qty of items on hand that you can order from direct.
Edit Stock In The Catalog Grid
You can also edit cost and price the same easy way
- Find the item to change (eg. search in the sku column)
- Click in the 'Qty' field, and type in the new qty.
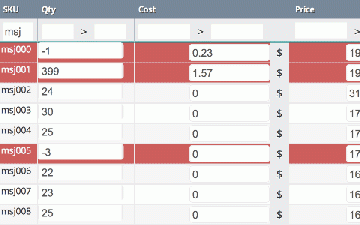
- Use simple arithmetic to make this easy: eg. type +371 on the right of the current qty, to add 371 to the current qty
- Hit Enter
- The cell will glow green when set : easy to see when it's saved, and visually easy to find your place.
Editing The Grid Layout
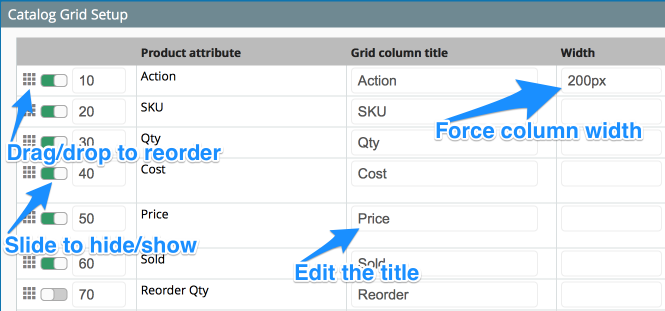
stockEasy provides a super easy-to-use Grid Editor : only show columns that are useful to you
- Go to the SystemConfigMoogento > stockEasy -> Catalog Grid Setup
- Slide the green on/off switches to show/hide each column
- Drag the grid icon (left of each entry) to reorder the columns
- Set the column title to something you'll understand
- Force the column width by setting that
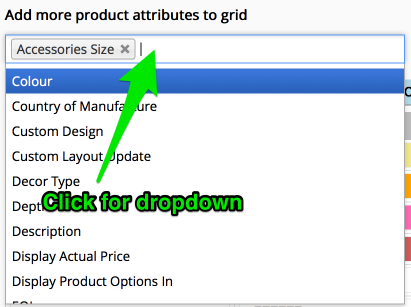
Add Custom Attributes To The Grid
- Just click in the 'Add more product attributes to grid' section.
- Choose the ones you want, and save.
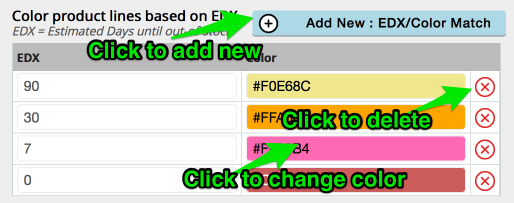
Set EDX Row Warning Colors
- What's EDX? Estimated Days to Out-Of-Stock
- Set this in the same part of the config.
- You can add as many steps and custom colors as you like.
You'll have an easy-to-see visual low-stock warning.
Editing products
stockEasy has a powerful stock import engine, you can set a lot of product values :
- Direct in the Catalog Grid (click & edit: qty, price, cost)
- Importing a CSV file in either a one-time process
- Importing a CSV as a recurring automated process
- Using a barcode scanner
Edit Stock via Manual CSV Import
Setup
First up, you need to set which columns we're looking for.
The 1st line in a csv is usually the column titles
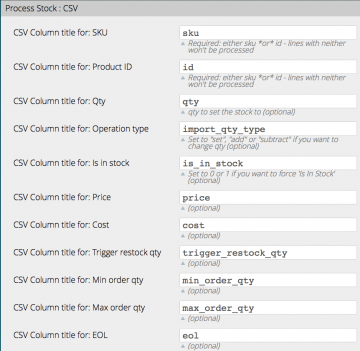
- Head to SystemConfigstockEasy -> Process Stock : CSV
- You need to enter either sku or product id column titles
- Then also enter whatever you're trying to change - eg. the qty column title
Running the import
- Head to to the CatalogManage Products(Product Grid) and click Import Stock : CSV
- You'll arrive on a page with one button; click it and select your CSV file.
- It will import that and then set your stock levels automatically from that.
Here's a sample CSV stock import file
Edit Stock via Automated CSV Import
Setup
First up, you need to set which columns we're looking for.
- Head to SystemConfigstockEasy -> Auto-import setup
- Click Add New : Auto-Import
- Click the slider on the left to enable the rule
- Set the error notification email (this will be sent an email in the event on an import error)
- Set the import type (CSV or XML) and details (eg. the remote URL where your supplier has his stock csv)
- The 'test' button won't actually process the remote csv, it will just test that it's there.
- Then we need to setup which csv columns map to which product attributes:
- You need to enter either sku or product id column titles
- Then also enter whatever you're trying to change - eg. the qty column title
- Finally, set which days and at what time this should be imported.
- A classic would be Monday-Friday at 1am
- Save!
Adding supplier-specific sku prefixes
If you store skus in your catalog with a specific prefix (compared to the sku provided in your supplier's feed), enter that here.
No column titles? No problem!
If the remote csv doesn't have column titles on the 1st row, slide-green the "If CSV, is the 1st row data (not titles)?". Then enter the column number (starting at 1) which has each field in.
Running the import
Once this is setup it should start working - test with a single product and go from there.
Edit Stock via Barcode Scan
Confused about barcode scanners? Check our quick guide!
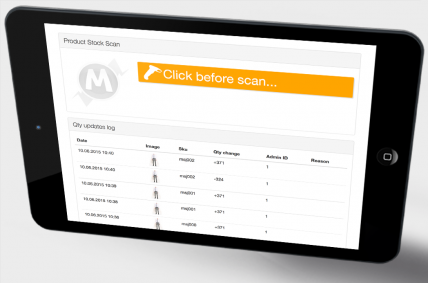
This is an awesome stockEasy feature, significantly cutting team training time. You can now give a team member a barcode scanner and tablet (iPad mini works well) and they'll be scanning stock in no time.
stockEasy has a custom responsive screen for this, so, in conjunction with powerLogin, you don't need to give access to other parts of your admin.
This special custom screen has been designed to cut out unnecessary Magento clutter and focus on the important bits related to stock control.
Setup the system for scanning stock
- Set the product attribute that we'll be scanning - this will usually be sku or something like barcode or gtin.
- This is set in SystemConfigMoogento > stockEasy -> Import Stock : Scan -> Which product attribute are we scanning?
- If you're setting a custom attribute at the same time (eg: entering warehouse shelf location while putting inbound products on shelves), then enter that product attribute in the 'Show additional attribute' section
"But wait - barcodes... whaaaat...?! Where do I get those?"
It can all seem pretty confusing to begin with, but all a barcode is is a font.
If you're trying to scan product barcodes with stockEasy then you'll need a product attribute for stockEasy to match against.
The usual attribute will be EAN or GTIN, which is just code for a specific layout of numbers that make up the barcode.
If you don't already have a barcode set for each product, then you need to enter one:
- Make a new custom product attribute, eg. 'barcode'
- Apply that attribute to the appropriate attribute groups
- Open up a product and enter the barcode number for it, and save.
- Update your products by uploading a CSV if you have a lot of products
Access the stock scanning screen
- Head to to the CatalogManage Products(Product Grid) and click Import Stock : Scan
- You'll arrive on the stockEasy responsive scanning page, designed just for importing stock with a barcode scanner.
- Use powerLogin to set this page as the login landing page for staff who only (or primarily) need access to it
Setup scanning screen
Scanning-screen setup will depend on what you're trying to achieve, but in general stockEasy can help with:
- Stock checking
- Disable all input options in the scanning screen, and just scan product barcodes. It'll show you the qty that's registered in the Magento Catalog.
- Stock updating
- Enable the Qty option in the scanning screen, scan the barcode, then set the new product qty.
- Stock shelving
- Enable the Qty and Location (if needed) fields in the scanning screen; scan the barcode, then the Qty barcode, then the Location barcode.
If scanning in Qty changes, after selecting the Qty checkbox you'll see 2 options:
- Qty action (Add-to, Remove-from, Set-as)
- This is what the number you're scanning represents. Eg. if stock-checking, this would be 'Set As'; if receiving stock 'Add To'; if doing offline removals, 'Remove From'; etc.

- Stock entry explanation ('Stock received', 'Stock check', 'Other')
- This is an easy way to keep track of what stock movements were for.

When scanning in the stock qty, we have a handy barcode-sheet of scannable numbers in the config section of stockEasy:
The numbers are in 3 columns, the start column represents how many characters in the number.
Eg: - to enter 100, scan '100' in the first column, and then 'Finish'. - to enter 110, scan '100' in the left column, then '10' in the second column, then 'Finish'. - to enter 117, scan '100' in the left column, then '10' in the middle column, then '7 in the right column, then 'Finish'.
- If you see the orange 'Click before scan' notice, just touch/click in that button.
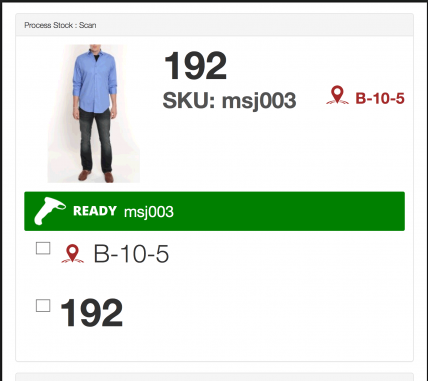
- When we have a green 'Ready': we're ready to start.
Process for scanning stock
- Scan the product barcode.
- The product image, SKU, and optional attribute (eg. Shelf) will load up to help identify issues (eg. if the manufacturer has changed the barcode).
- If you're doing a Stock Check:
- You'll compare the Qty that Magento has registered for stock, which will show up in the screen, against what you're seeing on the shelf.
- Then scan the next.
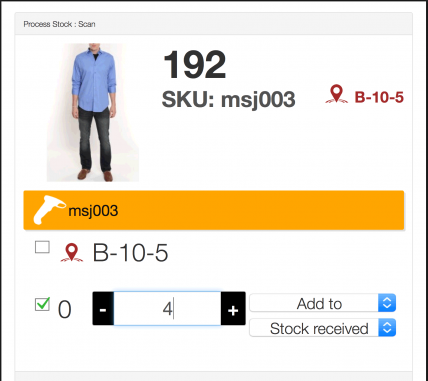
- If you're Updating Stock Qty:
- You'll have already selected the check box next to Qty so that it's editable, and the scanning point will automatically move to that input after scanning the barcode.
- Scan in the Qty using the qty sheet mentioned above.
- stockEasy will automatically move back ready for the next product barcode scan.
- If you're Shelving Stock, and want to also save the shelf location:
- Select the checkbox next to the Location icon, and you'll see an editable Shelf box appear.
- Scan the new shelf location and the entry point will automatically move to Qty.
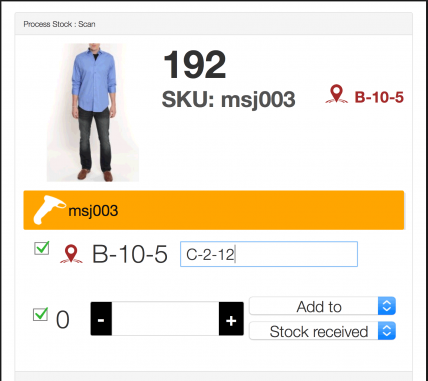
- As soon as you've finished that product, stockEasy will cue up the next - there's normally no need to click/touch anything in the screen once started.
stockEasy will remember your selections here, so you won't need to set checkbox(es) before each product.
Setting A Custom Attribute (eg. Shelf) During Scan
It can be handy to set the Shelf at the same time as Inventory updates, eg. if you have fuzzy-shelving or just to set the spot where the latest inventory intake has been stored.
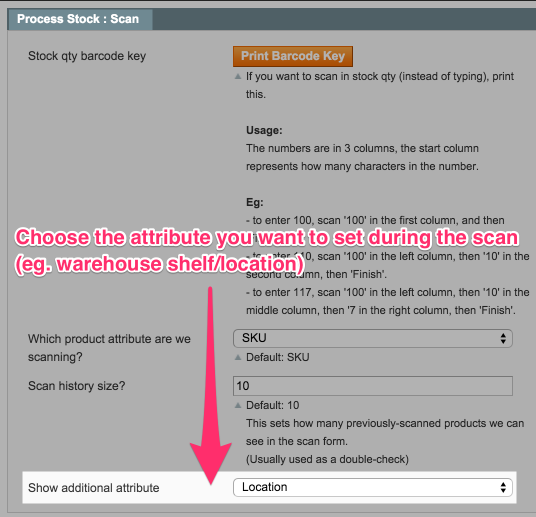
stockEasy can do this :
- Head to the config section 'Process Stock : Scan'.
- Find the 'Show additional attribute' option.
- Set the custom product attribute that you want to set (eg. Location):
- Reload the scanning page, and you'll also see that new attribute with a selectable checkbox.
- Select the checkbox if you want to edit the option with each scan, or leave unchecked to just see what it is set to for each product.
Example: Adding new stock to warehouse shelves
- Pick up item.
- Scan item barcode.
- Scan item shelving location.
- Scan item stock qty (with the option set to 'add to', so you're adding to the current stock levels).
- Repeat.
via Automatic CSV Import
This is a gem. If you can persuade your suppliers to provide a live csv file (eg. saved at a specific URL), then stockEasy will take care of setting your stock levels from that. (No need for you to constantly update stock) This is a huge time-saver for dropshippers. It's also an easy way to do training for staff that might be more used to saving spreadsheets than working a website (or barcode scanner) - you could just get them to save your stock levels, and have stockEasy pick up the file on a daily basis.
- You need your Magento Cron running for this to work (as with most stockEasy features). Do check that it is running...
- Ok, first we want to set a new import record. You can set as many as you like.
- Click the 'Add New' button to add a new record.
- Click the green switch to enable this record.
- Enter an email for error notices (this will get sent if there is any issues importing).
- Set whether you are importing an XML or CSV file.
- If CSV, set the field separator (usually a comma).
- Set the full remote URL of the CSV file, including
https://wwwif appropriate.- We also have options for connecting via FTP to a remote server, and collecting a local file-system file.
- Now, map out the incoming CSV fields to your local attribute names.
- Eg. if the remote file 'sku' field is labelled 'product_barcode', enter 'product_barcode' under the 'Sku' section.
- Set which days you want this to run.
- Eg. if the remote site updates stock on weekdays, just set those days. If you're not operational weekends, it's maybe a good idea to not have it update stock on the weekends in the unlikely event that it causes an error.
- Set which hour you want this to run.
- Maybe this supplier updates their stock at the end of each day, so you could set it to 7pm.
- Save.
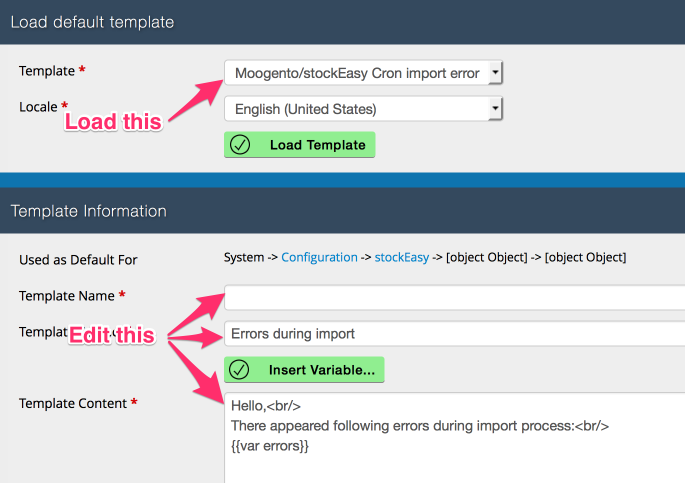
- You can edit the email which is sent in the event of an import error. To do that:
- Head to SystemTransactional EmailsAdd New Template
- Choose the preset option for 'Moogento/stockEasy Cron Import Error' and 'Load Template'.
- Edit that and save.
- You're set! This should now import the file from the remote site and set stock on your install based on that.
- It's a good idea to run a test - see if your supplier can make a test file with one sku that you can connect to and check all works well
Exporting Stock Reports
stockEasy provides an easy way to make great, customisable, stock reports. These can be really useful for accounting, connecting to other services, or simply just getting a weekly email overview.
stockEasy provides 3 types of stock report:
- Low Stock
- Lists products that are below the trigger-restock-qty threshold
- Filter by supplier to get specific stock reports to each supplier
- Add auto-email so each supplier gets an automatic email to restock products that they supply
- In Stock
- Lists all products that are in stock
- Good for accounting for value of held stock
- Inventory Change
- Lists all changes to inventory since the last report
- Doesn't include purchases - ie. good to get an end-of-day list fo everything that has changed on the warehose floor that day
In The Catalog Grid
The simplest option. You can export selected products to a CSV file or a PDF.
- First, set the 'EOL - End Of Life' attribute. You'll find the 'Manually Created Reports' section for this in the Config.

- stockEasy will not output any products with this attribute set to 'Yes'.
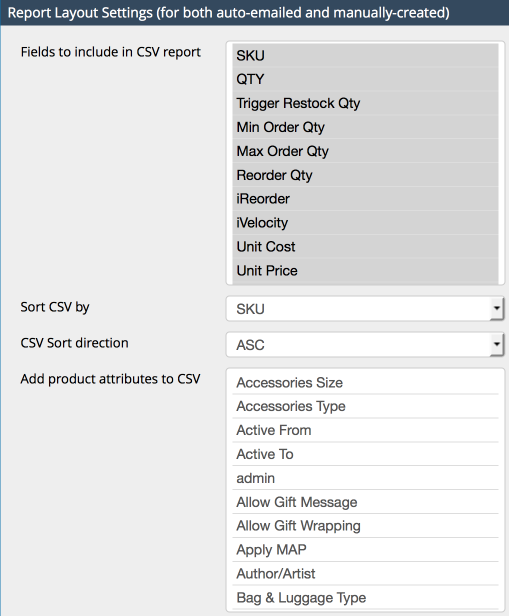
- Then find the 'Report Layout Settings' : you'll see identical options for both PDF and CSV exports.
- The PDF Export part has one extra section : Totals. You can include those in the PDF base.
- Save and then go to the Catalog Grid.
- Select the products you want the report for and in the Actions menu you'll see the new options to output CSV or PDF reports.
via Automatic Email
This is another awesome option. You can setup regular Stock Report Emails, individually custom formatted to each receiver. You could use this for:
- End-of-month Accounting (there's a specific output option for 'End-of-month)
- Daily/Weekly Accounting
- CEO Overview, weekly report
- Stock consolidation report
- Planning
- Incorporating into other processing software
- Before using output in any official accounting please triple-check the figures match what you're expecting!
Ok, let's get setup.
- We've probably already set the format for the PDF or CSV output, if not, find and edit the 'Report Layout Settings' in the Config.
- You can edit the format of the email which is sent to each (or every) auto-email recipient. To do that:
- Head to SystemTransactional EmailsAdd New Template
- Choose the preset option for 'Moogento/stockEasy Cron Reports' and 'Load Template'.
- Edit that and save.
- Make a 'Template Name' which you'll recognise later - this is what you'll choose from when setting up recipient-specific report emails.
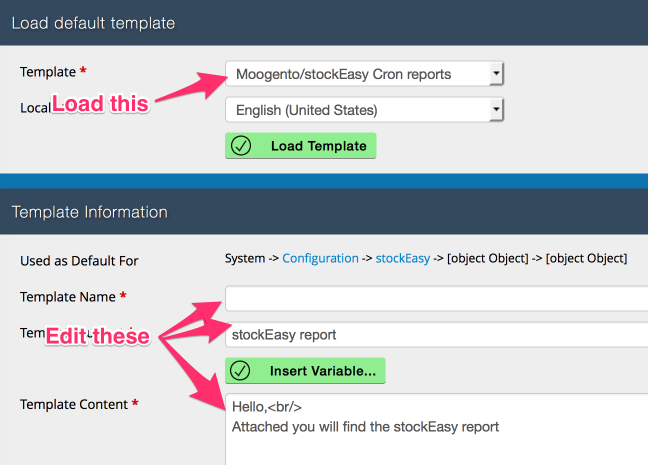
- Head back to the stockEasy config page.
- Click 'Add New' to make a new entry.
- Enable it by clicking the green switch.
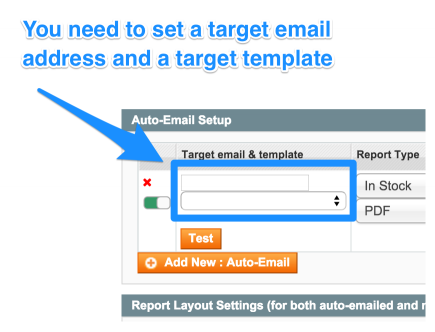
- Make sure you set the target email address and template, or there's nobody to send to.
- Set the other options.
- Save and you should be set!
Testing Automatic Email
stockEasy has a Test Button to check if you have the settings configured correctly.
- Make sure you have all settings set for the output that you want to test.
- If you don't set a target email or template, there's nothing to send to nobody, so nothing will send :)
Planning Stock Buys
This is a work-in-progress. Check back soon for an update. Here's an overview of what can be expected (some is already functional)
Another game-changing feature of stockEasy, this helps you to plan what stock to buy, based on per-product settings, and, past sales levels.
You can set how far ahead to look (for iReorder), so if your factory takes 90 days to manufacture items you could set it to plan ahead for the next 90 days.
What's more, it can look at the same period last year, so you don't get a recommendation to sell snow shovels in the summer.
iVelocity
Every day that stockEasy is installed, it runs through all your products and checks to see if they are:
- Enabled
- In-stock
- Visible
We can then calculate the Sales Velocity, or what we call the iVelocity. This is simply:
Number of sales (per product) / Days product has been available (according to above formula)
or more simply:
Average sales per day
Why is this useful?
If you have Product A, which made 100 sales over the last day, and Product B, which made 100 sales over the past year, you probably want to restock Product A before Product B, as it has made a lot more sales per day.
You can sort Stock Reports by iVelocity, so that you can get an idea of which products to restock first.
This figure is more accurate the longer you've had stockEasy running. For a new install however, stockEasy will make a rough estimate of iVelocity, based on:
- Date product was created (max 1 year ago)
- Number of sales since that date
This doesn't take account of out-of-stock days, or any days that the product wasn't available for purchase.
There's an admin option to reset this figure, based on each product's individual start date (max from 1 year previous), or based on 'most recently-added product, that was added more than 1 month ago'. The latter may help to level the playing field for historical product data. Once that's done, then stockEasy will be compiling accurate daily data to improve the numbers in the future.
Reorder
This number is what the current recommendation is for restocking each product. It is based on:
- Stock Qty
- Min Order Qty
- Trigger Restock Qty
- EOL
- Max Order Qty
It doesnt look at historical sales, or how any days ahead you want to plan (check iReorder for that).
Examples
ProductA has:
- Stock Qty : 12
- Min-order-qty : 10
- Max-order-qty : 200
- Trigger-restock-qty : 10
- EOL : false
stockEasy Low Stock Report will return Reorder Qty : 0 ('Stock Qty' is more than 'Trigger Restock Qty')
ProductB has:
- Stock Qty : 12
- Min-order-qty : 1
- Max-order-qty : 200
- Trigger-restock-qty : 20
- EOL : false
stockEasy Low Stock Report will return Reorder Qty : 8 (We're past the trigger qty, trigger-qty - stock-qty = 8)
ProductC has:
- Stock Qty : 12
- Min-order-qty : 100
- Max-order-qty : 200
- Trigger-restock-qty : 20
- EOL : false
stockEasy Low Stock Report will return Reorder Qty : 100 (We're past the trigger qty, MOQ = 100)
iReorder
Another game changer from stockEasy. In stockEasy General settings, you can set 'Estimate Restock Qty for next X days'. This will look at the same period last year, and work out what stock you'd need for the same period this year.
This is based on:
- iVelocity (ie. Sales-per-day) x ('plan ahead for X days' setting)
- Stock Qty
- Min Order Qty
- Max Order Qty
- Trigger Restock Qty
- EOL
"But my store is selling 2x as much as last year!" - stockEasy will also look at the historical store revenue change over the past year, and incorporate that into the planning. - If there is not 2 years of historical stockEasy sales, it will estimate as far back as it can.
Automating Product Stock Control
One sometimes frustrating thing with Magento is the need to set 4 things to get a product to show:
- Qty (Inventory)
- Stock Availability (In Stock/Out-of-Stock)
- Visibility (Catalog/Search/None)
- Status (Enabled/disabled)
- In addition you'll want to monitor if this next setting is set to Yes - if you're expecting Magento to adjust inventory levels with sales:
- Managed Stock (Enabled/disabled)
Even if you have 2,3,4,5 set, if you add Inventory after a product has been out of stock, your product will still not show.
In that case you need to specifically set 'Stock availability' to 'In Stock' or the product won't be available for sale.
If you just update inventory when you receive stock, your product listing page won't automatically update to show the product available for purchase.
Luckily stockEasy can help here :)
You can set it to automatically update the 'Stock availability' setting, when editing Inventory Qty.
How to Enable Automatic 'Stock Availability = In-Stock' Setting
- Ensure you have set 'Managed Stock' to 'Enabled' for your products.
- This won't work for products where this isn't enabled
- In stockEasy settings > General, set "Auto-set In-stock when Qty changes to 1+?" to Yes.
How to Enable Automatic 'Stock Availability = Out-of-Stock' Setting
Another often-encountered tripping point, is if you're selling configurable products.
If you have no stock in any child products, the parent product will still show, unless you've specifically set that parent product to be out of stock.
stockEasy has another time-saving fix here.
- Ensure you have set 'Managed Stock' to 'Enabled' for your products.
- This won't work for products where this isn't enabled
- In stockEasy settings > General, set "Auto-set Out-of-stock when Configurable product has no children with Qty > 0?" to Yes.
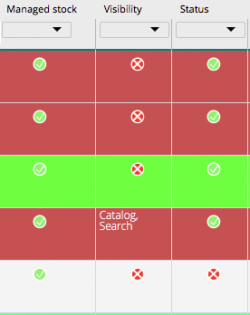
Also worth pointing out that stockEasy makes it visually very easy to see if you've set something wrong on products:
Setting Up Products for stockEasy
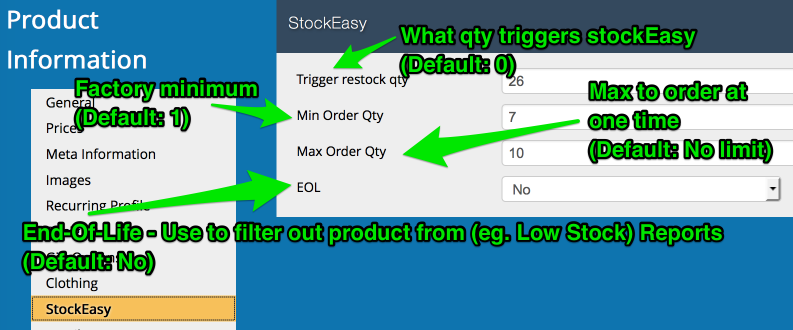
stockEasy adds a new section to your Product Detail page with 4 options:
Trigger Restock Qty
- The stock level at which stockEasy activates, when creating low-stock reports. Ie. if this is set, then stockEasy won't output a low-stock report until the stock qty is equal-or-lower than this number.
Min Order Qty
- Usually used as a factory minimum order. Default 1. If set then any time the product passes the 'trigger restock qty', the minimum qty in the 'low stock' report will be this number.
Max Order Qty
- Usually used as a sanity-check factor to prevent runaway orders. When stockEasy determines a restock qty is required, it won't go past this number.
EOL
- A way to block specific products from low-stock reports. Usually used where a factory has stopped making something, or you expect demand to drop eough that you don't want to restock this.
You can set these options:
- In the Product Detail Page, or
- Importing via a CSV using the stockEasy 'Process Stock : CSV' engine (set the 'Import Setup' options for 'Method: Manual'), or
- Using a tool like Magmi
- Globally in the stockEasy admin settings
- System > Configuration > StockEasy > Global reorder defaults, there is "Force override of product-set values
- You can set things like 'EOL', 'Minimum reorder qty', 'Maximum reorder qty' on a per-product level. This admin setting allows you to override all product-set options with the ones set here in the admin section.

