Difference between revisions of "stockEasy Setup"
m |
m |
||
| Line 185: | Line 185: | ||
#Enable it by clicking the green switch. | #Enable it by clicking the green switch. | ||
#Set the other options. | #Set the other options. | ||
| − | #:[[File:auto-email-setup.png|link=| | + | #:[[File:auto-email-setup-magento.png|link=|1000px]] |
#Save and you should be set! | #Save and you should be set! | ||
Revision as of 14:36, 10 June 2015

Contents
Aims & Preparation
Most of this is included if you get the Installation & Setup Service
stockEasy is an extremely powerful tool for dealing with inventory in Magento. We're going to set it up for most common tasks and see what it can do.
Follow the Easy Install Guide to get stockEasy up and running.
Make sure you have your Magento Cron running - stockEasy needs to use that.
What Does stockEasy Do?
It helps in 3 main areas:
- Editing & checking stock levels
- Exporting stock reports
- Planning stock buys
Editing stock levels
The standard Magento way to do this is:
- Click an item, wait for it to load
- Click the Inventory tab
- Find the specific item
- Set the new qty, trying not to make a maths error
- Remember to set the status to 'In Stock' and 'Enabled' (or the product won't be available to buy)
- Scroll back up and save the product
- Click 'back' to return to the Catalog Grid
- Wait for that to load again
- Find the next item
The stockEasy way to do this is:
- Find the item
- Type the new stock level (use artithmetic in the cell if needed)
- Hit Enter
- Find the next item
This is obviously a lot less time-consuming, and much less prone-to-errors. It's also a lot easier to train someone how to do it ("click the qty, enter the new qty" vs. ... A long process...)
--or--
- Import a simple csv file, where the only required fields are 'sku' and 'qty'.
Handy if you're generating stock numbers on spreadsheets, or outputting from other warehouse management software.
--or--
- Scan the products as they come in the factory door with a barcode scanner.
If you set the stock at the moment it arrives in the warehouse, and use things like Purchase Orders, where the delivered qty may be different to the ordered qty, then this is a great way to streamline the process.
--or--
- Automatically import stock from your suppliers.
Ideal for dropshippers, or if you have suppliers with varying qty of items on hand that you can order from direct.
In The Catalog Grid
You can also edit cost and price the same easy way
- Find the item to change (eg. search in the sku column)
- Click in the 'Qty' field, and type in the new qty.
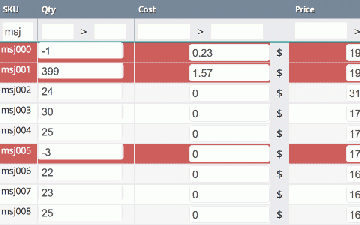
- Use simple arithmetic to make this easy: eg. type +371 on the right of the current qty, to add 371 to the current qty
- Hit Enter
- The cell will glow green when set : easy to see when it's saved, and visually easy to find your place.
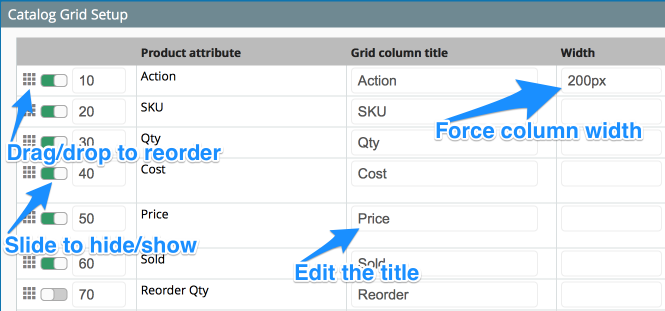
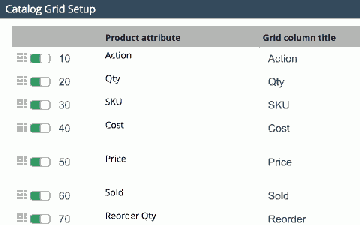
Editing The Grid Layout
stockEasy provides a super easy-to-use Grid Editor : only show columns that are useful to you
- Go to the SystemConfigMoogento > stockEasy -> Catalog Grid Setup
- Slide the green on/off switches to show/hide each column
- Drag the grid icon (left of each entry) to reorder the columns
- Set the column title to something you'll understand
- Force the column width by setting that
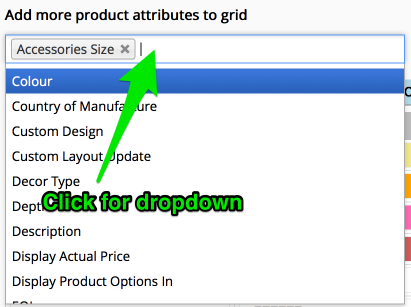
Add Custom Attributes To The Grid
- Just click in the 'Add more product attributes to grid' section.
- Choose the ones you want, and save.
Set EDX Row Warning Colors
- What's EDX? Estimated Days to Out-Of-Stock
- Set this in the same part of the config.
- You can add as many steps and custom colors as you like.
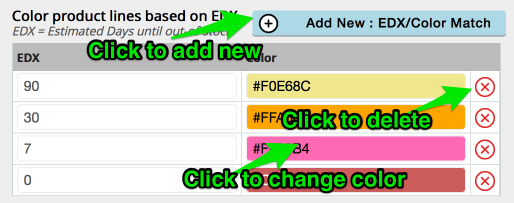
You'll have an easy-to-see visual low-stock warning.
via Manual CSV Import
- Head to to the CatalogManage Products(Product Grid) and click Import Stock : CSV
- You'll arrive on a page with one button; click it and select your CSV file.
- It will import that and then set your stock levels automatically from that.
- You need a sku column in that file, so stockEasy knows which product to edit.
- You can also have any of these optional fields:
- qty
- price
- cost
Here's a sample CSV stock import file
via Barcode Scan
- An awesome stockEasy feature. This significant cuts training, you can now give a team member a barcode scanner and tablet (iPad mini works well) and just get them to scan incoming stock.
- We made a separate screen so, in conjunction with powerLogin, you don't need to give access to any other parts of your admin.
- The special screen has been designed to cut out all that unnecessary Magento clutter and focus on the important bits related to importing stock.
- Set the product identifier attribute - this will usually be sku. This is set in SystemConfigMoogento > stockEasy -> Import Stock : Scan -> Which product attribute are we scanning?
- Bonus! If you're setting a custom attribute at the same time (eg: warehouse shelf location), then choose that attribute in the 'Show additional attribute' section
- If you want to scan in the qty (instead of entering it via the iPad keyboard)
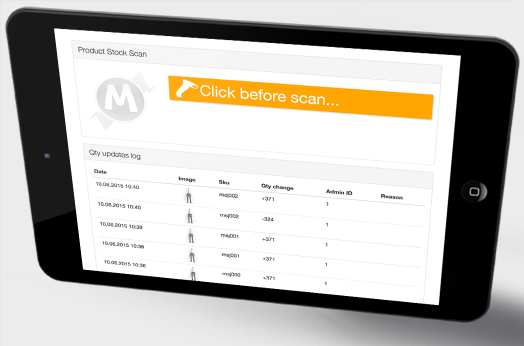
- Head to to the CatalogManage Products(Product Grid) and click Import Stock : Scan
- You'll arrive on a special page, designed just for importing stock with a Barcode Scanner.
- Use powerLogin to set this as the login landing page for staff who only (or primarily) need access to it
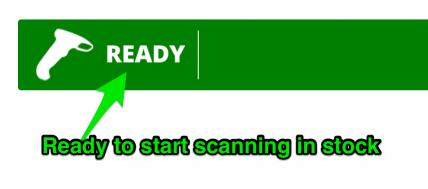
- If you see the orange 'Click before scan' notice, just touch/click in that button.
- When we have a green 'Ready': we're ready to start.
- Scan the product barcode.
- The product image will load up to help identify issues (eg. if the manufacturer has changed the barcode).
- If you're just doing a stock check, you can read the qty that Magento has registered for stock.
- If you need to edit the stock qty, just select the check box, and you'll see an editable qty box appear.
- If you set in the config to set a second attribute (such as location), you'll also see that with a selectable checkbox.
- stockEasy will remember your selections here, so if you're only entering new stock, you won't need to keep setting the checkbox(es).
- As soon as you've finished that product, stockEasy will cue up the next - there's normally no need to click/touch anything in the screen once started.
A standard process here might be: Adding new stock to warehouse shelves
- Pick up item.
- Scan item barcode.
- Scan item shelving location.
- Scan item stock qty (with the option set to 'add to', so you're adding to the current stock levels).
- Repeat.
via Automatic CSV Import
This is a gem. If you can persuade your suppliers to provide a live csv file (eg. saved at a specific URL), then stockEasy will take care of setting your stock levels from that. (No need for you to constantly update stock) This is a huge time-saver for dropshippers. It's also an easy way to do training for staff that might be more used to saving spreadsheets than working a website (or barcode scanner) - you could just get them to save your stock levels, and have stockEasy pick up the file on a daily basis.
- You need your Magento Cron running for this to work (as with most stockEasy features). Do check that it is running...
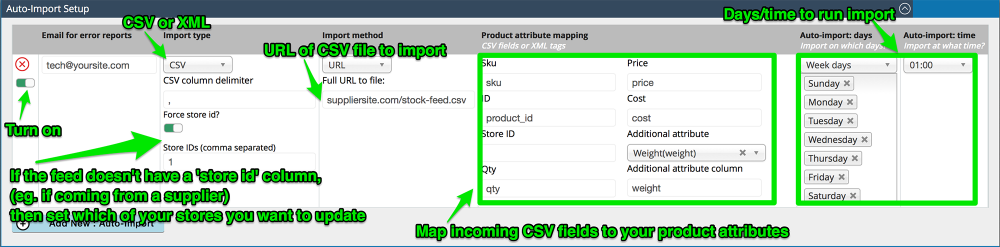
- Ok, first we want to set a new import record. You can set as many as you like.
- Click the 'Add New' button to add a new record.
- Click the green switch to enable this record.
- Enter an email for error notices (this will get sent if there is any issues importing).
- Set whether you are importing an XML or CSV file.
- If CSV, set the field separator (usually a comma).
- Set the full remote URL of the CSV file, including
http://wwwif appropriate.- We also have options for connecting via FTP to a remote server, and collecting a local file-system file.
- Now, map out the incoming CSV fields to your local attribute names.
- Eg. if the remote file 'sku' field is labelled 'product_barcode', enter 'product_barcode' under the 'Sku' section.
- Set which days you want this to run.
- Eg. if the remote site updates stock on weekdays, just set those days. If you're not operational weekends, it's maybe a good idea to not have it update stock on the weekends in the unlikely event that it causes an error.
- Set which hour you want this to run.
- Maybe this supplier updates their stock at the end of each day, so you could set it to 7pm.
- Save.
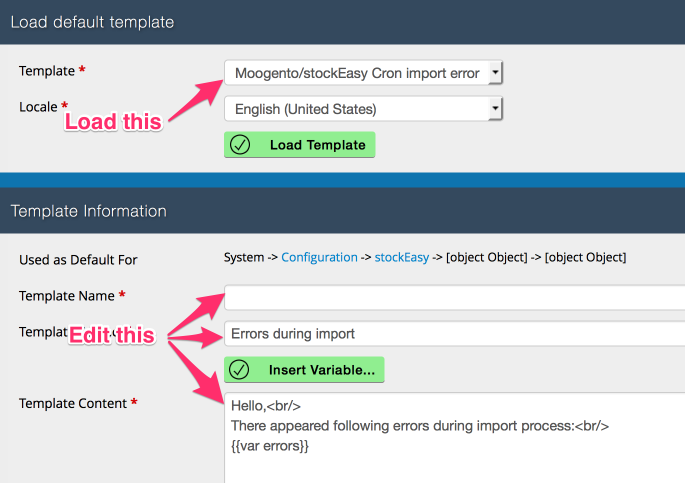
- You can edit the email which is sent in the event of an import error. To do that:
- Head to SystemTransactional EmailsAdd New Template
- Choose the preset option for 'Moogento/stockEasy Cron Import Error' and 'Load Template'.
- Edit that and save.
- You're set! This should now import the file from the remote site and set stock on your install based on that.
- It's a good idea to run a test - see if your supplier can make a test file with one sku that you can connect to and check all works well
Exporting stock reports
stockEasy provides an easy way to make great, customisable, stock reports. These can be really useful for accounting, connecting to other services, or simply just getting a weekly email overview.
In The Catalog Grid
The simplest option. You can export selected products to a CSV file or a PDF.
- First, set the 'EOL - End Of Life' attribute. You'll find the 'Manually Created Reports' section for this in the Config.
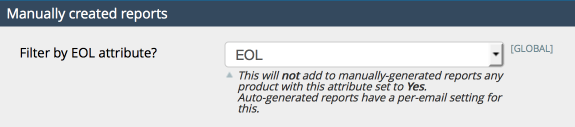
- stockEasy will not output any products with this attribute set to 'Yes'.
- Then find the 'Report Layout Settings' : you'll see identical options for both PDF and CSV exports.
- The PDF Export part has one extra section : Totals. You can include those in the PDF base.
- Save and then go to the Catalog Grid.
- Select the products you want the report for and in the Actions menu you'll see the new options to output CSV or PDF reports.


via Automatic Email
This is another awesome option. You can setup regular Stock Report Emails, individually custom formatted to each receiver. You could use this for: - End-of-month Accounting (there's a specific output option for 'End-of-month) - Daily/Weekly Accounting - CEO Overview, weekly report - Stock consolidation report - Planning - Incorporating into other processing software
- Before using output in any official accounting please triple-check the figures match what you're expecting!
Ok, let's get setup.
- We've probably already set the format for the PDF or CSV output, if not, find and edit the 'Report Layout Settings' in the Config.
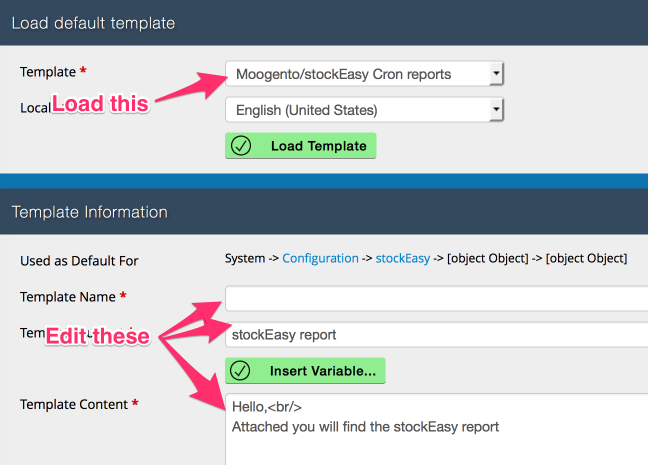
- You can edit the format of the email which is sent to each (or every) auto-email recipient. To do that:
- Head to SystemTransactional EmailsAdd New Template
- Choose the preset option for 'Moogento/stockEasy Cron Reports' and 'Load Template'.
- Edit that and save.
- Make a 'Template Title' which you'll recognise later - this is what you'll choose from to set recipient-specific emails.
- Head back to the stockEasy config page.
- Click 'Add New' to make a new entry.
- Enable it by clicking the green switch.
- Set the other options.
- Save and you should be set!
