shipEasy Quickstart
 Most of this 'basic setup' is included if you get the Installation & Setup Service
Contents
Installation
Follow the Easy Install Guide to get shipEasy running.
Column Display & Ordering
Head to the SystemConfig > Moogento / shipEasy and find the Grid Columns Setup. It's probably good to have the SalesOrders page open on another window. Then go through and remove/add/reposition the columns to suit your store and way of working. This will likely evolve over a few weeks, so just get the obvious ones now.
Store Logos
This really helps get a quick visual overview of where the orders are coming from.
- Load, into Photoshop or equivalent, the logo image template which came with your extension zipfile > _sample_images / sample_website_images /Template_website.psd.
- Grab your logo, ideally a vector image.
- Copy that and paste into the template file. You'll need to resize this to fit in the template.
- We've also got some standard logos, premade in the same sample images folder (eg. eBay).
- Save this as a transparent png-24 file.
- Head back to the shipEasy config > Grid Columns Setup -> Store set Replace with image > Yes, and then upload your images for each store.
Order Flags & Custom Attributes
Quickly and easily set meaningful flags on orders. A flag can be an image (including custom ones), preset text, custom text, or the current date. A flag can be set, in conjunction with pickPack, when you create a PDF (eg. you can show 'printed' so that you can easily keep track of where each order is in the processing line).
- First up, find the custom columns and turn them on. We've pre-filled some values to get you going fast.
- In shipEasy Config > Grid Columns Setup find Custom Attribute 1 and turn it on.
- For flags you can use:
- Preset images:
- Just include any of these:
{{flag_red.png}}{{flag_orange.png}}{{flag_green.png}}{{flag_grey.png}}{{flag_shipped.png}}{{flag_checkered.png}}{{flag_alert.png}}- in this format:
Red Flag|{{flag_red.png}}- (In this example
Red Flagwill show as the dropdown option, and the red flag image will show in the Orders grid.)
- Custom images:
- Save .png images in skin / adminhtml / default / default / moogento / images / flag_images /
- If you're using a custom admin theme you might need to duplicate that folder structure and files into your theme.
- Use that filename in this format:
Custom Flag Text|{{custom_flag_image.png}}- (In this example
Custom Flag Textwill show as the dropdown option, and the custom flag image will show in the Orders grid.)
- Custom text:
- Enter in this format:
Custom Text|#FFFFFF- (In this example
Custom Textwill show in the orders grid on a white background (#FFFFFF= hex code for white).)
- If you're not sure about hex codes, check here.
- Preset images:
Showing Shipping Addresses
This is one the great missing features of Magento, if you ship physical products. Now you can see the full shipping address of each order, before printing and processing, check for address problems, and help sort orders.
- shipEasy Config > Grid Columns Setup / Name column > Show Address? set to Yes and you're away.
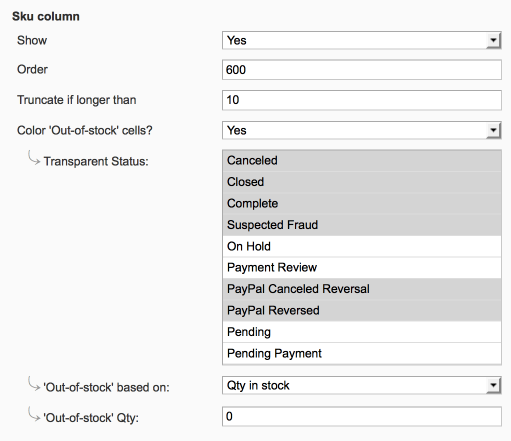
Showing Out-of-Stock Items
Very handy this, how you use it will depend on how you run your store, but essentially you can quickly see orders which have out-of-stock orders in.
You could use this:
- With pickPack to print 'Out-of-stock' PDFs or CSVs, to order more items.
- As a double-check against 'never out-of-stock' product-lists.
- As a marker for when stock levels reach a certain level, to know when to re-stock.
- Choose your settings here : shipEasy Config > Grid Columns Setup / Product name column + Sku Column