shipEasy Advanced Setup

Contents
Aims & Preparation
Most of this is included in the Installation & Pro Setup Service
We're going to activate some of shipEasy's more advanced features.
Follow the Easy Install Guide and the shipEasy: Quickstart to get shipEasy up and running.
We're going to be mainly focused on SystemConfiguration > Moogento / shipEasy and SalesOrders
Customise Column Display
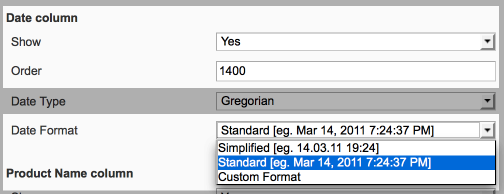
Date Column
We have auto-selected a shortened date format, as part of the plan to reduce horizontal space (less scrolling) and reduce visual clutter. We figure most people don't need to see long-form month, the exact second an order was placed, etc. If you're not one of those people, you can change it back to the default date format, or use your own custom format.
- In Grid Columns Setup find the 'Date' column.
- You'll see a dropdown menu of choices : make your pick!
- If you want a custom date format, check php.net/date for details of the options available.
- Eg. this is the format to mimic the default Magento date format:
- M j, Y g:i A
- Eg. this is the format to mimic the default Magento date format:
Show Persian & Thai Calendars
With shipEasy you can now see the date of an order in your local Calendar format!
- Just choose which format you want and it will be displayed in the Date Column
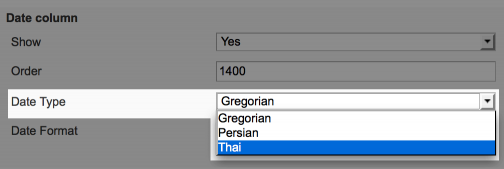
- Gregorian = Default!
Set Row 'Order Status' Color
One great feature of shipEasy is the ability to set the color of each row based on the Order Status. This allows you to quickly visually scan orders for issues and see which need processing. We've set the defaults to basically be like traffic lights:
- Clear (White) for Processing
- Red for a hold or problem
- Orange for Pending Payment
- Green for Complete/Shipped
You can customise these colors to suit your process.
- Click in the color you want to change
- A color picker will appear, you can either choose a color in the picker, or type/paste in the color code.
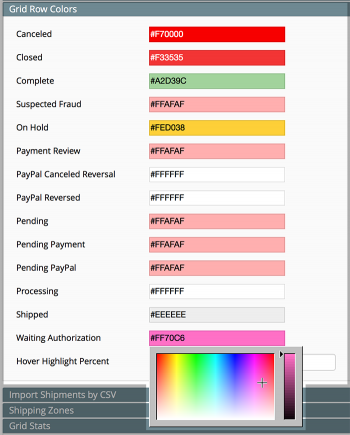
- You can also set the Hover Highlight Percent to adjust how each row highlights when hovering over the grid.
Show Product Images
Depending on your packing process you may find it useful to see product images in the Order Grid.
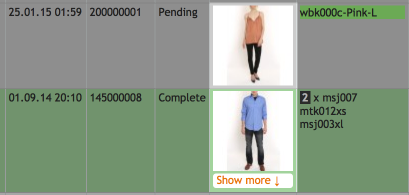
- Just turn these on in the 'Grid Columns Setup' in SystemConfiguration > Moogento / shipEasy
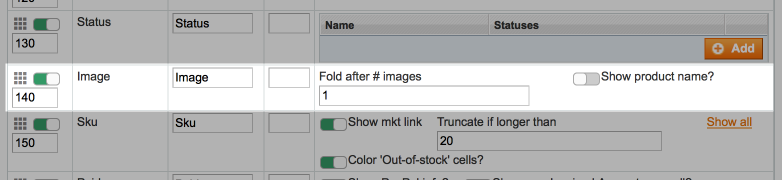
- Fold after x images : This sets at what number of images we collapse into a 'click-to-open' link (to not use the entire vertical height of the screen with multiple product orders).
- Set this to 0, to keep the images always collapsed, to 1 to show the first one, etc.
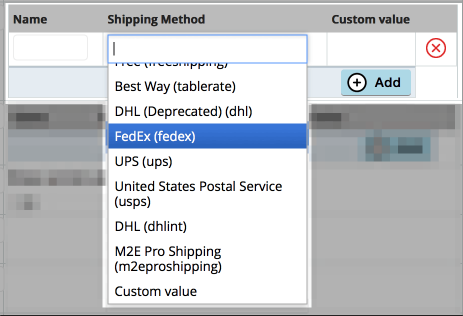
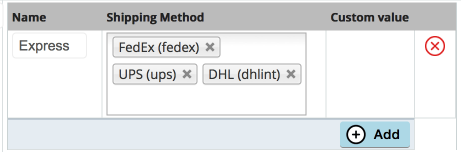
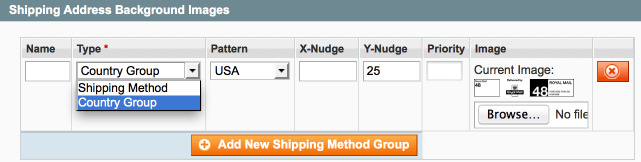
Group Shipping Methods
shipEasy enables you to quickly sort by shipping method groups. How could this be useful? Eg. group all Express methods together, and process those at the beginning of the day, and again just before the courier cutoff time. To set this up:
- Go to the shipEasy Grid Columns Setup config section.
- Add a new group:
- Click in the 'Shipping Method' field, you'll see the available Shipping Methods.
- Click each shipping method, to add to the group.
- Finally add a name for the group.
- Save the config.
- You'll now see an option to select that group in the Orders Grid -> Shipping Method column.

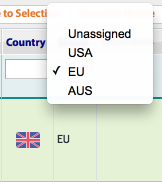
Country Groups
We can create up to 4 groups based on countries. This can be used for:
- Grouping orders in Magento based on order status, for the 'Weights/Orders Bar', to have a quick overview of where your orders are heading.

- Turn it on here, and choose which order statuses will be counted:
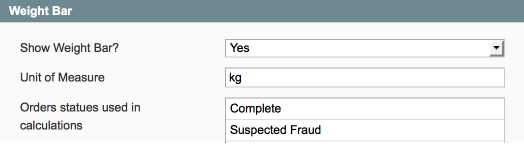
- Turn it on here, and choose which order statuses will be counted:
- To group by and filter by country group in the SalesOrders page.
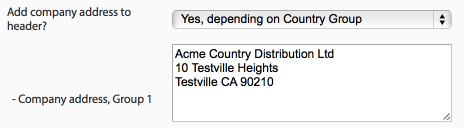
- In conjunction with pickPack to show specific return addresses / company addresses (per store) based on the country group.
- In conjunction with pickPack to show specific shipping labels based on the country group.
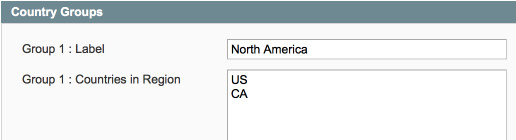
Ok, let's set these up. Head to the Country Groups section.
- We've pre-filled some standard options, and listed some common groups to make it easy to copy/paste.
- Here I've made a group 'North America' and added in Canada and the USA.
- Common groups are usually based on shipping rate or carrier, or to help with marketing info:
- Home country
- Home country group
- Specific other country group
- Rest of World
Order Barcode Scanning
Ok, are you ready to save yet more hours every single day, reduce mistakes when shipping and processing orders, and generally feel like a bit of a rebel with a gun in your hand?! Ok, it's a laser (barcode-reading) gun, and the bonus is that this makes order processing so easy, so pain-free, that you can easily train someone else in minutes to do this, so you can focus on running your business. Even if you're left holding the gun, you're going to save so much time that you'll be a happy gunner.
- Use in conjunction with pickPack, so the order IDs are printed as barcodes on the Packing Sheets / Picklists / address labels / zebra labels.
- Turn this feature on in the SystemConfigMoogento > shipEasy > Order Barcode Scanning section.

- Back in the SystemOrders page you'll see a new button top right:

- Click it.
- A new section will slide open:
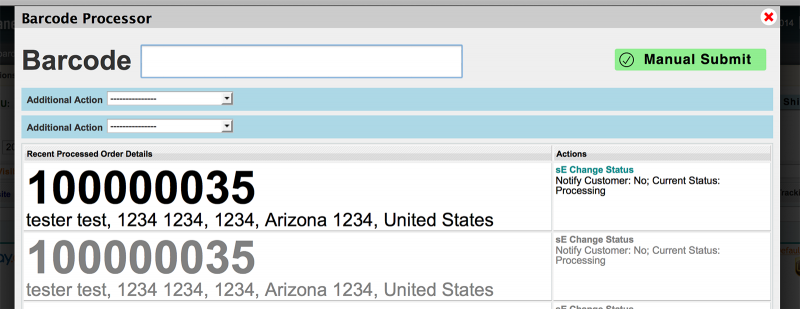
- Now, setup the action(s) that you want to happen when you scan an order.
- You can set two actions (from a dropdown choice), which will be applied for each scan.

- See an easy-to-read history below the scan box, to check you're not missing anything.
- You can set two actions (from a dropdown choice), which will be applied for each scan.
- When you've set the actions, just make sure the cursor is in the big text field, and scan your first order ID barcodes in Magento!
- Most barcode scanners will send an Enter signal after each scan. If you'd like to copy/paste an Order ID into the barcode field (or use a scanner which doesn't send an Enter signal, you can use the 'Manual Submit' button to complete the order.
- ! Make sure that the last scan finished processing before your start on the next one.
Boom! You could do all this in one barcode scanner pop:
- Set the order status to 'shipped' or 'complete'.
- Email the customer their shipping confirmation email.
- Add a custom tag to the order (eg. tag all orders in a specific batch for each processing later on).
- Why do this?
- Maybe you take a day to get all shipments ready, and don't want to get your customers thinking that you have shipped their orders until the end of the day. If you tag all orders processed each day, at the end of the day you can filter by that tag, and process all orders as 'Shipped' as they are on the way out the door.
- Accounting - you can now make an easy report by the day using pickPack to show profit/loss.
Barcode Scanner Recommendations
- I'd recommend laser scanners over CCD types.
- Here's a good barcode scanner: this one.
- If you're getting a wired (vs. wireless) one, check the length of the cable will be suitable for your setup. You can usually substitute longer cables.
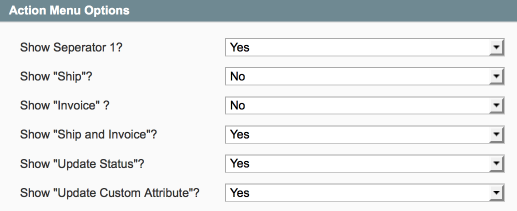
Hide Un-used Options
You'll probably realise that you just don't use some of the massaction menu options. Turn 'em off and de-clutter your dashboard!
- These are at the bottom of the shipEasy Config > Action Menu Options
...From Specific Users
This is a great one, if you have multiple people accessing your Magento install.
- Reduce the chance of mistakes happening and restrict the shipEasy options to specific users.
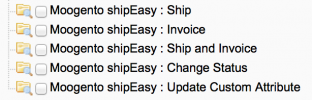
- eg. you can hide the 'Ship & Invoice' option from the warehouse crew / accountants / etc.
- First edit the specific user role in SystemPermissionsRoles
- Then assign those roles to specific users in SystemPermissionsUsers