Difference between revisions of "pickPack Advanced Setup"
m |
m |
||
| Line 186: | Line 186: | ||
Next step is to install the pickPack Email extension. | Next step is to install the pickPack Email extension. | ||
#You'll find this in the [https://www.moogento.com/downloadable/customer/products/ Downloads] section of your account. | #You'll find this in the [https://www.moogento.com/downloadable/customer/products/ Downloads] section of your account. | ||
| − | #:: [[File: | + | #:: [[File:pickpack_email_extension.png|link=|895px]] |
#Download & install that extension. | #Download & install that extension. | ||
#Test - placing orders, order emails. Quite a few Magento extensions rewrite the email code, so you do need to check all is working after install. | #Test - placing orders, order emails. Quite a few Magento extensions rewrite the email code, so you do need to check all is working after install. | ||
Revision as of 13:26, 5 July 2015
Contents
- 1 Aims & Preparation
- 2 Zebra Labels
- 3 Setting up Shipping Labels (aka. PPI Images)
- 4 Supersize PDFs
- 5 Change Order of Subtotals in Invoices / Packing Sheets
- 6 Attach pickPack PDFs to Magento Emails
- 7 Split Packing Sheets by Supplier (or any other attribute)
- 8 Hide Un-used Options
- 9 Leverage pickPack to Generate More Sales
- 10 Leverage pickPack to Save Money And Time
Aims & Preparation
Most of this is included in the Installation & Pro Setup Service
We're going to dive into the more advanced features of pickPack.
We'll also look at some ways that pickPack can save you time & money, and help you to generate more orders.
Follow the Easy Install Guide and the pickPack: Quickstart to get pickPack up and running.
We're going to be mainly focused on SystemConfiguration > Moogento / pickPack and SalesOrders
Zebra Labels
Print out your orders for Zebra printers direct from Magento, fully customize with your prepaid shipping labels, etc.
- Add in order ID barcodes, return addresses.
- In the config you can rotate the return address (eg. have it vertical down one side), and position the barcode.
- Customize label padding and margins to suit your label sheets.
- Show a list of products ordered on the same label.
- In the config you can setup column positions for the various product attributes.
- Add in your company logo: do this in Shipping Address Background Images.
- If you don't want it to change based on Shipping Method, just include an image with a blank in Pattern.
- You can also rotate the output PDF to suit your printer.
Setting up Shipping Labels (aka. PPI Images)
This is an extremely powerful option, and if setup correctly can produce very professional results.
This will save a lot of time from order processing, cut packing and shipping errors, and look great for your customers.
- Add in shipping label images, that change based on the Magento shipping method chosen.
- Add these to the shipping addresses in: Packing Sheets Invoices Zebra Labels
- Just set this option to Yes in each section.

- and then find the Shipping Address Background Images section.
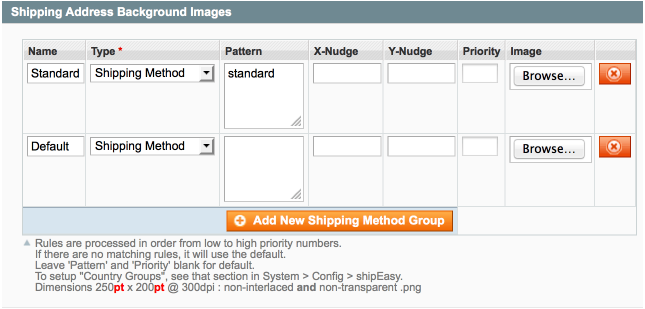
Here I've added two variants:
- A default option, by leaving the Pattern blank this automatically becomes the default option. Ie. when no other patterns match this will be shown.
- A 'standard' option. By entering
standardin the pattern section, this will match shipping methods with 'standard' in.
I've then gone and clicked Browse for each and added in my edited background image for each option.
- To make your own images, edit the zipfile > _sample_images / _shipping_backgrounds / Shipping_image.psd file.
- You'll likely want to include your business logo and return address.
- If you have different return addresses for different destinations, you can set the return address as a text option (based on country group).
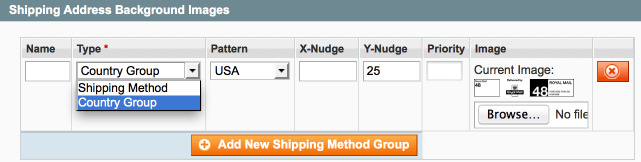
- If you find that you need to nudge the background image on the printout, you can do that in the X-Nudge ( [-] = left / [+] = right) and Y-Nudge ( [-] = down / [+] = up) fields.
- If some addresses will match multiple patterns, you can give them a priority as well.
- Priority:1 will get matched before Priority:2
- In conjunction with shipEasy you can choose a filter based on the country group.
What is a PPI Image?
If you're shipping at least 1000 items a year out of the UK then Royal Mail offers 30-day credit accounts, with the PPI service.
PPI = Printed Postage Impressions : http://www.royalmail.com/general-correspondence/uk-delivery/printed-postage-impression-ppis
These are the different ones that you can print and use:
- 1st Class
- 2nd Class
- Economy
- Royal Mail 24™
- Royal Mail 24™ Signed For
- Royal Mail 48™
- Royal Mail 48™ Signed For
pickPack can auto-assign these labels based on your shipping method - easy!
Once your account is approved RM will give you a unique PPI number, which you add to your PPI images.
Once approved you will be issued with your royal mail PPI number, you then use this to print off your own PPI impressions. You can add this number direct into the template that we include zipfile > _sample_images / _shipping_backgrounds / Shipping_image.psd
You get reduced RM prices, compared to over-the-counter prices. Similar to franking, a similar way to post a lot of packages, but then you're spared the hassle of hiring the franking machine, paying for franking value refills, etc.
Creating PPI Images to Use with pickPack
The label template we include should work with most default label sizes.
You can find a few templates here : zipfile > _sample_images / _shipping_backgrounds /
- You'll see some specifically for Royal Mail, and some specifically for landscape and portrait labels.
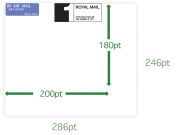
- You may have downloaded a PPI image from Royal Mail. This will be the wrong dimensions for pickPack, but will have your unique ID:
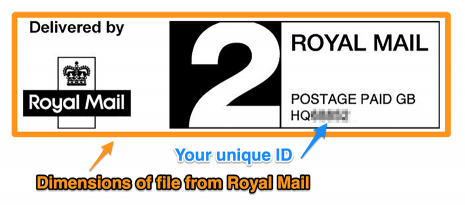
- Enter that ID in our template file:
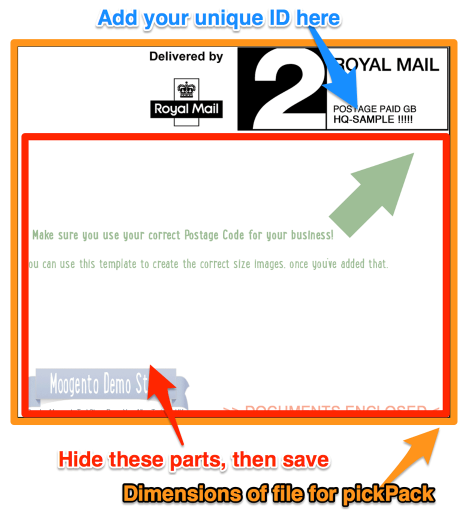
- Save that template file (note the different dimensions to the PPI image from Royal Mail) and import to pickPack.
Why do we use a different-size template? That way you can design the entire label, e.g. adding your logo, a background image or return address, etc.
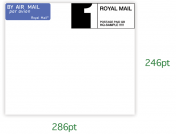
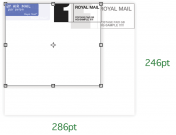
Re-sizing PPI Images to Fit Custom Labels
If you need to resize the printed image smaller, the easiest way is to resize the image, inside the same file dimensions.
If you just upload a smaller file dimension, pickPack will re-size it up.
Here's a quick graphical explanation how to do this, if you're not sure:
- Load the template into Photoshop:
- Select all layers and resize to the size that you want:
- The image is now resized inside the same file dimensions:
- Save & upload.
Rolling Your Own Images
- We have a range of correctly-sized editable templates in the product zip file that came with your extension.
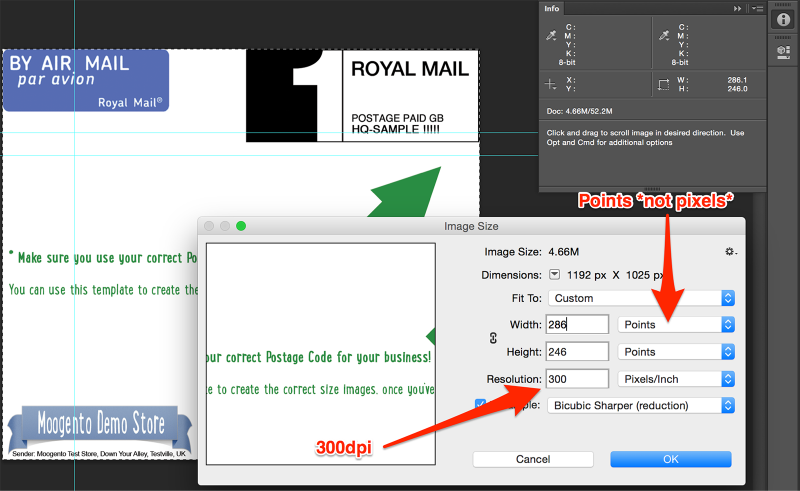
- If you want to make your own, there's a few important things:
- Make sure the resolution is 300dpi (or the image will print blurry).
- Look at the sizing in points not pixels (points relate to printed dimensions, and pixels relate to screens).
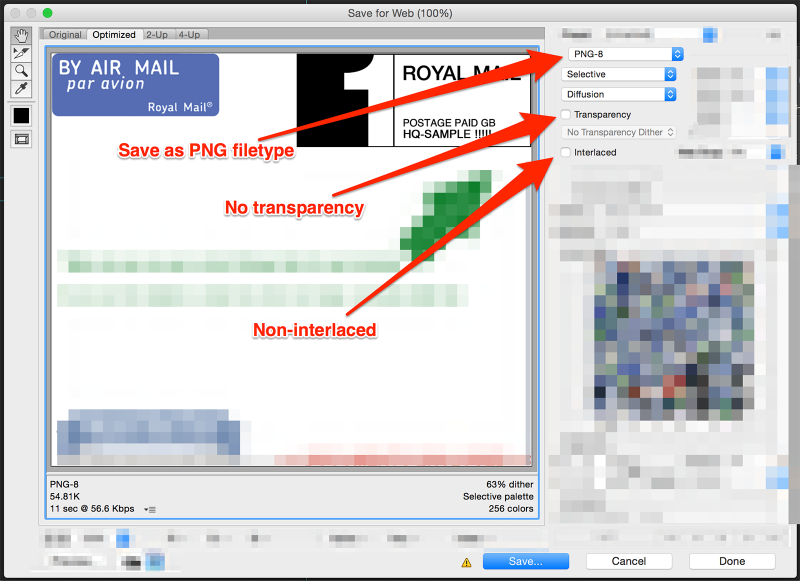
- Save as non-interlaced, non-transparent, PNG file.
How to Ship with PPIs?
- Once you've printed off your labels with pickPack and prepared your packages, group them by letters and parcels.
- Put those groups in mail sacks, counting as you go, and then weigh the sacks.
- You then have average weight per item type, and will be charged based on that.
- Print the despatch note and either take to the Post Office or arrange a pickup.
- Pickups cost around £15, unless sending over £15,000/year in which case they are free.
- Your items are sent and you'll be sent an invoice.
Supersize PDFs
Let's get it o-on, let's make some tasty PDFs. We're going to look at Packing Sheets & Invoices. So far you'll have nice sharp logos, color-coordinated title bars, and integrated labels. With some changes we can really make these stand out.
We're still in the SystemConfiguration > Moogento / pickPack configuration section.
Full-width Top Logo
pickPack can deal with full-width logos, which can look really good.
Bigger images = bigger filesize PDFs : increase your server memory resources, or your site will likely break when you try to make a PDF
- Set the Header Logo > Logo position to Full Page Width

- Create a template file in Photoshop to be wide 540pt (562pt for US-Letter) @ 300dpi. You can make this image as tall as you like - pickPack will adapt.
- Save image as non-transparent png-8, and reduce the number of colors used to get a smaller filesize : you will generate PDFs faster and use less server resources.
- You might want to add your company address in this full-width logo, so that you can easily style it
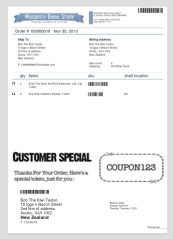
Full-width Bottom Image
This can be a great way to include styled return instructions, a company address or logo, or a promo coupon. This way you're styling the top and bottom of the PDF to match your brand.
Bigger images = bigger filesize PDFs : increase your server memory resources, or your site will likely break when you try to make a PDF
- Make an image in Photoshop with the same width as the full-width top logo
- Save image as non-transparent png-8, and reduce the number of colors used to get a smaller filesize : you will generate PDFs faster and use less server resources.
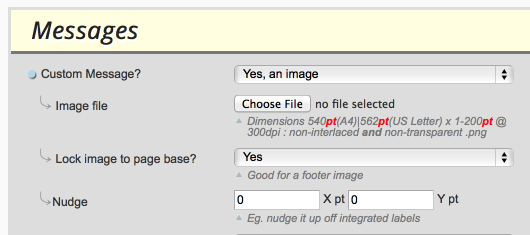
- Choose these slightly-hidden options :
- Custom Message? > Yes, an image
- Lock image to page base? > Yes
- If you use integrated labels, you'll then want to nudge this image up above the top of the labels, use the Nudge : Y pt
- If you have orders where they extend past one page, you will also want to edit the Page 1 Product-lines cutoff Y-pos to be above the height of the base image. This way when the order line items reach that point, they'll stop and go to a new page, leaving your shiny image unadulterated.
Here's a sample of this, with a promo coupon added:
Use Custom Fonts in PDFs
Have a brand-specifc font which you'd like to use in your PDFs? Or some specific characters which are missing? You can use your own font file, fairly easily, if you're at a basic level of understanding with FTP and transferring/renaming files. This is a bit tacky, but it works so hey :)
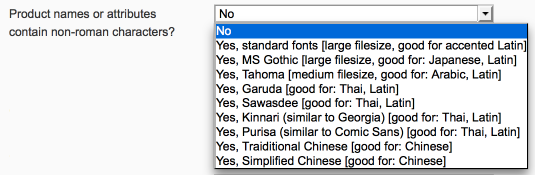
- Set General > Product names or attributes contain non-roman characters? to Yes [choose suitable option]
- Now choose a font there, it doesn't matter which one. For this explanation let's say 'Sawasdee', and save the config.
- Find Step_1/app/code/local/Moogento/Pickpack/Model/Sales/Order/Pdf and look for the font files that match the name of the font that you've chosen.
- Rename them eg. from sawasdee.ttf to sawasdee_old.ttf
- Upload your font file (e.g. your_brand_font.ttf to the same folder.
- Rename the new font to match the previous one that you renamed, ie. your_brand_font.ttf has the name sawasdee.ttf
- Print and be amazed!
Change Order of Subtotals in Invoices / Packing Sheets
Depending on your country's standards and your own setup, you may want to change the order of subtotals, when showing pricing information in the PDFs.
You can change this order in the 'Subtotals Order' section in 'Page Base':
![]()
Attach pickPack PDFs to Magento Emails
- Send your customers a nice Invoice in their order email.
- Include a copy of the Packing Sheet in the shipping confirmation email.
- Send your accountant an Invoice as soon as each sale happens.
Setup Transactional Emails
First step is to check that you have proper transactional emails setup.
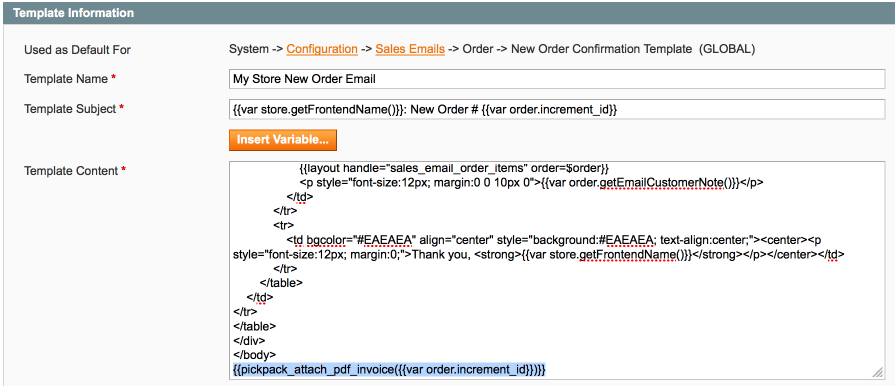
- Edit the SystemTransactional Emails email that you want to attach one of these our great PDFs to.
- At the bottom of the content, add either of these (or both):
<pickpack_email>{{var order.increment_id}}{{attach_invoice({{var order.increment_id}})}}</pickpack_email>to attach the pickPack PDF Invoice<pickpack_email>{{var order.increment_id}}{{attach_packingsheet({{var order.increment_id}})}}</pickpack_email>to attach the pickPack PDF Packing Sheet
Install pickPack Email Extension
Next step is to install the pickPack Email extension.
- You'll find this in the Downloads section of your account.
- Download & install that extension.
- Test - placing orders, order emails. Quite a few Magento extensions rewrite the email code, so you do need to check all is working after install.
- We have made this compatible with Mailchimp/Mandrill, SMTPpro, and the default Magento email system - if you use a different email extension, or are running a new version of one, then it may have issues. If that happens, disable the pickPack email extension, and get in touch.
- Test email sending - check that your PDF is getting attached to the correct emails.

Split Packing Sheets by Supplier (or any other attribute)
This is really useful:
- If you dropship from multiple suppliers,
- or if you ship from multiple warehouses.
- You can send each warehouse Packing Slips showing just the items that they should pack and ship.
- If you want to make the customer less confused you can choose to show the 'other warehouse' products greyed-out (if there are multiple warehouse/supplier products in an order).
- You can also generate Order-Separated and Order-Combined Picklists that are split by supplier. This can be handy, depending on how your business is run, to generate purchase orders, or to help each remote warehouse pick/pack the orders.
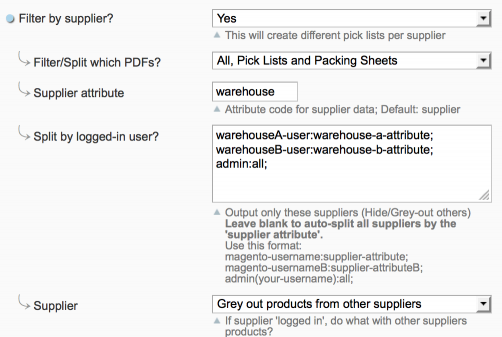
- The 'Split by logged-in user' section is optional, just leave blank.
- If you want to use this feature, enter the username of the person at each warehouse, a colon, then the warehouse attribute vale that it should filter by.
- In this case it will only show items in each order which have that value of the warehouse attribute (when that user is logged in).
- This is really handy as you can have each remote warehouse/dropshipper print direct from your Magento backend, and only see the items that are relevant to them.
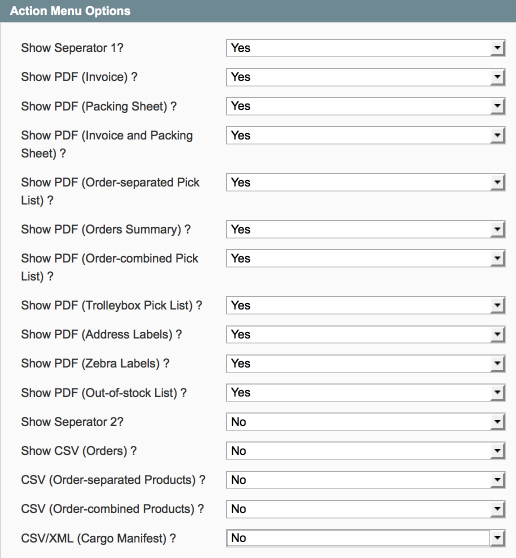
Hide Un-used Options
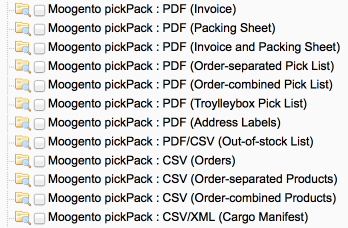
You'll probably realise that you just don't use some of the massaction menu options. Turn 'em off and de-clutter your dashboard!
- These are at the bottom of the pickPack Config > Action Menu Options
...From Specific Users
This is a great one, if you have multiple people accessing your Magento install.
- Reduce the chance of mistakes happening and restrict the pickPack options to specific users.
- eg. you can hide the 'Invoice' option from the warehouse crew, and show it to the accountants / etc.
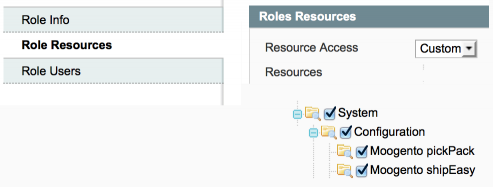
- First edit the specific user role in SystemPermissionsRoles
- Then assign those roles to specific users in SystemPermissionsUsers
- You'll also need to turn on config access to the main extension for each role, at least temporarily, and then log in as that user and set which menu options you want to display. You can turn off config access to that user after setting those.
Leverage pickPack to Generate More Sales
pickPack can actually help to make you more money by generating sales!
Customer Promotions
- Simply by making a great-looking Packing Sheet, you're going to be making that first physical point of contact a memorable one.
- Think this is not important? Imagine Apple sending you an iPhone in a battered box with a dotMatrix packing sheet...
- A good start is to add full-width header and footer logos and set the colors to match.
- Think of the next sale - the first sale is expensive in terms of customer acquisition cost. You've had to pay for the marketing, and actually find that new customer. If we can help this customer with their next purchase we're onto a winner and are directly generating more sales.
- A full-width image in the page base can contain a coupon for the next sale
- Or an image reminding them to sign up for your newsletter, visit your facebook page, etc.
- One like by a customer and you're suddenly in 500 facebook feeds...
Saving Negative Feedback
- Think about the costs of negative reviews, the drop in sales (and even banning of your store) that those bring about.
- How about adding an image (eg. Full-width footer image) or text (eg. 'Text under product list') reminding the customer that you will do anything to avoid a less-than-5* review.
- A small nudge can make a lot of 'quiet & happy' customers leave a positive review - helping to cover you against future negatives, as well as driving sales with all the positive public feedback!
- Screenshots of the relevant review page can help to jog their memory.
- Use the pickPack multi-site feature to save a different review image for different channels (eg. show an eBay review page for eBay orders, and Amazon review page for Amazon orders, etc).
Leverage pickPack to Save Money And Time
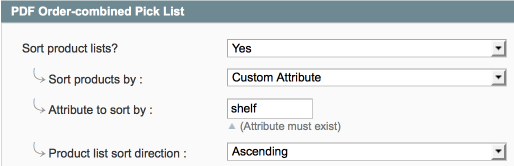
Sort By Shelf
- Sort the product list by shelf (and include your shelf attribute in the PDFs), and save zigzagging around the warehouse to pick orders.
Reduce Pick/Pack Mistakes
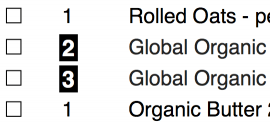
- Add the product image to packing slips to cut down picking mistakes.
- Highlight where the quantity is not 1 (eg. if most of your orders are for single items, it's easy for pickers to miss an occasional order for 2).
- Show total items count in Packing Slips - a quick check when all products have been picked that you're not missing any.
- Tickboxes on all PDFs - get a physical 'proof' of picking.
- Bonus #1 : You can edit the tickbox size to be large enough for initials - get a personal QC mark.
- Bonus #2 : Add a 2nd tickbox - get someone to doublecheck all picks, and sign for it.
- Add a 'Picked By.....' movable (and editable) text to the Packing Slips/Invoices. A final QC check mark.
With shipEasy :
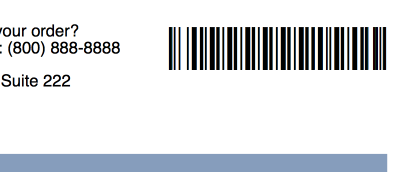
Use Barcodes To Process Orders
- pickPack can print the Order ID as a barcode on the top of the PDFs, and also in the integrated label portion.
- Use this in combination with shipEasy to quickly process orders with a barcode scanner.
Avoid Double-Printing Orders
- Integrated labels and toner, and the time dealing with sorting double-prints, are costly.
- Shipping an order several times to a customer is even more expensive.
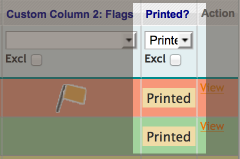
- pickPack will save into a shipEasy custom column when a PDF is generated : show 'printed' automatically, to quickly see the status of your orders.
- In shipEasy you can filter against this, so can quickly print all processing orders which have not been printed.