Installing Magento Extensions : Pre-install Checklist
Contents
We spend a lot of time testing our extensions on fresh installs of Magento. However, there are a lot of different ways to setup, customize, and add-on to Magento, which can cause new issues - please follow this checklist before starting your install, to safeguard your site.
The steps described here are a good basis before every magento extension install (not just ours!).
Each of these steps are important, don't be tempted to skip!
1. Backup your database
With any method, test that you can restore a backup (eg. to a test blank db) before starting!
Using Magento's built-in backup system
- Head to SystemToolsBackups and click Database Backup
- You'll see a popup option to 'Put store in Maintenance Mode?' : this will show the Magento Maintenance Page to site visitors. See section below for pros/cons.
Using the command line
- Make a backup of your database:
mysqldump -u [database user] -p [database name] > db_backup_[todays date].sql
- Restore from backup:
mysql -u [database user] -p [database name] < db_backup_[todays date].sql- (change
[bracketed words]to match your setup)
Using phypMyAdmin
- Export/Import your Magento database
- Make sure you "Disable Foreign Key Constraints".
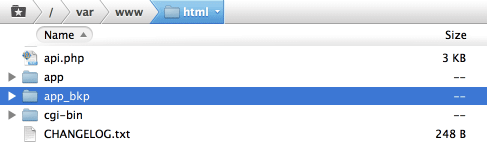
2. Backup your app folder
- This is the fastest way to fully revert if you need to.
- Easiest to put it next to your current app folder (e.g. app_bkp), that way you only need to rename the two folders to revert.
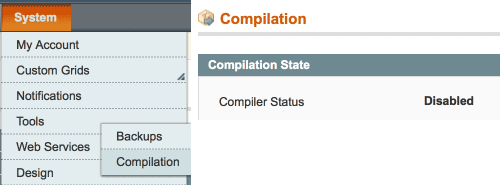
3. If you have compilation enabled for your site, disable it
- If you're not sure if you have this turned on, check SystemToolsCompilation
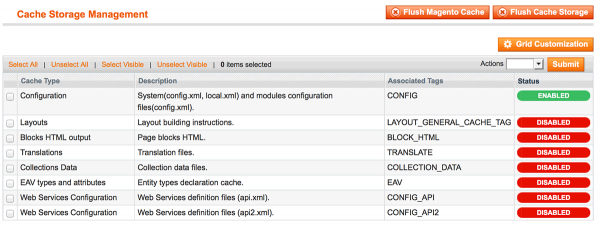
4. Turn on Configuration Cache
In SystemCache Management enable Configuration Cache and disable the other caches.
- This can help avoid errors if Magento attempts to start the extension installation before all files are uploaded.
5. Close all admin windows
If you start installation with several users logged in, or several active admin windows, it's possible for several installation processes to be started. This can result in some temporary errors, eg. if we need to create some database tables..
- Check no other admin users are logged in before installing, and check you don't have multiple admin windows open yourself.
Maintenance Mode?
What is it?
- Magento has a built-in system to turn off the website frontend for visitors, and still allow admin access to the backend.
How to turn it on
- Just create an empty file in your Magento root with the filename maintenance.flag
- Delete that file to turn off the Maintenance Mode.
- Before you do turn it on, make sure that you customise it to match your store (see section below).
Why would we do this?
Pros
You're about to backup the database:
- If there is any customer activity between making the backup and potentially restoring it, you'll lose that activity.
- This could include new orders.
- If they are then issued an Order/Invoice ID, you then turn on the store and another customer makes an order (before you can manually enter the new order(s), then multiple people will have the same Order/Invoice ID, which can make accountants anxious, and customer support tricky.
- You may lose track completely of those orders which arrived in between (or have to work them out via Payment Receipts, emails, etc).
- If your new extension involves database activity in the setup, if an order comes in halfway through, you could potentially include inconsistencies into the database.
Cons
- Your site is temporarily 'closed for business' and you may lose customers (if they don't come back later).
- It's harder for you to test any frontend changes that the new extension has made (as the frontend will also be locked out to you).
- To enable frontend access for yourself (while still showing the Maintenance Page to other visitors) edit the index.php file:
- Change :
if (file_exists($maintenanceFile)) {
    include_once dirname(__FILE__) . '/errors/503.php';
    exit;
}
- To :
$this_ip = $_SERVER['REMOTE_ADDR'];
$allowed_ips = array('127.0.0.1','111.22.33.44');
if (file_exists($maintenanceFile) && !in_array($this_ip, $allowed_ips)) {
    include_once dirname(__FILE__) . '/errors/503.php';
    exit;
}
- and then edit the
$allowed_ipssection to match your own local IPs.
Customising the Maintenance Mode page in Magento
If you don't edit the look of your Maintenance Page, visitors to your site will see this pretty unexciting page:
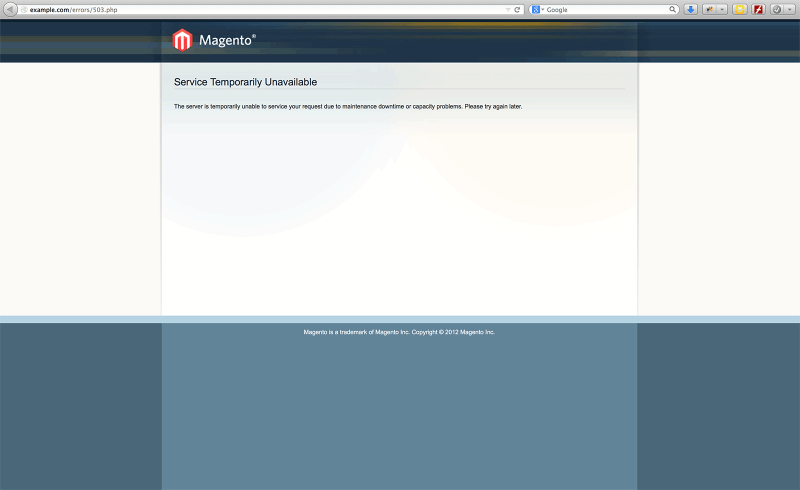 Importantly there is no immediate sign that it is even the correct store (no branding), that it is a problem that will be fixed (no ETA of site online), and if there is any way to contact you (no email or phone details). Let's customise this page! Have a quick look at what your site page looks like at the moment
- To show a custom Maintenance Page, edit the index.php file:
- Change :
include_once dirname(__FILE__) . '/errors/503.php';
- To :
include_once dirname(__FILE__) . '/errors/maintenance.html';
- and then create and style that maintenance.html file.
Quick way to make a well-styled page: open your your home page html in a text editor and remove the nav bars and central content
- Make sure your Maintenance Page:
- Is styled for your store, including your store logo, font, and general style.
- Explains what is happening.
- Gives a timeframe for completion.
- Has a contact email/phone number.
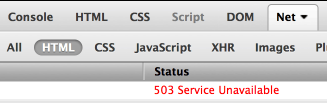
Check 503 Header
- It's worth checking that your Maintenance Page has the correct 503 header set (before turning it on!).
- This ensures that visiting search engines see the correct status of "Temporarily Unavailable" to save you any ranking issues.
- Easy way to check the 503 header, is to visit that page in Firefox and inspect with Firebug (described in the Optimising Tools for Magento section).
Updating Previous Versions of Moogento Extensions
We recommend that you keep your extensions up to date to make this easy - we usually release a new public update every week
- If you are updating from a version more than 6 months old, we recommend getting us to install it for you, to ensure the process goes smoothly.
- If you're doing the update process yourself, we recommend, as with all Magento extensions, to test the update on a dev server *before* the live server.
- If you must install direct to your live server, and are keen to do this yourself instead of getting us to help, it makes sense not to do this first thing Monday morning, with a weekends worth of orders waiting!
Upgrade Procedure
- Disable the old extension before starting the install.
- If you don't then you may create some errors in the tables that we create, as you could have part-old part-new code (during the upload) interacting.
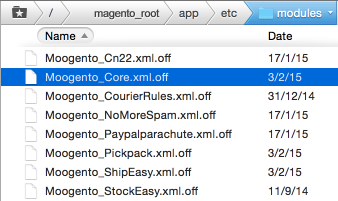
- Go to /app/etc/modules/ and look for the files beginning with 'Moogento_'.
- Add the text .off to the end of the filenames.
- Clear cache, either in SystemCache Management or by renaming /var/cache eg. to /var/cache.2 - you can then delete that folder, but by renaming it you're good to go immediately (no need to wait for the files to delete).
- Log out of Magento Admin.
- Check other admin users are also logged out, and that you have a single admin window open yourself.
- Proceed with installation of new version.
- After install, if you've only upgraded one-of-many Moogento extensions, check first that the new one works fine, then 'turn on' the others, one at a time, checking that there are no issues after each one.
- (There shouldn't be any issues but newer versions of some extensions may need other Moogento extensions to be recent versions to interact correctly).
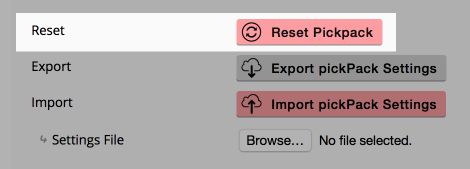
- If you experience issues after upgrading pickPack you might be able to quickly fix them by resetting the config settings:
- Go to SystemConfigpickPack - General and at the bottom you'll see buttons to 'Reset/Export/Import'.
- Export first for good measure.
- Then click 'Reset pickPack'.
- Bear in mind this will clear all pickPack settings!
- (Your buttons will look slightly different if you don't have Clean installed)