Difference between revisions of "Installing Magento 2 Extensions : Pre-install Checklist"
| Line 141: | Line 141: | ||
====Check You're Installing The Latest Version==== | ====Check You're Installing The Latest Version==== | ||
| − | # | + | #Check your [https://moogento.com/downloadable/customer/products Moogento downloads section]. |
| − | #If your extension is greyed out, that means | + | #If your extension is greyed out, that means your M2 subscription has lapsed. Just grab another one to regain access. |
| − | #: | + | #:* You need to be on a sub for M2 plugins, if that's lapsed then you're not licensed to use the product. |
| − | |||
| − | |||
| − | ===== | + | ====Update Process==== |
| − | |||
| + | In short, just follow our [https://moogento.com/guides/Installing_Magento_2_Extensions_:_Easy_Install_Guide Easy M2 Plugin Install Guide] | ||
| − | + | Here's a quick summary if you're comfy with the process: | |
| − | |||
| + | # Copy the contents of the 'app' folder, replacing files and merging folders. | ||
| + | # On the commandline, navigate to the magento root | ||
| + | # Enable Maintenance mode for the store | ||
| + | #: <code>php bin/magento maintenance:enable</code> | ||
| + | # Update composer: | ||
| + | #: <code>composer update</code> | ||
| + | # Update the Magento files: | ||
| + | #: <code>php bin/magento setup:upgrade</code> | ||
| + | #: <code>php bin/magento setup:di:compile</code> | ||
| + | #: <code>php bin/magento setup:db-schema:upgrade</code> | ||
| + | # Reindex: | ||
| + | #: <code>php bin/magento indexer:reindex</code> | ||
| + | # Clear cache: | ||
| + | #: <code>php bin/magento cache:clean && php bin/magento cache:flush && php bin/magento cache:enable</code> | ||
| + | # Disable Maintenance mode for the store | ||
| + | #: <code>php bin/magento maintenance:disable</code> | ||
| + | # Test store | ||
| − | ==== | + | =====How fast is Support if I have any issues?===== |
| − | + | Depending on your plan, we'll get back to you in 1-2 working days (Mon - Fri). | |
| − | |||
| − | |||
| − | |||
| − | |||
| − | |||
| − | |||
| − | |||
| − | |||
| − | |||
| − | |||
| − | |||
===Subscription Plans=== | ===Subscription Plans=== | ||
Revision as of 10:15, 13 September 2018
Contents
We spend a lot of time testing our extensions on fresh installs of Magento. However, there are a lot of different ways to setup, customize, and add-on to Magento, which can cause new issues - please follow this checklist before starting your install, to safeguard your site.
The steps described here are a good basis before every magento extension install (not just ours!).
Each of these steps are important, don't be tempted to skip!
1. Backup your database
With any method, it's a good idea to test that you can actually restore from a backup (eg. to a test install) before starting
Using Magento's built-in backup system
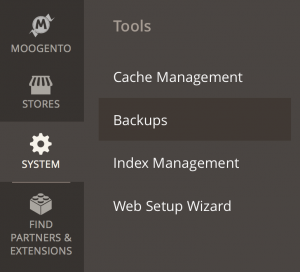
- Head to SystemToolsBackups
- Click Database Backup

- You'll see a popup option to 'Put store in Maintenance Mode?' : this will show the Magento Maintenance Page to site visitors. See section below for pros/cons.
Using the command line
- Make a backup of your database:
mysqldump -u [database user] -p [database name] > db_backup_[todays date].sql
- Restore from backup:
mysql -u [database user] -p [database name] < db_backup_[todays date].sql- (change
[bracketed words]to match your setup)
Using phypMyAdmin
- Export your Magento database
- Make sure you "Disable Foreign Key Constraints".
3. Check your cron is running
You need the magento cron to be running to get the most out of Moogento extensions.
What's a cron? It's a regular task run by the server. Usually things like preparing stats.
If you think your cron may not be running, have a quick look at our guide to fixing Magento crons.
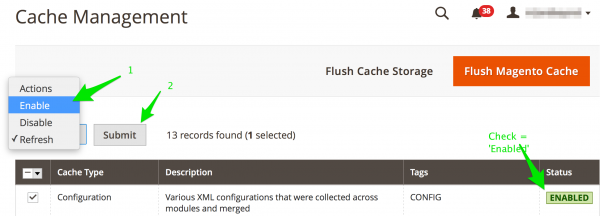
4. Turn on Caches
In SystemTools -> Cache Management enable Configuration Cache and disable the other caches.
- This can help avoid errors if Magento attempts to start the extension installation before all files are uploaded.
5. Close all admin windows
If you start installation with several users logged in, or several active admin windows, it's possible for several installation processes to be started. This can result in some temporary errors, eg. if we need to create some database tables..
- Check no other admin users are logged in before installing, and check you don't have multiple admin windows open yourself.
Maintenance Mode?
What is it?
- Magento has a built-in system to turn off the website frontend for visitors, and still allow admin access to the backend.
How to turn it on
- Just create an empty file in your Magento root with the filename maintenance.flag
- Delete that file to turn off the Maintenance Mode.
- Before you do turn it on, make sure that you customise it to match your store (see section below).
Why would we do this?
Pros
You're about to backup the database:
- If there is any customer activity between making the backup and potentially restoring it, you'll lose that activity.
- This could include new orders.
- If they are then issued an Order/Invoice ID, you then turn on the store and another customer makes an order (before you can manually enter the new order(s), then multiple people will have the same Order/Invoice ID, which can make accountants anxious, and customer support tricky.
- You may lose track completely of those orders which arrived in between (or have to work them out via Payment Receipts, emails, etc).
- If your new extension involves database activity in the setup, if an order comes in halfway through, you could potentially include inconsistencies into the database.
Cons
- Your site is temporarily 'closed for business' and you may lose customers (if they don't come back later).
- It's harder for you to test any frontend changes that the new extension has made (as the frontend will also be locked out to you).
- To enable frontend access for yourself (while still showing the Maintenance Page to other visitors) edit the index.php file:
- Change :
if (file_exists($maintenanceFile)) {
    include_once dirname(__FILE__) . '/errors/503.php';
    exit;
}
- To :
$this_ip = $_SERVER['REMOTE_ADDR'];
$allowed_ips = array('127.0.0.1','111.22.33.44');
if (file_exists($maintenanceFile) && !in_array($this_ip, $allowed_ips)) {
    include_once dirname(__FILE__) . '/errors/503.php';
    exit;
}
- and then edit the
$allowed_ipssection to match your own local IPs.
Customising the Maintenance Mode page in Magento
If you don't edit the look of your Maintenance Page, visitors to your site will see this pretty unexciting page:
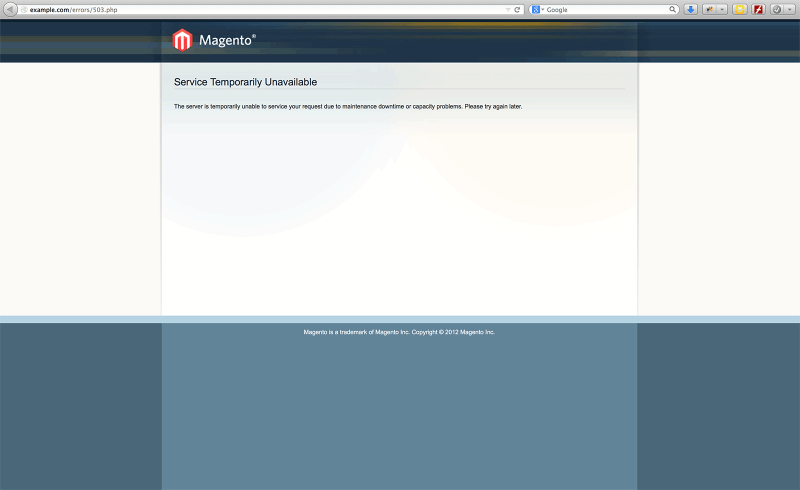 Importantly there is no immediate sign that it is even the correct store (no branding), that it is a problem that will be fixed (no ETA of site online), and if there is any way to contact you (no email or phone details). Let's customise this page! Have a quick look at what your site page looks like at the moment
- To show a custom Maintenance Page, edit the index.php file:
- Change :
include_once dirname(__FILE__) . '/errors/503.php';
- To :
include_once dirname(__FILE__) . '/errors/maintenance.html';
- and then create and style that maintenance.html file.
Quick way to make a well-styled page: open your your home page html in a text editor and remove the nav bars and central content
- Make sure your Maintenance Page:
- Is styled for your store, including your store logo, font, and general style.
- Explains what is happening.
- Gives a timeframe for completion.
- Has a contact email/phone number.
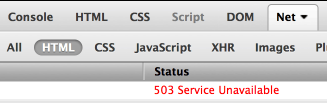
Check 503 Header
- It's worth checking that your Maintenance Page has the correct 503 header set (before turning it on!).
- This ensures that visiting search engines see the correct status of "Temporarily Unavailable" to save you any ranking issues.
- Easy way to check the 503 header, is to visit that page in Firefox and inspect with Firebug (described in the Optimising Tools for Magento section).
Updating Previous Versions of Moogento Extensions
Moogento has a small team working full-time adding features and functionality to our extensions (you'll see that we have a small number compared to other extension companies).
These features are always designed to save time and effort when processing orders - if you're running a busy store or just want to keep making your life easier, keep updated to the latest versions.
As we make so many changes it really does make sense to update on a regular basis.
We recommend that you keep your extensions up to date to make this easy - we usually release a new public update every week
- If you are updating from a version more than 6 months old, we recommend getting us to install it for you, to ensure the process goes smoothly.
- If you're doing the update process yourself, we recommend, as with all Magento extensions, to test the update on a dev server *before* the live server.
- If you must install direct to your live server, and are keen to do this yourself instead of getting us to help, it makes sense not to do this first thing Monday morning, with a weekends worth of orders waiting!
- Our extensions are quite often linked in some way. It makes sense to link different features together,
- eg. if you print a PDF with pickPack we can connect with shipEasy to show that the order has been printed in the grid edit that it makes.
- As there is new functionality constantly being developed we're relying on each part sending/receiving the correct signals : please try to update multiple extensions at the same time. That way, all connections will work!
Updating Procedure
Check You're Installing The Latest Version
- Check your Moogento downloads section.
- If your extension is greyed out, that means your M2 subscription has lapsed. Just grab another one to regain access.
- You need to be on a sub for M2 plugins, if that's lapsed then you're not licensed to use the product.
Update Process
In short, just follow our Easy M2 Plugin Install Guide
Here's a quick summary if you're comfy with the process:
- Copy the contents of the 'app' folder, replacing files and merging folders.
- On the commandline, navigate to the magento root
- Enable Maintenance mode for the store
php bin/magento maintenance:enable
- Update composer:
composer update
- Update the Magento files:
php bin/magento setup:upgradephp bin/magento setup:di:compilephp bin/magento setup:db-schema:upgrade
- Reindex:
php bin/magento indexer:reindex
- Clear cache:
php bin/magento cache:clean && php bin/magento cache:flush && php bin/magento cache:enable
- Disable Maintenance mode for the store
php bin/magento maintenance:disable
- Test store
How fast is Support if I have any issues?
Depending on your plan, we'll get back to you in 1-2 working days (Mon - Fri).
Subscription Plans
All our M2 plugins are on a recurring subscription.
This should hopefully be beneficial as the only 'risk' is the monthly amount during your evaluation, and there's specific costs based on the features that will most benefit you.
We've approximately grouped the pricing plans based on the the value-add each part provides, as well as the support cost for each bit. We hope this makes it clearer the value gain from each product (which should be many multiples :) ).
All plugins can be seen in the downloads page of your account, and can be canceled/upgraded in there; you can also get auto-emailed invoices.
This should be easier to try out multiple extensions to see which ones provide the best ROI for you business (hint - all of them!).
Can we buy this as a standalone product?
You could grab it for a year which works out cheaper than the old version with Maintenance. We don't currently have an option to buy a standalone version of the M2 plugins.