Difference between revisions of "Installing Magento 2 Extensions : Easy Install Guide"
Jump to navigation
Jump to search
m |
|||
| (68 intermediate revisions by the same user not shown) | |||
| Line 1: | Line 1: | ||
| + | {{#seo: | ||
| + | |title=Installing Magento 2 Extensions : Easy Install Guide from Moogento | ||
| + | |title_mode=replace | ||
| + | }} | ||
==Aims & Preparation== | ==Aims & Preparation== | ||
| − | + | {{idea|Upgrading from an older version? Check our [https://moogento.com/guides/Installing_Magento_2_Extensions_:_Pre-install_Checklist#Updating_Previous_Versions_of_Moogento_Extensions Upgrading Magento 2 Extensions Guide]}} | |
| − | |||
| + | ::* '''We have a reduced rate [https://moogento.com/installation install & setup service] if you want us to do this for you.''' | ||
| + | ::* Make sure you've gone through the [[Installing_Magento_2_Extensions_:_Pre-install_Checklist|Pre-install Checklist]] before starting! | ||
| + | ::* Installing on Plesk? Check our [https://moogento.com/guides/Installing_Magento_2_Extensions_:_Plesk Guide to installing Magento 2 extensions on Plesk] | ||
| + | ==Installation== | ||
| + | ===1. Upload The Files=== | ||
| + | :# Unzip your downloaded zip and open the single folder (usually the extension name). | ||
| + | :# Inside that you'll see {{folder|app}} and {{folder|m2.0.patches}}. Open this containing folder inside your FTP app. | ||
| + | :# Locate your website's Magento {{folder|app}} folder in the same FTP app. You should now have the unzipped {{folder|app}} on one side, and your main website folder (containing the Magento app folder) on the other side. | ||
| + | :#: * ''Check that you see an {{folder|app}} folder each side.''[[File:magento-2-plugin-installation.png|link=|674px]] | ||
| + | :# Drag the {{folder|app}} folder from inside the unzipped folder into your remote site (the important thing here is not to drag on top of another folder, or the files will be placed in the wrong location - easiest is to drag onto a file or blank space on the remote side).[[File:drag-n-drop-copy-app-folder.png|link=|674px]] | ||
| + | :# You may be asked {{keypress|Merge or Replace?}} by your FTP app. Choose {{keypress|Merge}} for folders and {{keypress|Replace}} for files.[[File:merge_folders_replace_files.png|link=|674px]] | ||
| + | :# ''Only if you're using a version of Magento 2 that's older than 2.1'', copy {{folder|m2.0.patches}} into your remote root folder, overwriting any file changes. | ||
| + | |||
| + | ===2. Enable Maintenance Mode=== | ||
| + | |||
| + | :{{idea|This will display your store 'Down for Maintenance' page in the frontend}} | ||
| + | |||
| + | :<code>php bin/magento maintenance:enable</code> | ||
| + | |||
| + | :''* Not needed on local test site!'' | ||
| + | |||
| + | ===3. Disable the Cache=== | ||
| + | :Disable the cache in {{menu|System|Cache Management}} | ||
| + | |||
| + | :Or, if you're in the commandline already: | ||
| + | |||
| + | :<code>php bin/magento cache:disable</code> | ||
| + | |||
| + | ===4. Run Install & Setup Scripts=== | ||
| + | :* Run these on the command line, from inside the magento root: | ||
| + | |||
| + | ====Update composer==== | ||
| + | :In the magento root folder run: | ||
| + | :<code>composer update</code> | ||
| + | |||
| + | ::''• If you're running on some cPanel-type setup, you might find it easier to run a local version of composer, instead of server-wide one:'' | ||
| + | |||
| + | ::''Install:'' | ||
| + | |||
| + | :::<code>curl -sS https://getcomposer.org/installer | php</code> | ||
| + | |||
| + | ::''Run:'' | ||
| + | :::<code>php composer.phar update</code> | ||
| + | |||
| + | ::''If you get a memory error here, try specifying memory in the same command:'' | ||
| + | :::<code>php -d memory_limit=512M composer.phar update</code> | ||
| + | |||
| + | :{{idea|Check that the 'composer update' process completes before continuing - if it says 'Killed' then it hasn't completed}} | ||
| + | :[[File:composer-update-killed.png|link=|600px]] | ||
| + | : ''^ If you see this, stop and get composer updating before you continue'' | ||
| + | |||
| + | ====Install the core Moogento files==== | ||
| + | |||
| + | :If this is your first Moogento M2 plugin, then run these first: | ||
| + | :<code>php bin/magento module:enable Moogento_License</code> | ||
| + | :<code>php bin/magento module:enable Moogento_Core</code> | ||
| + | ====Install the module==== | ||
| + | :Run the appropriate one for the plugin you want to install. | ||
| − | === | + | :<code>php bin/magento module:enable Moogento_PickPack</code> |
| − | + | ||
| − | + | :<code>php bin/magento module:enable Moogento_Shipeasy</code> | |
| − | # | + | |
| − | #: * | + | :<code>php bin/magento module:enable Moogento_Stockeasy</code> |
| − | # | + | |
| − | # | + | :<code>php bin/magento module:enable Moogento_Profiteasy</code> |
| − | # '' | + | |
| − | + | * Or, run all at once: <code>php bin/magento module:enable Moogento_Core Moogento_License Moogento_Shipeasy</code> | |
| − | + | ||
| + | ====Setup scripts==== | ||
| + | :<code>php bin/magento setup:upgrade</code> | ||
| + | :: ''If you get an error here, it might be helpful to see details about why it failed. In that case try:'' | ||
| + | :: <code>bin/magento setup:upgrade -vvv</code> | ||
| + | |||
| + | :* re-compile: | ||
| + | :<code>php bin/magento setup:di:compile</code> | ||
| + | |||
| + | :::''^ Check that the code works all the way through to 100% (usually 7 lines)'' | ||
| + | ::: ''If it doesn't, you should fix this first before proceeding.'' | ||
| + | ::: ''Here's roughly how it should look when successful:'' | ||
| + | :::::[[File:magento-2-compilation-success.png|link=|600px]] | ||
| + | |||
| + | |||
| + | :* then we're going to upgrade the database, with any new tables needed by the plugin: | ||
| + | :<code>php bin/magento setup:db-schema:upgrade</code> | ||
| + | |||
| + | ===5. Refresh index & cache=== | ||
| + | |||
| + | :* re-index | ||
| + | |||
| + | :<code>php bin/magento indexer:reindex</code> | ||
| + | |||
| + | :* refresh caches | ||
| + | |||
| + | :<code>php bin/magento cache:clean && php bin/magento cache:flush && php bin/magento cache:enable</code> | ||
| + | |||
| + | ===6. Check Installation=== | ||
| + | :Head to {{menu3|Stores|Configuration|Advanced -> Advanced}} and you should see your new module in the admin panel. | ||
| + | ::::[[File:moogento-installed-magento-2.png|link=|674px]] | ||
| + | |||
| + | ===7. Set User Permissions=== | ||
| + | :# Log out then Log in. | ||
| + | :# Head to {{menu3|System|Permissions|User Roles}} | ||
| + | :#:[[File:magento-2-user-roles.png|link=|674px]] | ||
| + | :# Check that you have assigned the new Moogento Extension options to the appropriate roles, and save. | ||
| + | :#:*If saving an admin role, likely you have 'All' resources set; just re-save this: | ||
| + | :#:[[File:magento-2-user-all-role-access.png|link=|674px]] | ||
| + | :#:*If saving a partial access role (eg. granting pickers access to create Packing Sheets), find the new extension sections and grant as needed (eg. here is access to edit the PDF templates): | ||
| + | :#:[[File:magento-config-settings-pickpack.png|link=|674px]] | ||
| + | :# Head to {{menu3|System|Permissions|Users}} | ||
| + | :# Check that you have assigned the correct role (that we just granted the appropriate Extension options to) to the appropriate users, and save. | ||
| + | |||
| + | ===8. Clear static content=== | ||
| + | :If you get some 404 errors, try clearing the static folder. | ||
| + | :# Copy {{folder|/static/.htaccess}} out of that folder | ||
| + | :# Delete {{folder|/static}} | ||
| + | :# Put back .htaccess from (1) | ||
| + | :#: '''Or in commandline in root folder:''' | ||
| + | :#:<code>mv pub/static/.htaccess pub/.htaccess</code> | ||
| + | :#:<code>rm -R pub/static</code> | ||
| + | :#:<code>php bin/magento setup:static-content:deploy</code> | ||
| + | :#:<code>mkdir pub/static</code> | ||
| + | :#:<code>mv pub/.htaccess pub/static/.htaccess</code> | ||
| + | :# Run <code>bin/magento setup:static-content:deploy</code> | ||
| + | |||
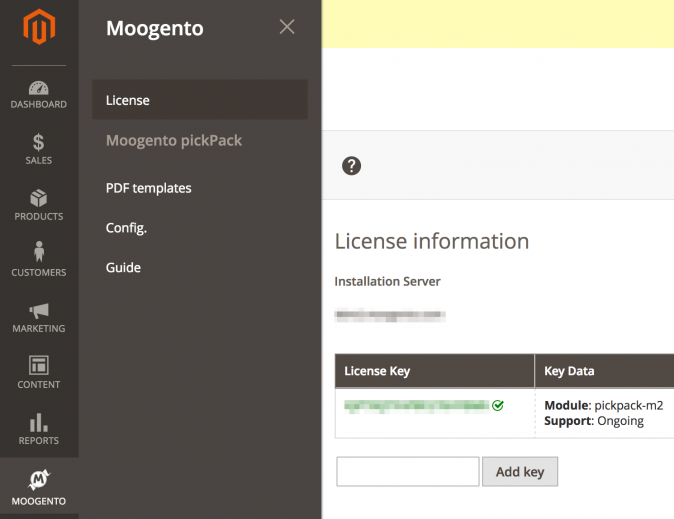
| + | ===9. Enter The License Key=== | ||
| + | :If you're installing a Moogento extension, we'll have sent you a license key. Let's install it! | ||
| + | |||
| + | :# Navigate to {{menu|Moogento|License}}. | ||
| + | :# At the top, if this extension requires a license key, enter your license key (this will have been emailed to you; you can also find it inside your Moogento account downloads section). | ||
| + | :#* Enter the key and save the page. You should see a green tick! | ||
| + | :#:[[File:moogento-license-entry.png|link=|674px]] | ||
| + | |||
| + | |||
| + | ===10. Save The Config Page=== | ||
| + | :After entering the license key, clear the cache and logout again. | ||
| + | :*Even if you're installing an extension without a license key, it's still a good idea to '''save the config section at this point''' (even if you've not made any changes). | ||
| + | |||
| + | ===11. Disable Maintenance Mode=== | ||
| + | |||
| + | :<code>php bin/magento maintenance:disable</code> | ||
| + | |||
| + | |||
| + | ==Uninstalling== | ||
| + | :Want to uninstall the plugins to check something? | ||
| + | |||
| + | :Here's a quick commandline 'stack', which you should be able to copy/paste, to disable all Moogento modules: | ||
| + | |||
| + | ::<code>php bin/magento maintenance:enable</code> | ||
| + | |||
| + | ::<code>php bin/magento module:disable Moogento_PickPack</code> | ||
| + | |||
| + | ::<code>php bin/magento module:disable Moogento_Shipeasy</code> | ||
| + | |||
| + | ::<code>php bin/magento module:disable Moogento_Stockeasy</code> | ||
| + | |||
| + | ::<code>php bin/magento module:disable Moogento_Profiteasy</code> | ||
| + | |||
| + | ::<code>php bin/magento module:disable Moogento_SlackCommerce</code> | ||
| + | |||
| + | ::<code>php bin/magento module:disable Moogento_Core</code> | ||
| + | |||
| + | ::<code>php bin/magento module:disable Moogento_License</code> | ||
| + | |||
| + | ::<code>php bin/magento setup:upgrade</code> | ||
| + | |||
| + | ::<code>php bin/magento setup:di:compile</code> | ||
| + | |||
| + | ::<code>php bin/magento setup:db-schema:upgrade</code> | ||
| + | |||
| + | ::<code>php bin/magento indexer:reindex</code> | ||
| + | |||
| + | ::<code>php bin/magento cache:clean && php bin/magento cache:flush && php bin/magento cache:enable</code> | ||
| + | |||
| + | ::<code>php bin/magento maintenance:disable</code> | ||
| + | |||
| + | |||
| + | :And the same to enable them again: | ||
| + | |||
| + | ::<code>php bin/magento maintenance:enable</code> | ||
| + | |||
| + | ::<code>php bin/magento module:enable Moogento_License</code> | ||
| + | |||
| + | ::<code>php bin/magento module:enable Moogento_Core</code> | ||
| + | |||
| + | ::<code>php bin/magento module:enable Moogento_PickPack</code> | ||
| + | |||
| + | ::<code>php bin/magento module:enable Moogento_Shipeasy</code> | ||
| + | |||
| + | ::<code>php bin/magento module:enable Moogento_Stockeasy</code> | ||
| − | + | ::<code>php bin/magento module:enable Moogento_Profiteasy</code> | |
| − | |||
| − | + | ::<code>php bin/magento module:enable Moogento_SlackCommerce</code> | |
| − | |||
| − | <code>php | ||
| − | + | ::<code>php bin/magento setup:upgrade</code> | |
| − | <code>php | ||
| − | + | ::<code>php bin/magento setup:di:compile</code> | |
| − | |||
| − | ::: | ||
| − | + | ::<code>php bin/magento setup:db-schema:upgrade</code> | |
| − | |||
| − | |||
| − | |||
| − | |||
| − | |||
| − | |||
| − | |||
| − | |||
| − | |||
| − | |||
| − | |||
| − | |||
| − | + | ::<code>php bin/magento indexer:reindex</code> | |
| − | |||
| − | + | ::<code>php bin/magento cache:clean && php bin/magento cache:flush && php bin/magento cache:enable</code> | |
| − | |||
| − | |||
| − | |||
| + | ::<code>php bin/magento maintenance:disable</code> | ||
| − | === | + | ==Registering the License== |
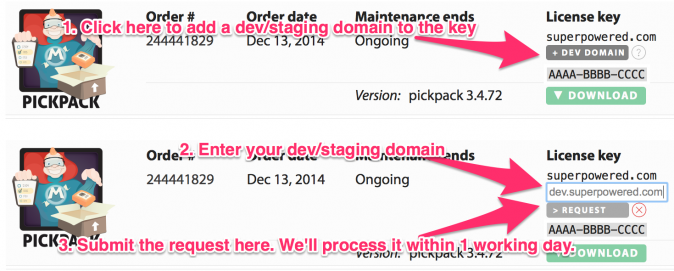
| − | + | ===Setup the Key for Dev/Staging Sites=== | |
| − | + | :If you're setting up on a dev or staging server, we've got you covered. You can assign up to 2 dev/staging servers to each key, and we have a super-simple way to assign them. | |
| + | :# Navigate to your Moogento Account downloads section. | ||
| + | :# Find the specific extension you want to request dev/staging access for. | ||
| + | :# Click '+ dev domain' | ||
| + | :# Enter the domain name. | ||
| + | :# Click 'Request' | ||
| + | :# Done! We'll check that and assign it within 1 working day. | ||
| + | :#:[[File:dev-licenses.png|link=|674px]] | ||
| + | :* If your dev site is not an obvious dev subdomain (dev. / stage. / etc.) please ensure that the site is [[Installing_Magento_Extensions_:_Troubleshooting#.22I_need_to_set_the_Magento_demo_site_notice..22|showing the Magento 'demo site' message]]. | ||
| + | :* Enter the license key in every install you make with our software, including dev & staging sites. | ||
| + | :* Before installing the software, please add the domain you'll be using to the list of authorised domains, as described above. | ||
| − | === | + | ===Using Multi-site Magento Installs=== |
| − | + | The license is valid for a single Magento installation - this means that if you're running a multi-site setup, you're covered. | |
| − | |||
| − | |||
| − | |||
| − | |||
| − | |||
| − | |||
| − | |||
| − | |||
| − | + | Make sure you register the main install domain, which you'll see in your {{menu|Admin sidebar | Moogento -> Licenses}} section. | |
| − | + | ===Legal=== | |
| + | {{idea|Important legal notices!}} | ||
| − | :''It's against the terms of your license to use the software: '' | + | ::''It's against the terms of your license to use the software, or keep it installed on any site: '' |
| − | ::''- without entering the license key in every install'' | + | :::''- without entering the license key in every install'' |
| − | ::''- without authorising the domain before use'' | + | :::''- without authorising, in your [https://moogento.com/downloadable/customer/products Moogento product page], the domain before use'' |
| − | :::'' (only needed if you're using multiple domains for testing - the first-used domain is registered automatically)'' | + | ::::'' (only needed if you're using multiple domains for testing - the first-used domain is registered automatically)'' |
| − | ::''- on multiple Magento installations'' | + | :::''- on multiple Magento installations'' |
| − | :::''( | + | ::::''(excepting : (pre-registered) dev/staging servers for the specific domain the key is purchased for)'' |
| + | :::''- without an active subscription & valid payment method on file'' | ||
| − | + | :::''- without using it to the max!'' | |
| − | + | ::::''(not serious on this point of course, but get in touch for a free look at your install and suggestions to do more!)'' | |
| − | |||
| − | + | ==Final Check== | |
| + | :# Check that it works at a basic level; this is also a good time to check your public store front. I would also make a test order at this stage, check that the emails you're expecting are coming through etc. | ||
| + | :# If everything is ok and you have previously disabled compilation, now you can enable it. | ||
| − | + | :You should now be setup at a basic level. | |
| + | :If you have any issues, check the [[Installing_Magento_2_Extensions_:_Troubleshooting|Troubleshooting]] guide. | ||
[[Category:Extension installation]] | [[Category:Extension installation]] | ||
Latest revision as of 12:00, 24 August 2021
Contents
- 1 Aims & Preparation
- 2 Installation
- 2.1 1. Upload The Files
- 2.2 2. Enable Maintenance Mode
- 2.3 3. Disable the Cache
- 2.4 4. Run Install & Setup Scripts
- 2.5 5. Refresh index & cache
- 2.6 6. Check Installation
- 2.7 7. Set User Permissions
- 2.8 8. Clear static content
- 2.9 9. Enter The License Key
- 2.10 10. Save The Config Page
- 2.11 11. Disable Maintenance Mode
- 3 Uninstalling
- 4 Registering the License
- 5 Final Check
Aims & Preparation
Upgrading from an older version? Check our Upgrading Magento 2 Extensions Guide
- We have a reduced rate install & setup service if you want us to do this for you.
- Make sure you've gone through the Pre-install Checklist before starting!
- Installing on Plesk? Check our Guide to installing Magento 2 extensions on Plesk
Installation
1. Upload The Files
- Unzip your downloaded zip and open the single folder (usually the extension name).
- Inside that you'll see app and m2.0.patches. Open this containing folder inside your FTP app.
- Locate your website's Magento app folder in the same FTP app. You should now have the unzipped app on one side, and your main website folder (containing the Magento app folder) on the other side.
- * Check that you see an app folder each side.
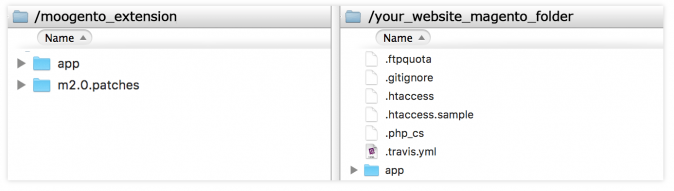
- * Check that you see an app folder each side.
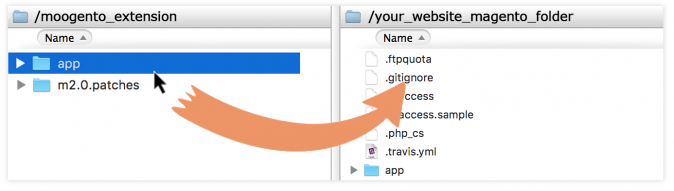
- Drag the app folder from inside the unzipped folder into your remote site (the important thing here is not to drag on top of another folder, or the files will be placed in the wrong location - easiest is to drag onto a file or blank space on the remote side).
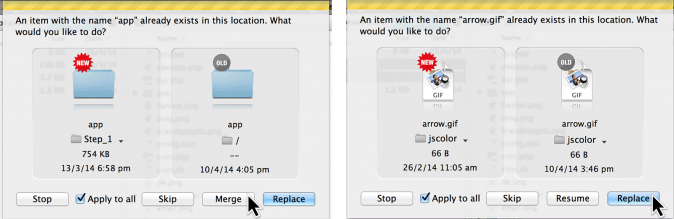
- You may be asked Merge or Replace? by your FTP app. Choose Merge for folders and Replace for files.
- Only if you're using a version of Magento 2 that's older than 2.1, copy m2.0.patches into your remote root folder, overwriting any file changes.
2. Enable Maintenance Mode
- This will display your store 'Down for Maintenance' page in the frontend
php bin/magento maintenance:enable
- * Not needed on local test site!
3. Disable the Cache
- Disable the cache in SystemCache Management
- Or, if you're in the commandline already:
php bin/magento cache:disable
4. Run Install & Setup Scripts
- Run these on the command line, from inside the magento root:
Update composer
- In the magento root folder run:
composer update
- • If you're running on some cPanel-type setup, you might find it easier to run a local version of composer, instead of server-wide one:
- Install:
curl -sS https://getcomposer.org/installer | php
- Run:
php composer.phar update
- Run:
- If you get a memory error here, try specifying memory in the same command:
php -d memory_limit=512M composer.phar update
- If you get a memory error here, try specifying memory in the same command:
- Check that the 'composer update' process completes before continuing - if it says 'Killed' then it hasn't completed

- ^ If you see this, stop and get composer updating before you continue
Install the core Moogento files
- If this is your first Moogento M2 plugin, then run these first:
php bin/magento module:enable Moogento_License
php bin/magento module:enable Moogento_Core
Install the module
- Run the appropriate one for the plugin you want to install.
php bin/magento module:enable Moogento_PickPack
php bin/magento module:enable Moogento_Shipeasy
php bin/magento module:enable Moogento_Stockeasy
php bin/magento module:enable Moogento_Profiteasy
- Or, run all at once:
php bin/magento module:enable Moogento_Core Moogento_License Moogento_Shipeasy
Setup scripts
php bin/magento setup:upgrade- If you get an error here, it might be helpful to see details about why it failed. In that case try:
bin/magento setup:upgrade -vvv
- re-compile:
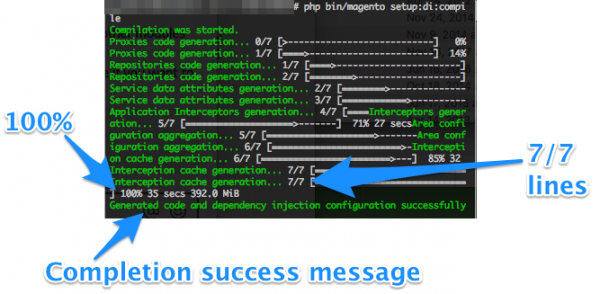
php bin/magento setup:di:compile
- ^ Check that the code works all the way through to 100% (usually 7 lines)
- If it doesn't, you should fix this first before proceeding.
- Here's roughly how it should look when successful:
- then we're going to upgrade the database, with any new tables needed by the plugin:
php bin/magento setup:db-schema:upgrade
5. Refresh index & cache
- re-index
php bin/magento indexer:reindex
- refresh caches
php bin/magento cache:clean && php bin/magento cache:flush && php bin/magento cache:enable
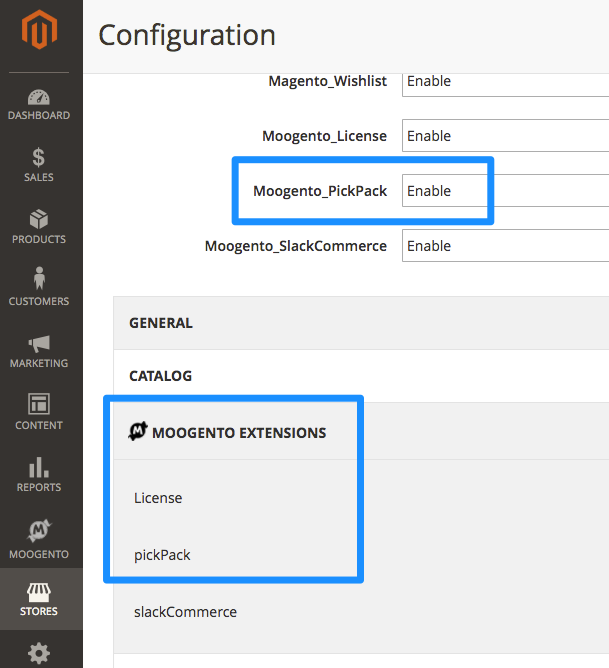
6. Check Installation
- Head to StoresConfigurationAdvanced -> Advanced and you should see your new module in the admin panel.
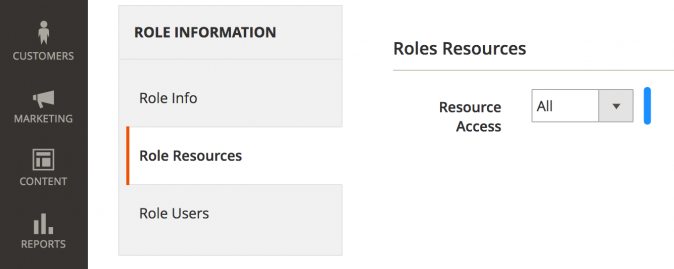
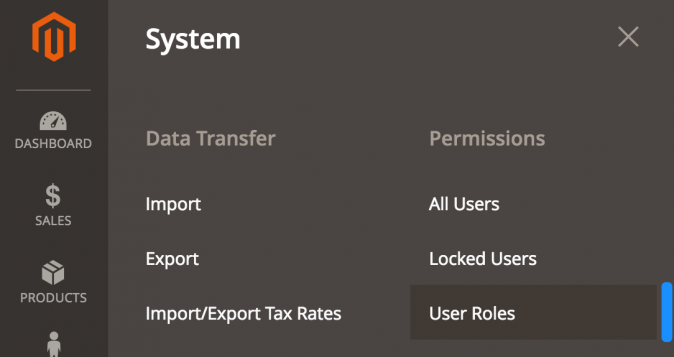
7. Set User Permissions
- Log out then Log in.
- Head to SystemPermissionsUser Roles
- Check that you have assigned the new Moogento Extension options to the appropriate roles, and save.
- If saving an admin role, likely you have 'All' resources set; just re-save this:
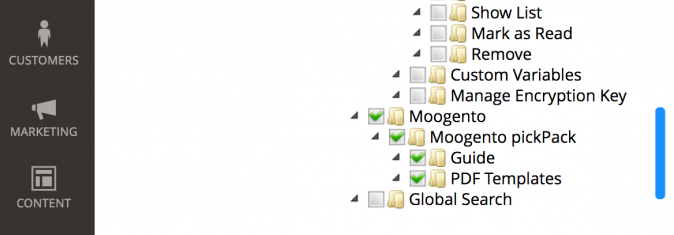
- If saving a partial access role (eg. granting pickers access to create Packing Sheets), find the new extension sections and grant as needed (eg. here is access to edit the PDF templates):
- Head to SystemPermissionsUsers
- Check that you have assigned the correct role (that we just granted the appropriate Extension options to) to the appropriate users, and save.
8. Clear static content
- If you get some 404 errors, try clearing the static folder.
- Copy /static/.htaccess out of that folder
- Delete /static
- Put back .htaccess from (1)
- Or in commandline in root folder:
mv pub/static/.htaccess pub/.htaccessrm -R pub/staticphp bin/magento setup:static-content:deploymkdir pub/staticmv pub/.htaccess pub/static/.htaccess
- Run
bin/magento setup:static-content:deploy
9. Enter The License Key
- If you're installing a Moogento extension, we'll have sent you a license key. Let's install it!
- Navigate to MoogentoLicense.
- At the top, if this extension requires a license key, enter your license key (this will have been emailed to you; you can also find it inside your Moogento account downloads section).
- Enter the key and save the page. You should see a green tick!
10. Save The Config Page
- After entering the license key, clear the cache and logout again.
- Even if you're installing an extension without a license key, it's still a good idea to save the config section at this point (even if you've not made any changes).
11. Disable Maintenance Mode
php bin/magento maintenance:disable
Uninstalling
- Want to uninstall the plugins to check something?
- Here's a quick commandline 'stack', which you should be able to copy/paste, to disable all Moogento modules:
php bin/magento maintenance:enable
php bin/magento module:disable Moogento_PickPack
php bin/magento module:disable Moogento_Shipeasy
php bin/magento module:disable Moogento_Stockeasy
php bin/magento module:disable Moogento_Profiteasy
php bin/magento module:disable Moogento_SlackCommerce
php bin/magento module:disable Moogento_Core
php bin/magento module:disable Moogento_License
php bin/magento setup:upgrade
php bin/magento setup:di:compile
php bin/magento setup:db-schema:upgrade
php bin/magento indexer:reindex
php bin/magento cache:clean && php bin/magento cache:flush && php bin/magento cache:enable
php bin/magento maintenance:disable
- And the same to enable them again:
php bin/magento maintenance:enable
php bin/magento module:enable Moogento_License
php bin/magento module:enable Moogento_Core
php bin/magento module:enable Moogento_PickPack
php bin/magento module:enable Moogento_Shipeasy
php bin/magento module:enable Moogento_Stockeasy
php bin/magento module:enable Moogento_Profiteasy
php bin/magento module:enable Moogento_SlackCommerce
php bin/magento setup:upgrade
php bin/magento setup:di:compile
php bin/magento setup:db-schema:upgrade
php bin/magento indexer:reindex
php bin/magento cache:clean && php bin/magento cache:flush && php bin/magento cache:enable
php bin/magento maintenance:disable
Registering the License
Setup the Key for Dev/Staging Sites
- If you're setting up on a dev or staging server, we've got you covered. You can assign up to 2 dev/staging servers to each key, and we have a super-simple way to assign them.
- Navigate to your Moogento Account downloads section.
- Find the specific extension you want to request dev/staging access for.
- Click '+ dev domain'
- Enter the domain name.
- Click 'Request'
- Done! We'll check that and assign it within 1 working day.
- If your dev site is not an obvious dev subdomain (dev. / stage. / etc.) please ensure that the site is showing the Magento 'demo site' message.
- Enter the license key in every install you make with our software, including dev & staging sites.
- Before installing the software, please add the domain you'll be using to the list of authorised domains, as described above.
Using Multi-site Magento Installs
The license is valid for a single Magento installation - this means that if you're running a multi-site setup, you're covered.
Make sure you register the main install domain, which you'll see in your Admin sidebar Moogento -> Licenses section.
Legal
Important legal notices!
- It's against the terms of your license to use the software, or keep it installed on any site:
- - without entering the license key in every install
- - without authorising, in your Moogento product page, the domain before use
- (only needed if you're using multiple domains for testing - the first-used domain is registered automatically)
- - without authorising, in your Moogento product page, the domain before use
- - on multiple Magento installations
- (excepting : (pre-registered) dev/staging servers for the specific domain the key is purchased for)
- - on multiple Magento installations
- - without an active subscription & valid payment method on file
- - without using it to the max!
- (not serious on this point of course, but get in touch for a free look at your install and suggestions to do more!)
- - without using it to the max!
Final Check
- Check that it works at a basic level; this is also a good time to check your public store front. I would also make a test order at this stage, check that the emails you're expecting are coming through etc.
- If everything is ok and you have previously disabled compilation, now you can enable it.
- You should now be setup at a basic level.
- If you have any issues, check the Troubleshooting guide.