Difference between revisions of "Automation Quickstart"
m |
m |
||
| Line 60: | Line 60: | ||
===Automatically Print pickPack PDFs=== | ===Automatically Print pickPack PDFs=== | ||
| − | |||
The basic idea to to auto-email [https://zapier.com Zapier] or [https://ifttt.com IFTTT] your pickPack PDFs (eg. Zebra shipping labels). | The basic idea to to auto-email [https://zapier.com Zapier] or [https://ifttt.com IFTTT] your pickPack PDFs (eg. Zebra shipping labels). | ||
Revision as of 14:43, 17 March 2017
Contents
Aims & Preparation
Most of this is included if you get the Installation & Setup Service
Follow the Easy Install Guide to get Automation up and running.
Make sure you have your Magento Cron running - Automation uses it to index your sales for display.
We're going to have a look at the core Automation functions, and how to customise them for your store.
Features
Save yourself time and money by automating time-sapping actions in Magento. Reduce errors, cut training time and staffing needs, and increase your team's efficiency.
Automatically Change Status
Eg. Here we've set it to:
- run at 5pm
- only look at orders that are status:Shipped + shipEasy-flag-printed:Printed
- change matching orders to Status:Complete

At Specific Times
Set the hour you'd like Automation to run. Eg. at the end of the day Automation can change status from Shipped to Archived.
If the hour isn't set then Automation will process that rule every 5 minutes. This can be useful if you want to keep customers totally up-to-date with order statuses.
Based On Order Status
Just set the 'Trigger Order Status' - Automation will only look at orders with this status.
Based On shipEasy Flag
If you'd like to also filter by specific shipEasy custom flag, you can also do that. Just set which of the 3 custom flag columns you'd like to look at, and the specific value you want to trigger on. Automation will then only process orders with the status selected above, and the shipEasy flag set here.
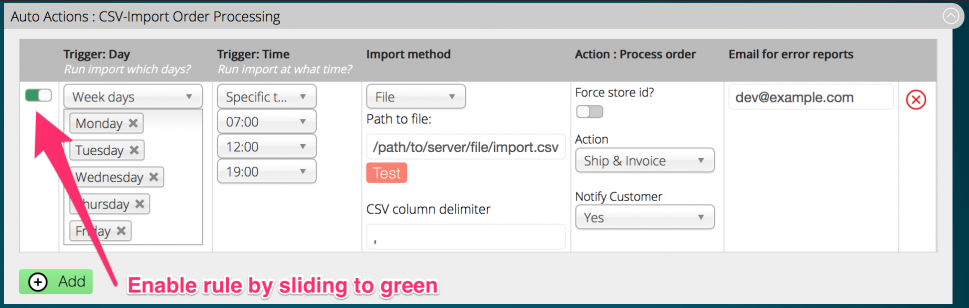
Automatically Process Orders
Eg. Here we've set it to:
- run weekdays, at 7am, midday, and 7pm
- import the csv from the server via a specific path
- use a comma as the separating character
- with imported orders, Invoice if not already Invoiced; Ship if not already Shipped
- Send the appropriate transactional emails to the customers
- email any errors to dev@example.com
Via CSV Upload
This uploads a csv file of order ids, and connects with shipEasy to process them. It uses the same settings that have been set for 'CSV Upload' in shipEasy.
You can specify days of the week to run each action, and also which hour(s) on those days.
Eg. if you courier gives you a csv of order ids and tracking numbers at the end of the day, this can auto-import that, change the order status of each order (eg. to 'Shipped'), add the tracking number, and send the notification email.
Automatically Print pickPack PDFs
The basic idea to to auto-email Zapier or IFTTT your pickPack PDFs (eg. Zebra shipping labels).
Zapier then copies that attached file to a specific folder in your Dropbox account.
You have a computer attached to your desired target printer, with Dropbox running.
Dropbox see the new file, and downloads it.
You set a local folder automated action (on a Mac with the built-in app called 'Automator') to print any file in that folder, and to then move that file to the "Printed Folder".
Once Dropbox copied the file in, your local app spots it and runs, thereby printing the file and moving it to the "Printed" folder.
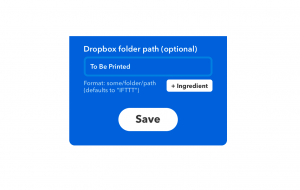
IFTTT Setup Process
The easiest setup process is usually :
- Create a Dropbox account if you don't have one
- Remember that this account is going to be used on the staff-accessible machine attached to the printer - you might want to create a new Dropbox account instead of your usual business account
- Create 2 folders in your account named "To Be Printed" & "Printed"
- Create a IFTTT account
- Save this action to your account
- Enter *trigger@applet.ifttt.com* to the Automation 'Target Email' field
- Edit the body text transactional email to include #pickpack in the subject or body
- Set the Automation rule to email your intended pickPack PDF (eg. Zebra Labels), and enable it.
- Away you should go!
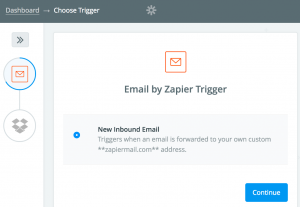
Zapier Setup Process
The easiest setup process is usually :
- Create a Dropbox account if you don't have one
- Remember that this account is going to be used on the staff-accessible machine attached to the printer - you might want to create a new Dropbox account instead of your usual business account
- Create 2 folders in your account named "To Be Printed" & "Printed"
- Create a Zapier account
- Add this action to your account
- Copy the custom email it gives you, to the Automation 'Target Email' field
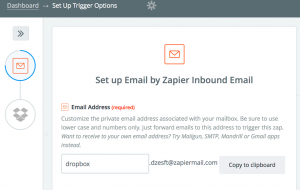
- Here it'd be dropbox.dzesft@zapiermail.com but your email will be different
- Work through the Zapier tests that your email address is working
- Set the dropbox part of the Zap to match "To Be Printed"
- Set the Automation rule to email your intended pickPack PDF (eg. Zebra Labels), and enable it.
- Away you should go!
Setup
There's actually pretty minimal setup required.
You need a current subscription for Automation to work, and to get the status-change features you also need shipEasy running. If you have pickPack installed, you can also auto-print PDFs and auto-set order status at the time of printing.