pickPack Advanced Setup
Contents
Aims & Preparation
This 'advanced setup' is included if you get the Installation & Pro Setup Service
We're going to dive into the more advanced features of pickPack. Follow the Easy Install Guide and the pickPack: Quickstart to get pickPack up and running.
We're going to be mainly focused on SystemConfiguration > Moogento / pickPack and SalesOrders
Zebra Labels
Print out your orders for Zebra printers direct from Magento, fully customize with your prepaid shipping labels, etc.
- Add in order ID barcodes, return addresses.
- In the config you can rotate the return address (eg. have it vertical down one side), and position the barcode.
- Customize label padding and margins to suit your label sheets.
- Show a list of products ordered on the same label.
- In the config you can setup column positions for the various product attributes.
- Add in your company logo: do this in Shipping Address Background Images.
- If you don't want it to change based on Shipping Method, just include an image with a blank in Pattern.
- You can also rotate the output PDF to suit your printer.
Setting up Shipping Labels
This is an extremely powerful option, and if setup correctly can produce very professional results.
This will save a lot of time from order processing, cut packing and shipping errors, and look great for your customers.
- Add in shipping label images, that change based on the Magento shipping method chosen.
- Add these to the shipping addresses in: Packing Sheets Invoices Zebra Labels
- Just set this option to Yes in each section.

- and then find the Shipping Address Background Images section.
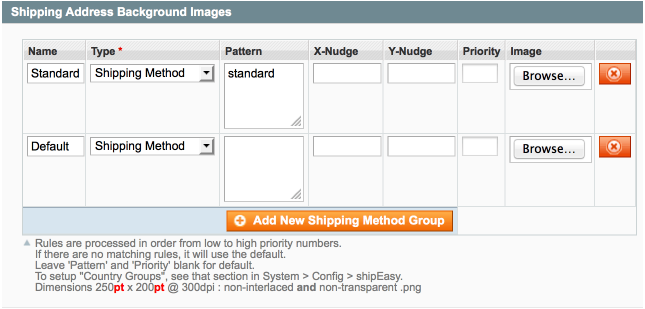
Here I've added two variants:
- A default option, by leaving the Pattern blank this automatically becomes the default option. Ie. when no other patterns match this will be shown.
- A 'standard' option. By entering
standardin the pattern section, this will match shipping methods with 'standard' in.
I've then gone and clicked Browse for each and added in my edited background image for each option.
- To make your own images, edit the zipfile > _sample_images / _shipping_backgrounds / Shipping_image.psd file.
- You'll likely want to include your business logo in there, and can also include your return address.
- If you find that you need to nudge the background image on the printout, you can do that in the X-Nudge ( [-] = left / [+] = right) and Y-Nudge ( [-] = down / [+] = up) fields.
- If some addresses will match multiple patterns, you can give them a priority as well.
- Priority:1 will get matched before Priority:2
- In conjunction with shipEasy you can choose a filter based on the country group.

Supersize PDFs
Let's get it o-on, let's make some tasty PDFs. We're going to look at Packing Sheets & Invoices. So far you'll have nice sharp logos, color-coordinated title bars, and integrated labels. With some changes we can really make these stand out.
Full-width Top Logo
pickPack can deal with full-width logos, which can look really good. Bear in mind bigger/more images will lead to larger filesize PDFs - if you're on a slow connection or have limited server resources you may want to leave the logo small.
- Set the Header Logo > Logo position to Full Page Width

- Create a template file in Photoshop to be wide 540pt (562pt for US-Letter) @ 300dpi. You can make this image as tall as you like - pickPack will adapt.
- You might want to add your company address in this full-width logo, so that you can easily style it
Full-width Bottom Image
This can be a great way to include styled return instructions, a company address or logo. This way you're styling the top and bottom of the PDF to match your brand.
- Make an image in Photoshop with the same width as the full-width top logo
- Choose these slightly-hidden options :
- Custom text under product list? > Yes, an image
- Lock image to page base? > Yes
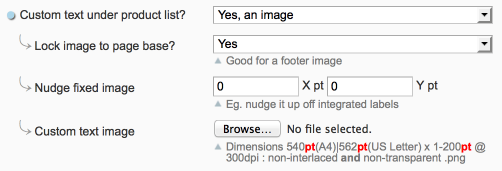
- If you use integrated labels, you'll then want to nudge this image up above the top of the labels, use the Nudge fixed image > Y pt
- If you have orders where they extend past one page, you will also want to edit the Page 1 Product-lines cutoff Y-pos to be above the height of the base image. This way when the order line items reach that point, they'll stop and go to a new page, leaving your shiny image unadulterated.
Hide Un-used Options
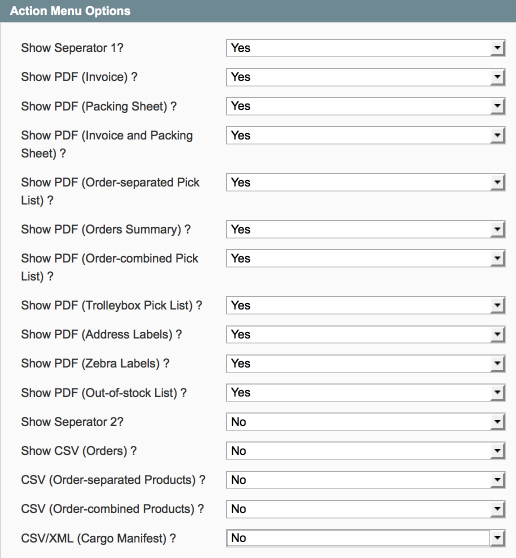
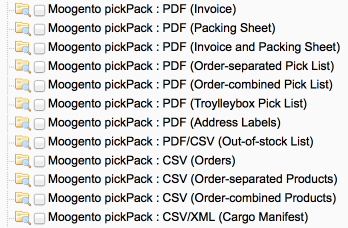
You'll probably realise that you just don't use some of the massaction menu options. Turn 'em off and de-clutter your dashboard!
- These are at the bottom of the pickPack Config > Action Menu Options
...From Specific Users
This is a great one, if you have multiple people accessing your Magento install.
- Reduce the chance of mistakes happening and restrict the pickPack options to specific users.
- eg. you can hide the 'Invoice' option from the warehouse crew, and show it to the accountants / etc.
- First edit the specific user role in SystemPermissionsRoles
- Then assign those roles to specific users in SystemPermissionsUsers
