Magento 2 Quick Setup Check
Contents
Magento Setup Help
If you've just installed Magento and are having issues, first step is to check some basic things.
You might also want to check the official guide.
Check PHP Version
Acceptable PHP Versions for Magento 2
First up, Magento 2 won't work with some versions.
Here's the current list of accepted versions:

Running Magento 2 Locally
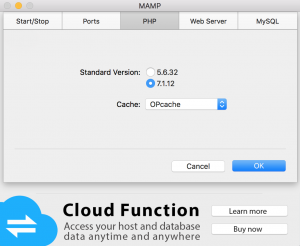
If you're running this locally, if you're using something like MAMP, check in the settings:

If the version showing as installed doesn't match one of the above accepted versions, change it before continuing.
Check Commandline PHP Version
Type:
php -v
You should see something like this:
PHP 7.1.12 (cli) (built: Nov 27 2017 15:53:40) ( NTS )
Copyright (c) 1997-2017 The PHP Group
Zend Engine v3.1.0, Copyright (c) 1998-2017 Zend Technologies
with Zend OPcache v7.1.12, Copyright (c) 1999-2017, by Zend Technologies
First, if you're running Magento locally, and using something like MAMP, check the versions match.
If they don't then time to fix.
Fixing Different PHP Versions in Commandline and MAMP
We want to get the commandline to use MAMP's version.
1. Edit the system settings to tell it to get PHP from the MAMP version:
nano ~/.bash_profile
Add this line, editing the php version to match whatever you have selected in MAMP:
alias phpmamp='/Applications/MAMP/bin/php7.1.12/bin/php'
2. Check where the local system is getting php from:
which php
which should return something like:
/usr/local/bin/php
3. Backup this php, using the path from (2):
sudo mv /usr/local/bin/php /usr/local/bin/php.bak
4. Make an alias to the MAMP PHP version, using the path from (2) and the PHP version from MAMP:
sudo ln -s /Applications/MAMP/bin/php/php7.1.12/bin/php /usr/local/bin/php
5. Reload the new settings:
source ~/.bash_profile
6. Check the new version is sticking:
php -v
Make Initial PHP Settings
Magento needs some minimum system resources. PHP by default will have 128MB of memory allocated. We want more!
Find In-use PHP Settings File (php.ini)
Type:
php -r 'phpinfo();' | grep 'php.ini'
Should return something like:
/Applications/MAMP/bin/php/php7.1.12/conf/php.ini
Edit PHP Settings for Magento 2
- These are basic settings for a new test install.
- If you're running a live site these will be different!
1. Find that file from above and edit in a text editor.
2. Look for these settings and change them if they're different.
Uncomment (remove the semicolon from the start of the line) if needed.
memory_limit = 2G
^ You might be able to deal with 1G, but for things like updating Magento you might need the 2G.
date.timezone = "Asia/Bangkok"
^ Set this to match your local machine (if running local), or the server timezone.
always_populate_raw_post_data = -1
Uncomment this line:
zend_extension="...
Add this line near the above line:
opcache.save_comments=1
^ This turns on PHP caching which will make decent improvements to the speed Magento runs at.
Check PHP Version
Finally check the running PHP version:
php -v
Magento Cache
While you're in the commandline, may as well enable Magento Caches:
bin/magento cache:enable
You can selectively enable/disable caches by adding from :
config layout block_html collections db_ddl eav full_page translate config_integration config_integration_api config_webservice
Enable Developer Mode locally
If you're running a local test install, check you've got developer mode enabled:
php bin/magento deploy:mode:set developer
Tidy Up Magento 2
Magento 2 comes with a couple modules that you'll probably not use, some of which annoyingly provide warnings in the Dashboard!
Quick check what you have installed:
php bin/magento module:status
Here's a couple quick ones you might want to disable:
bin/magento module:disable Shopial_Facebook
^ fixes the dashboard warning that never goes away "One or more integrations have been reset because of a change to their xml configs"
bin/magento module:disable Temando_Shipping
^ Unless you're shipping in Australia
bin/magento module:disable Dotdigitalgroup_Email
^ Unless you're using dotMailer
bin/magento module:disable Magento_Usps && bin/magento module:disable Magento_Ups && bin/magento module:disable Magento_Fedex && bin/magento module:disable Magento_Dhl
^ Unless you're offering USPS, UPS< FedEx
bin/magento module:disable Magento_NewRelicReporting
^ Unless you're using NewRelic to monitor your app/server
bin/magento module:disable Magento_SampleData
^ If you're not using the Magento Sample Data to test a setup
Enable Demo Store Notice on Magento 2
If you're not yet live, or have a dev and live server, it's helpful to visually separate live vs dev with a demo store 'hello bar'.
- In admin, ContentDesignConfiguration
- Select the store to add the Demo notice to
- In 'Other Settings' -> 'HTML Head', set the 'Display Demo Store Notice'