Difference between revisions of "pickPack Advanced Setup - M2"
| (14 intermediate revisions by the same user not shown) | |||
| Line 1: | Line 1: | ||
| + | {{#description2:Let's get advanced and setup custom Invoice PDFs, Packing Sheets and Picklists with PickPack in Magento 1. Automatic actions, set specific statuses when printing, and more.}} | ||
[[File:PickPack_Magento_Advanced_PDFs.png|link=https://www.moogento.com/pickpack|border|323px]][https://www.moogento.com/pickpack Get pickPack today((.buy))] | [[File:PickPack_Magento_Advanced_PDFs.png|link=https://www.moogento.com/pickpack|border|323px]][https://www.moogento.com/pickpack Get pickPack today((.buy))] | ||
| Line 5: | Line 6: | ||
We're going to dive into some of the more advanced features of pickPack. | We're going to dive into some of the more advanced features of pickPack. | ||
| + | |||
| + | |||
| + | |||
| + | |||
| + | |||
| + | |||
| + | |||
| + | |||
| + | ==Auto-actions when printing== | ||
| + | |||
| + | {{idea|This is an integration with shipEasy - check you have a valid shipEasy license first!}} | ||
| + | |||
| + | ::: [[File:limit-magento-order-printing.png|link=|500px]] | ||
| + | |||
| + | ===Set a shipEasy flag=== | ||
| + | |||
| + | * This will set a 'custom shipEasy flag column' when you create one of 3 pickPack PDFs. | ||
| + | * Filter by printed (or not-printed) orders - make that first (or second) packing run faster. | ||
| + | |||
| + | # Head to {{menu3|System sidebar - Moogento|pickPack -> Config|Assign PDF Templates -> Invoices/Packing sheets/Zebra labels}} | ||
| + | # Change "Set shipEasy flag on print?" to 'Yes'. | ||
| + | # Choose the flag (eg. 'Printed?') | ||
| + | # Choose the setting (eg. 'Printed') | ||
| + | # Save | ||
| + | |||
| + | ===Restrict printing to once per order=== | ||
| + | |||
| + | * You'll only be allowed to print pickPack PDFs once for each order, from the Orders page. | ||
| + | * Reduce the chance of double-shipping orders. | ||
| + | * You can still print multiple times from inside the Order detail pages. | ||
| + | |||
| + | # Head to {{menu3|System sidebar - Moogento|pickPack -> Config|Assign PDF Templates -> Invoices/Packing sheets/Zebra labels}} | ||
| + | # Change "Limit orders page printing to one per order?" to 'Yes'. | ||
| + | # Save | ||
| + | |||
| + | ===Set order status=== | ||
| + | |||
| + | * Change the order status when printing specific PDFs. | ||
| + | * Eg. change the status to 'Packing Order' when printing the Packing Sheet. | ||
| + | * Combine with Automation and/or Pick-n-Scan to change the status when the order is boxed. | ||
| + | * Keep your customers happy with better expectation management & reduce customer enquiries. | ||
| + | * This usually won't work 100% if an order has previously been canceled or shipped - in this case it's recommended to duplicate the order and process the new one. | ||
| + | |||
| + | # Head to {{menu3|System sidebar - Moogento|pickPack -> Config|Assign PDF Templates -> Invoices/Packing sheets/Zebra labels}} | ||
| + | # Change "Set order status on print?" to 'Yes'. | ||
| + | # Set "Set which status?" to your desired status. | ||
| + | # Save | ||
| + | |||
| + | |||
| + | |||
==Attach pickPack PDFs to Magento 2 Emails== | ==Attach pickPack PDFs to Magento 2 Emails== | ||
| Line 15: | Line 66: | ||
{{idea|You need to be on the Startup or Pro Plan to do this}} | {{idea|You need to be on the Startup or Pro Plan to do this}} | ||
| − | This is pretty easy - we just need to add a short code to your | + | This is pretty easy - we just need to add a short code to your Email Templates, and pickPack will do the rest. |
Remember that one of pickPack's great features is being able to generate an Invoice without actually invoicing the order in Magento first. Handy if you're not actually billing customers until you've confirmed the shipment - you can send an order confirmation email. | Remember that one of pickPack's great features is being able to generate an Invoice without actually invoicing the order in Magento first. Handy if you're not actually billing customers until you've confirmed the shipment - you can send an order confirmation email. | ||
| − | ===1. Setup | + | ===1. Setup Email Templates=== |
| − | First step is to check that you have proper [http://docs.magento.com/m1/ce/user_guide/store-operations/email-transactional.html?Highlight=transactional%20emails | + | ''(Also known as Transactional Emails)'' |
| − | # Edit the {{menu| | + | |
| + | First step is to check that you have proper [http://docs.magento.com/m1/ce/user_guide/store-operations/email-transactional.html?Highlight=transactional%20emails Email Templates] setup. | ||
| + | # Edit the {{menu|Marketing|Email Templates}} email that you want to attach one of pickPack's PDFs to. | ||
# At the bottom of the content, add the relevant code from here: | # At the bottom of the content, add the relevant code from here: | ||
| − | * To attach an Invoice: | + | * To attach an '''Invoice''': |
| − | <code><nowiki><pickpack_attachment type="invoice">{{var order.id}}</pickpack_attachment></nowiki></code> | + | ::<code><nowiki><pickpack_attachment type="invoice">{{var order.id}}</pickpack_attachment></nowiki></code> |
| − | * To attach a Packing Sheet: | + | * To attach a '''Packing Sheet''': |
| − | <code><nowiki><pickpack_attachment type="packing_sheet">{{var order.id}}</pickpack_attachment></nowiki></code> | + | ::<code><nowiki><pickpack_attachment type="packing_sheet">{{var order.id}}</pickpack_attachment></nowiki></code> |
| − | * To attach a Credit Memo: | + | * To attach a '''Credit Memo''': |
| − | <code><nowiki><pickpack_attachment type="credit_memo">{{var order.id}}</pickpack_attachment></nowiki></code> | + | ::<code><nowiki><pickpack_attachment type="credit_memo">{{var order.id}}</pickpack_attachment></nowiki></code> |
| − | ::: [[File: | + | ::: [[File:magento_2_add_pdf_to_transactional_emails.png|link=|701px]] |
Set 'pickpack_attachment type' according to this list: | Set 'pickpack_attachment type' according to this list: | ||
| Line 47: | Line 100: | ||
* zebra | * zebra | ||
| − | + | {{idea|The type of PDF available to be attached depends on your pickPack plan}} | |
| − | |||
| − | |||
===2. Test=== | ===2. Test=== | ||
Place some sample orders, and check the expected order emails come through. Quite a few Magento extensions rewrite the email code, so you do need to check all is working after install. | Place some sample orders, and check the expected order emails come through. Quite a few Magento extensions rewrite the email code, so you do need to check all is working after install. | ||
| − | * ''We made this compatible with Mailchimp/Mandrill, SMTPpro, and the default Magento email system - if you use a different email extension, or are running a new version of one, then it may have issues. If that happens, | + | * ''We made this compatible with Mailchimp/Mandrill, SMTPpro, and the default Magento email system - if you use a different email extension, or are running a new version of one, then it may have issues. If that happens, get in touch.'' |
* Test email sending - check that your PDF is getting attached to the correct emails. | * Test email sending - check that your PDF is getting attached to the correct emails. | ||
If you have issues, [https://moogento.com/guides/Installing_Magento_Extensions_:_Pre-install_Checklist#Check_Magento_emails_are_setup check your Magento email setup] first. | If you have issues, [https://moogento.com/guides/Installing_Magento_Extensions_:_Pre-install_Checklist#Check_Magento_emails_are_setup check your Magento email setup] first. | ||
| + | |||
| + | ==Showing 中国/日本の/한국의/русский in PDFs== | ||
| + | If you're printing non-Roman characters (ie. accented letters, or picture scripts) in your PDFs you'll need to setup a different font in the config. | ||
| + | |||
| + | pickPack will then attach a font file with the PDF which will then be able to show those characters at the other end. | ||
| + | |||
| + | # Set {{menuchoice|General > Seeing tofu : ▯?}} to {{menuchoice|Yes}} | ||
| + | #: [[File:tofu-pdf-fix.png|link=|500px]] | ||
| + | |||
| + | This will use a larger font family with more characters in it, which is likely to sort the 'tofu'. | ||
| + | |||
| + | (The 'tofu' is basically characters that aren't in the font which is attached to the PDF or available to your local system) | ||
| + | |||
| + | If you still see tofu then : | ||
| + | |||
| + | # In the left column of the pickPack PDF Editor, find the '''default font''' setting | ||
| + | # Choose a specific font to suit the characters you're trying to output | ||
| + | * ''For these custom fonts, you need to install the optional font pack, which you can find in your Downloads page at Moogento.'' | ||
| + | ::''(You need to be on a current pickPack license to have access to that)'' | ||
| + | ::: [[File:custom-font-pack.png|link=|500px]] | ||
| + | |||
| + | ===Using custom font files=== | ||
| + | If you're trying to use a custom font, the easiest solution is to replace one of the non-default font files in pickPack with your custom font. | ||
| + | |||
| + | In your pickPack PDF editor you can choose, in the left column, your 'default font'. I'd choose 'Sawasdee'. | ||
| + | |||
| + | Then what you need to do is swap those Sawasdee files for the MS Monaco ones. | ||
| + | |||
| + | You'll find the Sawasdee files here: | ||
| + | {{folder|app/code/Moogento/PickPack/view/adminhtml/web/fonts/sawasdee}} | ||
| + | |||
| + | Change the name of the Monaco file to match the Sawasdee name, and you should be auto-using that font after a cache clear. | ||
| + | |||
| + | If the correct characters don't appear then you'll need to just find a different font family that can deal with whatever script you're trying to print. | ||
[[Category:Extension Setup]] | [[Category:Extension Setup]] | ||
Latest revision as of 09:09, 27 July 2021
Contents
Aims & Preparation
Most of this is included in the Installation & Pro Setup Service
We're going to dive into some of the more advanced features of pickPack.
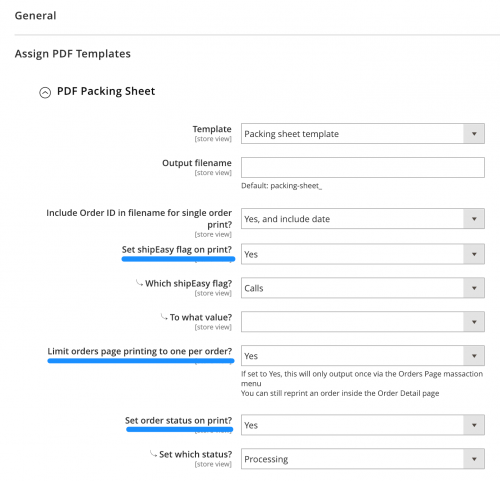
Auto-actions when printing
This is an integration with shipEasy - check you have a valid shipEasy license first!
Set a shipEasy flag
- This will set a 'custom shipEasy flag column' when you create one of 3 pickPack PDFs.
- Filter by printed (or not-printed) orders - make that first (or second) packing run faster.
- Head to System sidebar - MoogentopickPack -> ConfigAssign PDF Templates -> Invoices/Packing sheets/Zebra labels
- Change "Set shipEasy flag on print?" to 'Yes'.
- Choose the flag (eg. 'Printed?')
- Choose the setting (eg. 'Printed')
- Save
Restrict printing to once per order
- You'll only be allowed to print pickPack PDFs once for each order, from the Orders page.
- Reduce the chance of double-shipping orders.
- You can still print multiple times from inside the Order detail pages.
- Head to System sidebar - MoogentopickPack -> ConfigAssign PDF Templates -> Invoices/Packing sheets/Zebra labels
- Change "Limit orders page printing to one per order?" to 'Yes'.
- Save
Set order status
- Change the order status when printing specific PDFs.
- Eg. change the status to 'Packing Order' when printing the Packing Sheet.
- Combine with Automation and/or Pick-n-Scan to change the status when the order is boxed.
- Keep your customers happy with better expectation management & reduce customer enquiries.
- This usually won't work 100% if an order has previously been canceled or shipped - in this case it's recommended to duplicate the order and process the new one.
- Head to System sidebar - MoogentopickPack -> ConfigAssign PDF Templates -> Invoices/Packing sheets/Zebra labels
- Change "Set order status on print?" to 'Yes'.
- Set "Set which status?" to your desired status.
- Save
Attach pickPack PDFs to Magento 2 Emails
Let's attach pickPack PDFs to emails. They look great, help promote your brand, and provide valuable information.
- Send your customers a nice Invoice in their order email.
- Include a copy of the Packing Sheet in the shipping confirmation email.
- Send your accountant an Invoice as soon as each sale happens.
You need to be on the Startup or Pro Plan to do this
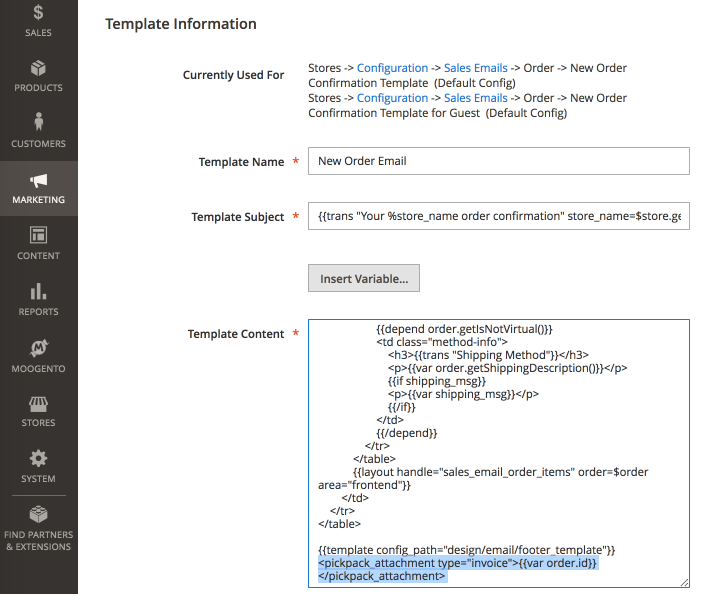
This is pretty easy - we just need to add a short code to your Email Templates, and pickPack will do the rest.
Remember that one of pickPack's great features is being able to generate an Invoice without actually invoicing the order in Magento first. Handy if you're not actually billing customers until you've confirmed the shipment - you can send an order confirmation email.
1. Setup Email Templates
(Also known as Transactional Emails)
First step is to check that you have proper Email Templates setup.
- Edit the MarketingEmail Templates email that you want to attach one of pickPack's PDFs to.
- At the bottom of the content, add the relevant code from here:
- To attach an Invoice:
<pickpack_attachment type="invoice">{{var order.id}}</pickpack_attachment>
- To attach a Packing Sheet:
<pickpack_attachment type="packing_sheet">{{var order.id}}</pickpack_attachment>
- To attach a Credit Memo:
<pickpack_attachment type="credit_memo">{{var order.id}}</pickpack_attachment>
Set 'pickpack_attachment type' according to this list:
- packing_sheet
- invoice
- combined
- separated
- credit_memo
- zebra
The type of PDF available to be attached depends on your pickPack plan
2. Test
Place some sample orders, and check the expected order emails come through. Quite a few Magento extensions rewrite the email code, so you do need to check all is working after install.
- We made this compatible with Mailchimp/Mandrill, SMTPpro, and the default Magento email system - if you use a different email extension, or are running a new version of one, then it may have issues. If that happens, get in touch.
- Test email sending - check that your PDF is getting attached to the correct emails.
If you have issues, check your Magento email setup first.
Showing 中国/日本の/한국의/русский in PDFs
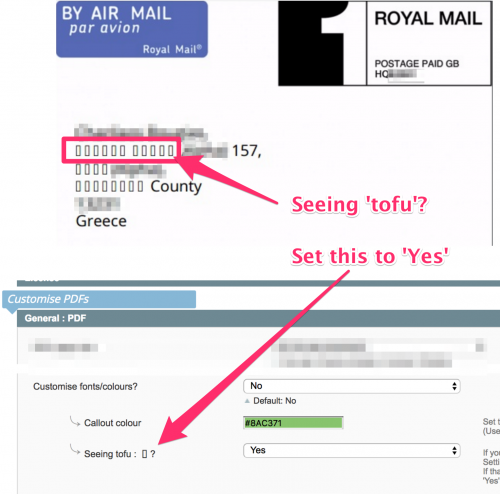
If you're printing non-Roman characters (ie. accented letters, or picture scripts) in your PDFs you'll need to setup a different font in the config.
pickPack will then attach a font file with the PDF which will then be able to show those characters at the other end.
- Set General > Seeing tofu : ▯? to Yes
This will use a larger font family with more characters in it, which is likely to sort the 'tofu'.
(The 'tofu' is basically characters that aren't in the font which is attached to the PDF or available to your local system)
If you still see tofu then :
- In the left column of the pickPack PDF Editor, find the default font setting
- Choose a specific font to suit the characters you're trying to output
- For these custom fonts, you need to install the optional font pack, which you can find in your Downloads page at Moogento.
- (You need to be on a current pickPack license to have access to that)
- (You need to be on a current pickPack license to have access to that)
Using custom font files
If you're trying to use a custom font, the easiest solution is to replace one of the non-default font files in pickPack with your custom font.
In your pickPack PDF editor you can choose, in the left column, your 'default font'. I'd choose 'Sawasdee'.
Then what you need to do is swap those Sawasdee files for the MS Monaco ones.
You'll find the Sawasdee files here: app/code/Moogento/PickPack/view/adminhtml/web/fonts/sawasdee
Change the name of the Monaco file to match the Sawasdee name, and you should be auto-using that font after a cache clear.
If the correct characters don't appear then you'll need to just find a different font family that can deal with whatever script you're trying to print.


